You can create a counter attribute to count or sum up values. This can be useful in situations such as:
Counting Active User Sessions
Article and Product/Page View Counts
Monitor cart abandonment frequency
Track LTV-related activities
Track login-frequency for security/engagement
Monitor support ticket submissions
Customer Journey Orchestration supports two types of counter attributes:
- Sliding counter : Get a count of events/actions. Create a sub-counter to retrieve counts within the counter duration for a smaller period of time. For example, create a sliding counter for a month with a sub-counter of a single week.
Other useful examples could include a variety across different applications:
E-commerce
Product views in last 7 days (for recent interest scoring)
Purchases in last 30 days (for loyalty tier evaluation)
Cart additions in last hour (for immediate personalization)
Subscription Businesses
Login frequency in last 14 days (for engagement health)
Feature usage in last 30 days (for upsell targeting)
Support tickets in last 90 days (for proactive outreach)
Content/Media
Article reads in last 24 hours (for trending content)
Video completions in last week (for recommendation engine)
Search queries in last hour (for real-time suggestions)
Marketing
Email clicks in last 7 days (for engagement scoring)
Campaign touchpoints in last 30 days (for frequency capping)
Website visits in last session (for exit-intent triggers)
Total counter : Get a total count of a specific value on top of a historical base value. For example, create a counter that calculates the total amount of purchases in the duration period.
Other useful examples could include the following:
Lifetime Value Tracking
Total purchases ever (for VIP customer identification)
Total dollars spent (for lifetime value segmentation)
Total loyalty points earned (for tier status)
Engagement Milestones
Total logins since signup (for user maturity scoring)
Total articles read (for content engagement level)
Total features used (for product adoption depth)
Achievement/Gamification
Total badges earned (for user profile display)
Total challenges completed (for achievement systems)
Total referrals made (for ambassador programs)
Business Intelligence
Total support tickets ever (for customer health scoring)
Total downloads (for product popularity ranking)
Total sessions (for user stickiness analysis)
Subscription Metrics
Total renewals (for churn prediction models)
Total upgrades (for customer growth tracking)
Total cancellations (for win-back campaigns)
If you want to use subdurations of time as a parameter as described in the examples above, it is recommended that you use the sliding Counter.
This topic includes:
To create a counter attribute, you must have FullData Workbench permissions for all parent segments.
- Open TD Console.
- Navigate to the Data Workbench > Parent Segments.
- Select a parent segment to which you want to add a counter attribute.
- Select Real-time Configuration.
- Select the Attributes tab, and then select Add Attributes.
- Select Counter.
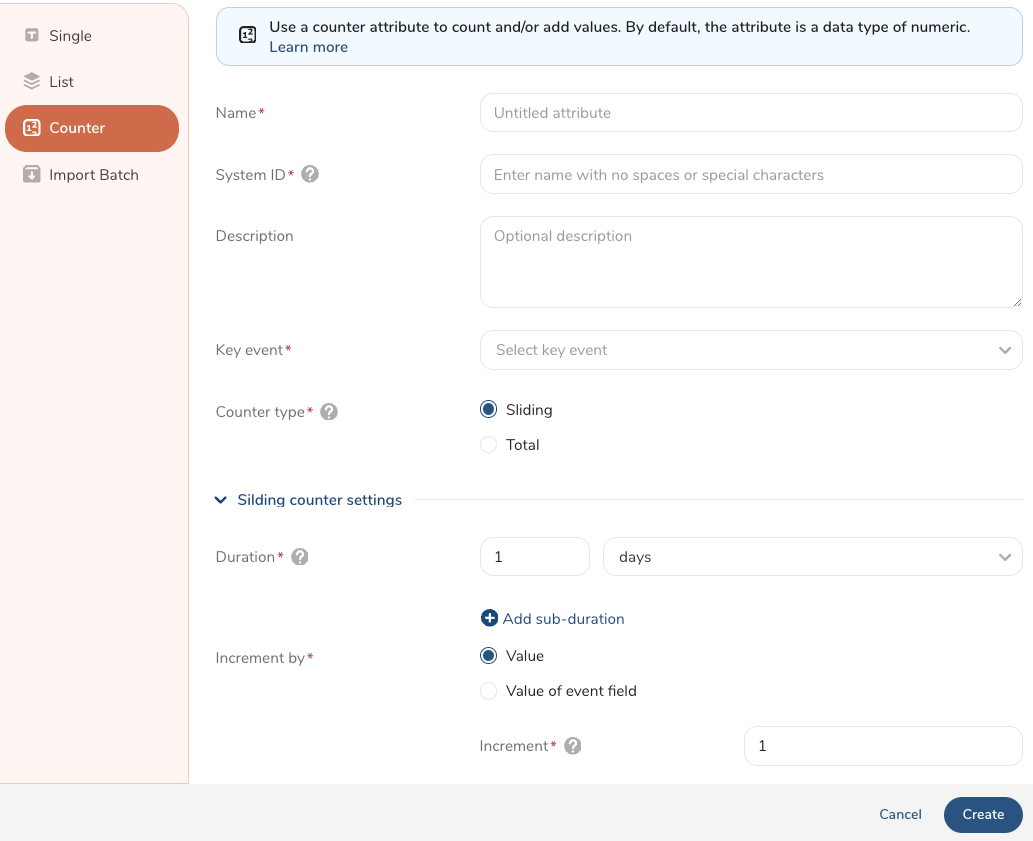
Review the information in the following fields to complete the form.
Name (Required): Enter a name for your counter attribute.
System ID (Required): Create a unique system ID for the attribute. A system ID is a string that starts with an alphabet or underscore () and is optionally followed by an alphanumeric and (). No spaces or special characters are allowed. The system ID is case-sensitive. Example systemID924
Description: Enter a description of your counter attribute.
Key event (Required): Select a key event from the parent segment. Optionally, add filters to your key event. For more information, see Configuring Event Definitions.
Counter type (Required): Select Sliding or Total. The criteria to complete these counter types are described in the following rows.
Sliding counter settings
Duration (Required): Add the number of minutes, hours, or days for a timeline.
Select + Add sub-duration
- Name: Create a name for the sub-duration attribute.
- System ID : Create a system ID for this sub-duration attribute.
- Duration : Add the number of minutes, hours, or days.
Duration All events within the duration period are stored in the attribute. For example, if the duration is one week, any events up to one week are saved in the attribute. As time progresses, any events exceeding the one-week period are removed.
Sub-Duration
- A sub-duration must be specified for a sliding counter attribute to be accessed in a real-time journey and activation.
- Extract the count for a smaller duration. Sub-durations cannot exceed the main counter's duration.
- The maximum of sub-durations within a counter is 20.
Increment by: Select one of the following:
- Value : Keep the default increment value of 1 or change it to a different number to add to the counter settings.
- Value of event field : Select the field to increment the counter, for example, amount.
Total Counter Settings
Duration: Keep the default duration of one day or change it to a different number and time value.
Increment by: Select one of the following:
- Value : Keep the default increment value of one or change it to a different number to add to the counter settings.
- Value of event field : Select the field to increment the counter, for example, amount.
Batch Backfill: (Optional) Check the box to define batch attribute details that can be used as a backfill if a real-time value is not updated. If you select Batch Backfill, the following information is required:
- Batch attribute to backfill : Select a value to use as the backfill.
- Batch attribute timestamp : Select the field to store the timestamp for the previously stored value. The timestamp is in Unix seconds format.
The attribute with the most recent timestamp will be used. Note: Batch Backfill is not available for sliding counters.
- Select Create.
Key Events with Null Element
When using the Key Event Field Name, Null is treated the same as “False” when doing comparisons (for equals and not-equals)
For example:
> 1 == null
false
> 1 != null
true
> null != null
false
> null == null
trueAfter you have created one or more counter attributes, you can view them in the Data Workbench.
- Open TD Console.
- Navigate to the Data Workbench >Parent Segments.
- Select a parent segment.
- Select the ellipses in the row where the counter attribute is listed.
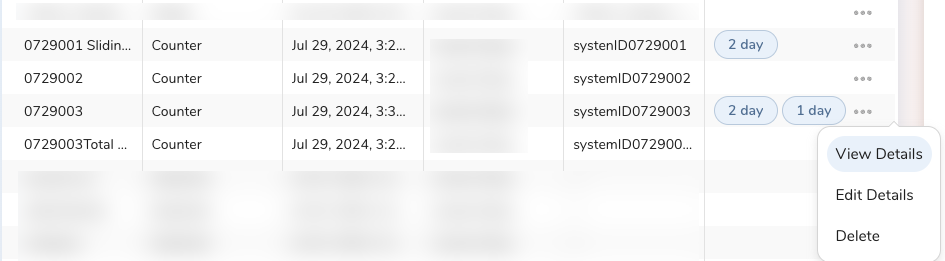
- Select View Details.
Note: Upon expiry, counters are deleted.
See also Real-time Attribute FAQs.