このSFTP Server Export Integrationを使用すると、ワークフロージョブの結果をSFTPサーバーに直接送信できます。
- toolbeltを含むTreasure Dataの基本知識
- SFTPサーバー
- パスプレフィックスには次の文字を含めることはできません: * ?
- v.1では接続タイムアウト設定が正しく機能しないため、エクスポートジョブがタイムアウトする代わりに長時間実行される可能性があります。
If your security policy requires IP whitelisting, you must add Treasure Data's IP addresses to your allowlist to ensure a successful connection.
Please find the complete list of static IP addresses, organized by region, at the following document
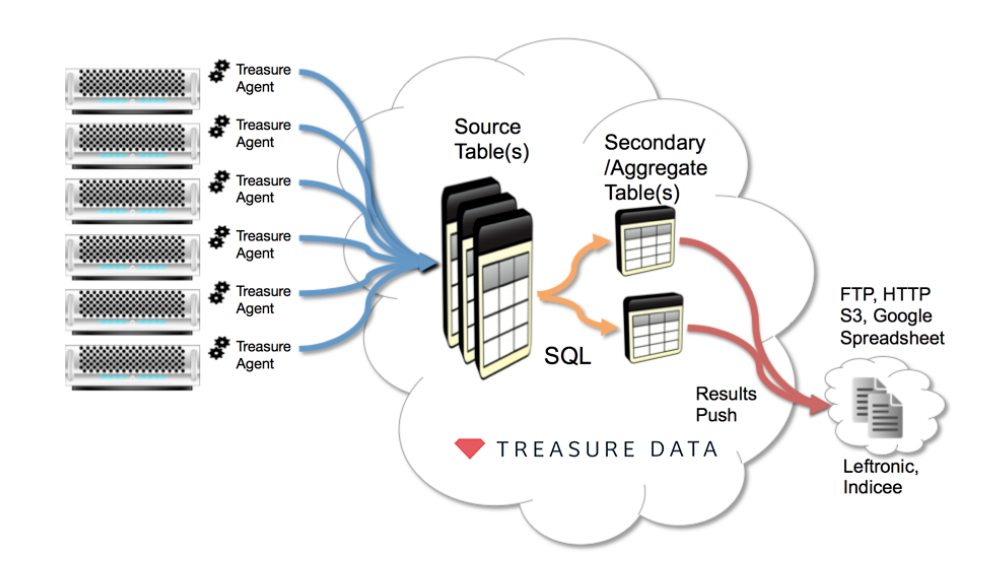
次の図は、Treasure Data AgentsからSFTPまたは類似のサーバーへのデータのエクスポートを含む典型的な使用シナリオを示しています。
SFTPサーバーにアクセスするための資格情報を取得します。
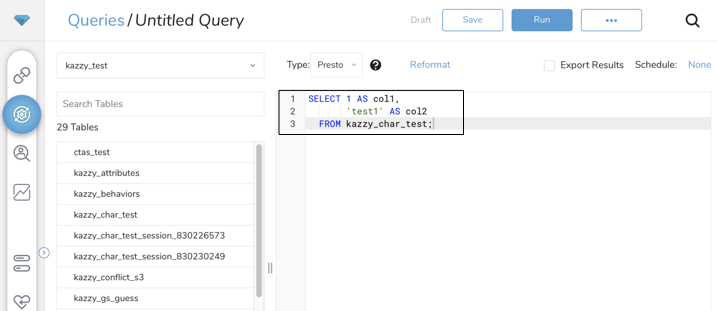
Data Workbench > Queriesに移動します。
New Queryを選択します。
クエリを実行して結果セットを検証します。
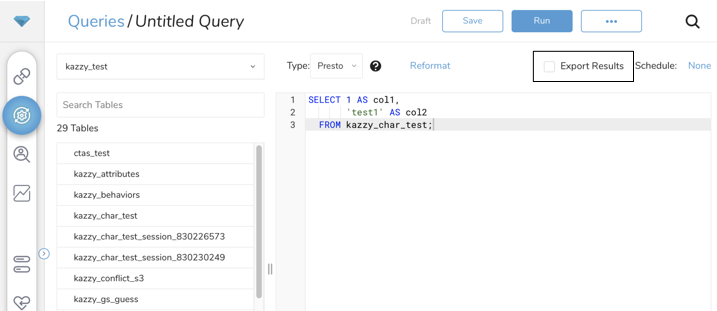
- Export Resultsを選択します。
- 出力に使用する外部サービスの認証として、既存の統合または新しい統合を選択できます。以下のいずれかを選択します:
既存の統合を使用
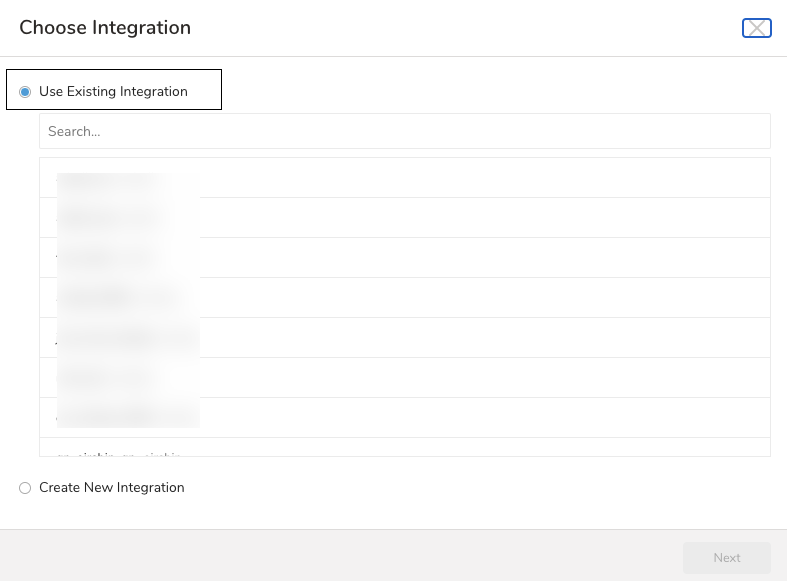
新しい統合を作成
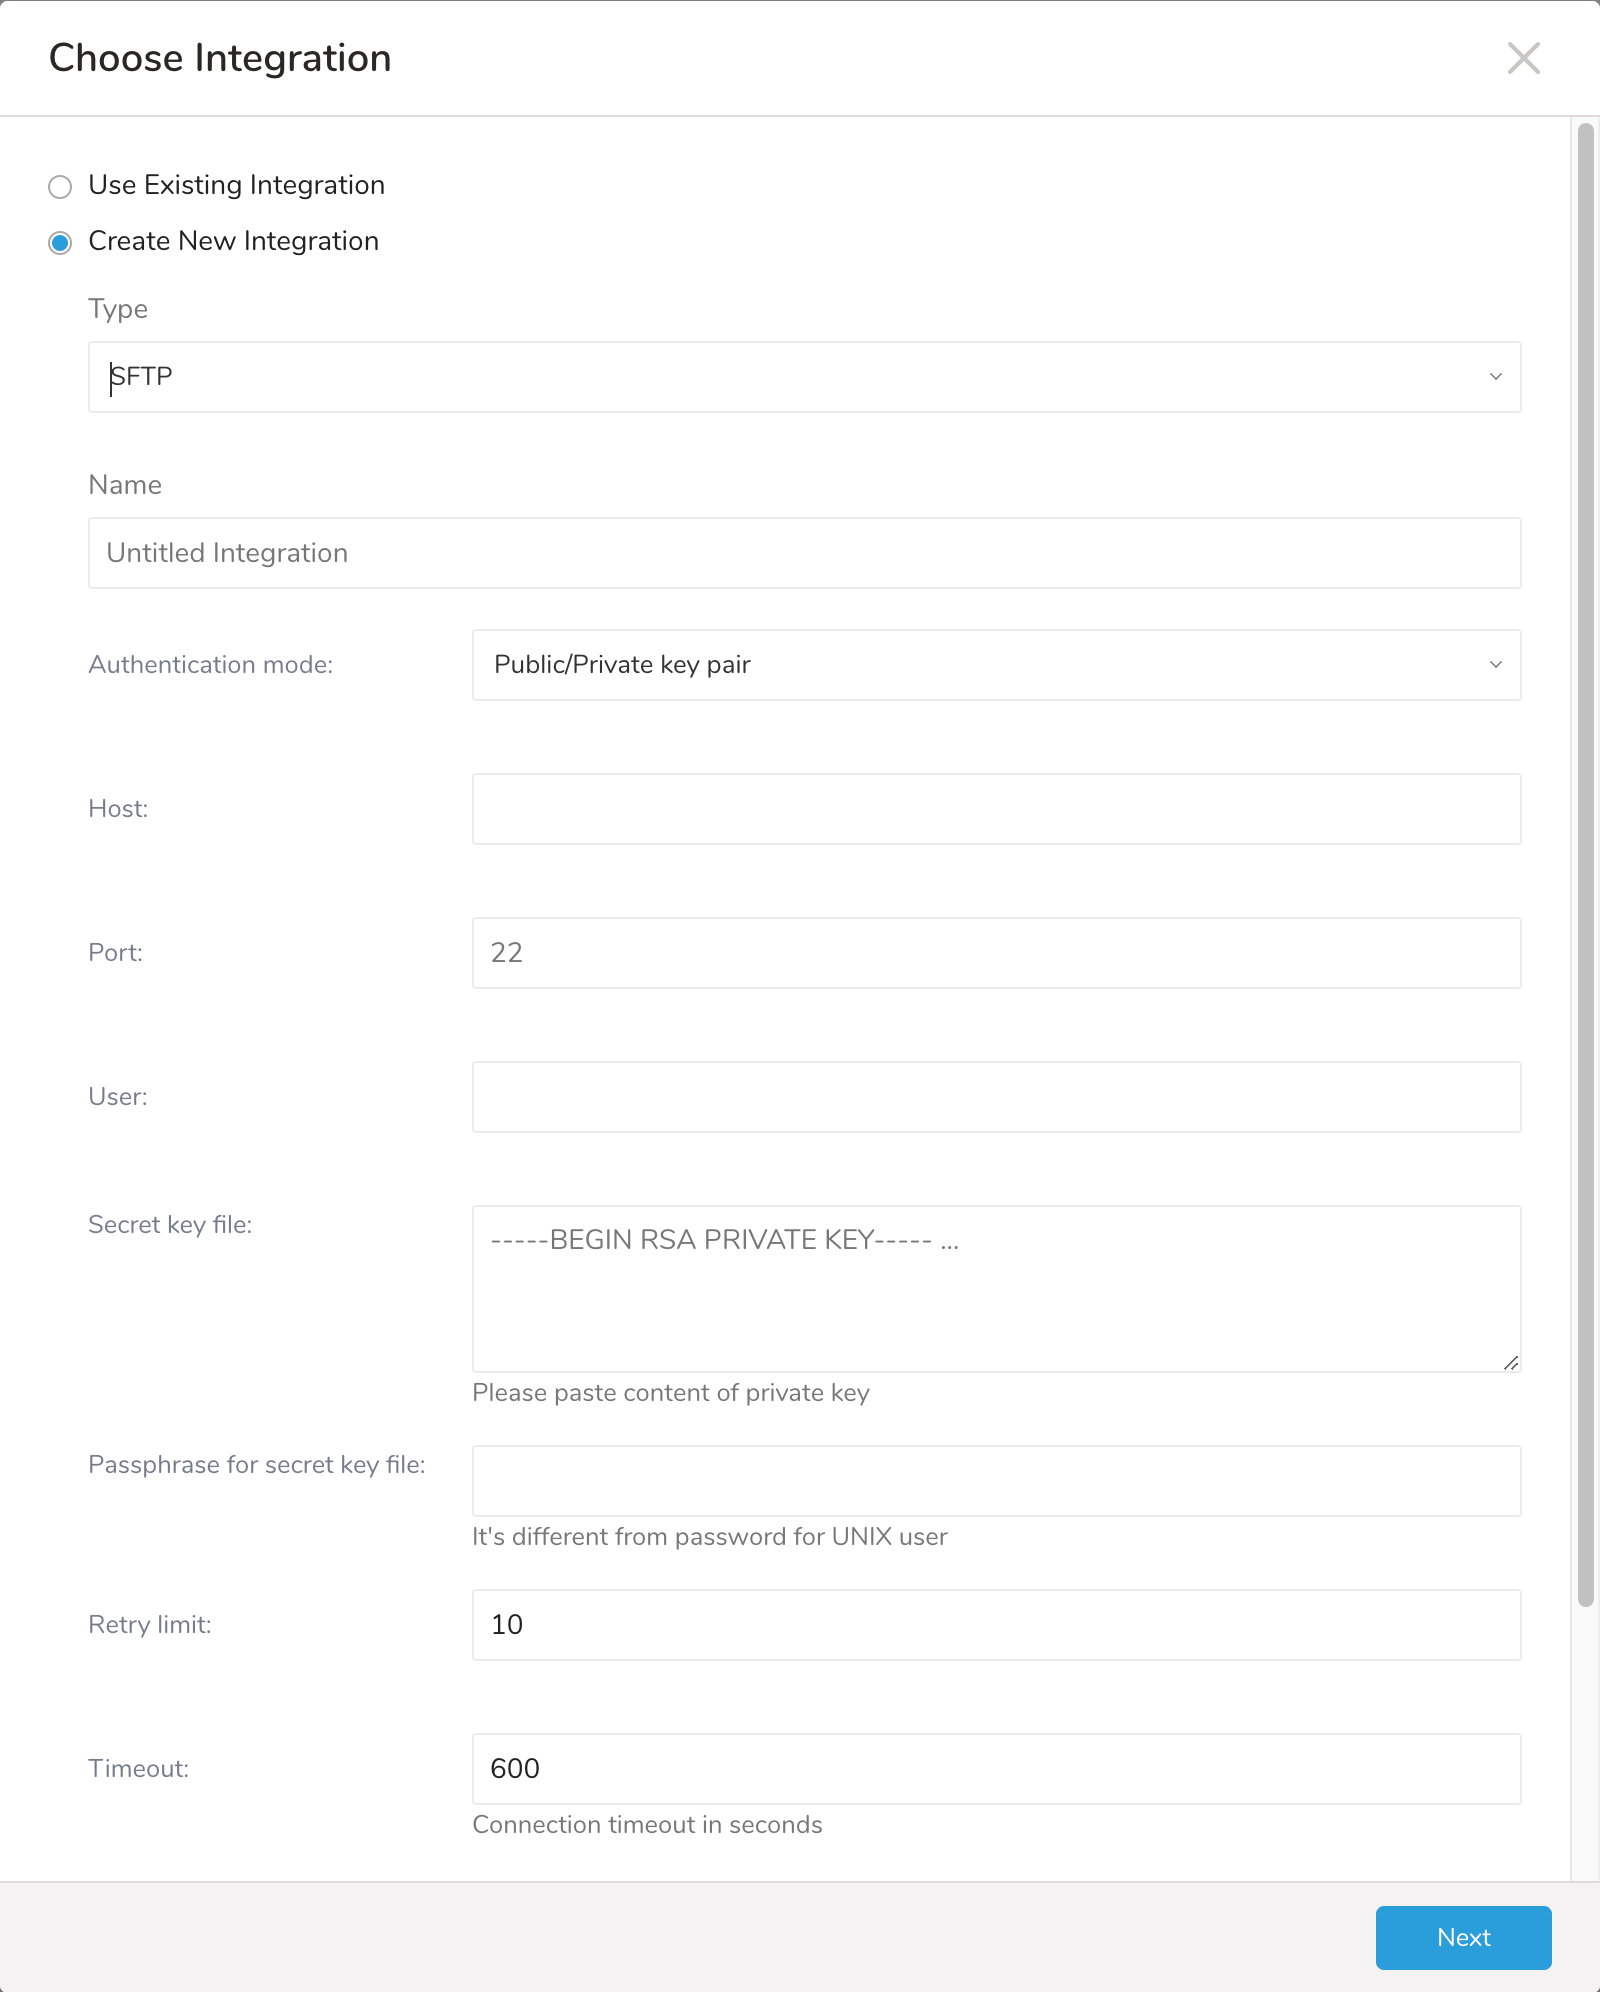
リモートSFTPインスタンスに必要な詳細と資格情報を入力します。
- Host: リモートSFTPインスタンスのホスト情報(例: IPアドレス)。
- Port: リモートSFTPインスタンスの接続ポート。デフォルトのポート番号は22です。
- User: リモートFTPインスタンスへの接続に使用されるユーザー名。
- Authentication mode: SFTPサーバーでの認証方法。
- Secret key file: Authentication Modeとしてpublic / private key pairが選択されている場合は必須です。(キータイプEd25519はサポートされていませんが、DSA/RSA/ECDSAキータイプはサポートされています。)
- Passphrase for secret key file: (オプション)必要な場合は、提供されたシークレットファイルのパスフレーズを提供します。
- Retry limit: 失敗した接続を再試行する回数(デフォルト10)。
- Timeout: 接続タイムアウト(秒)(デフォルト600)。
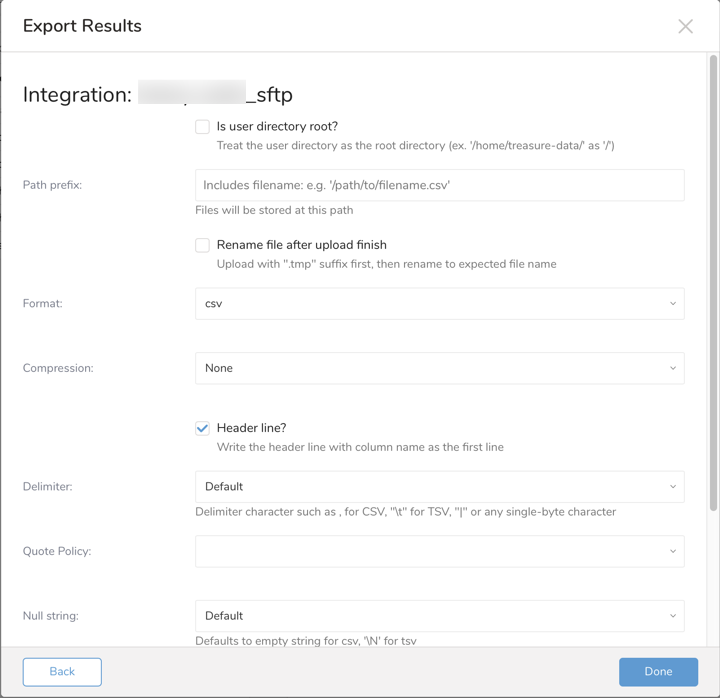
SFTPへのエクスポート情報を指定
| Field | Description |
|---|---|
| Is user directory Root? | 選択すると、ユーザーディレクトリがルートディレクトリとして扱われます。(例: /home/treasure-dataが/として) |
| Path prefix | ファイルが保存されるファイルパス |
| Rename file after upload finish | 選択すると、SFTP結果出力は、すべてのデータが転送された後、リモートSFTPサーバー上のファイル名を.xxx.tmpから.xxxに変更します。一部のMAツールは、SFTPサーバーに特定の名前のファイルが存在する場合にデータをインポートしようとします。一時名オプションは、このようなケースで役立ちます。 |
| Format | エクスポートされたファイルのフォーマット:
|
| Encoders |
|
Public Key EncoderがPGP暗号化の場合は必須 | アップロード前にファイルを暗号化するために使用される公開鍵 |
Key Identifier EncoderがPGP暗号化の場合は必須 | ファイルを保護するために使用される暗号化サブキーのKey IDを指定します。マスターキーは暗号化プロセスから除外されます。 |
Armor オプション | ASCIIアーマーを使用するかどうか |
Compression Type | SFTPサーバーへのアップロードのために暗号化の前に圧縮されるファイルを圧縮するために使用される圧縮アルゴリズムを定義します。 暗号化してアップロードする前にファイルを圧縮してください。復号化すると、ファイルは.gzや.bz2などの圧縮形式に戻ります。 |
| Header line? | ヘッダー行には、最初の行として列名が含まれます |
| Delimiter | 区切り文字:
|
| Quote policy | 引用符のポリシー:
|
| Null string | クエリの結果のnull値の表示方法:
|
| End-of-line character | EOL(end-of-line)文字:
|
Temp filesize threshold | ローカル一時ファイルの最大ファイルサイズ(バイト単位)。一時ファイルがしきい値に達すると、ファイルはリモートファイルにフラッシュされます。
|
You can use Scheduled Jobs with Result Export to periodically write the output result to a target destination that you specify.
Treasure Data's scheduler feature supports periodic query execution to achieve high availability.
When two specifications provide conflicting schedule specifications, the specification requesting to execute more often is followed while the other schedule specification is ignored.
For example, if the cron schedule is '0 0 1 * 1', then the 'day of month' specification and 'day of week' are discordant because the former specification requires it to run every first day of each month at midnight (00:00), while the latter specification requires it to run every Monday at midnight (00:00). The latter specification is followed.
Navigate to Data Workbench > Queries
Create a new query or select an existing query.
Next to Schedule, select None.

In the drop-down, select one of the following schedule options:
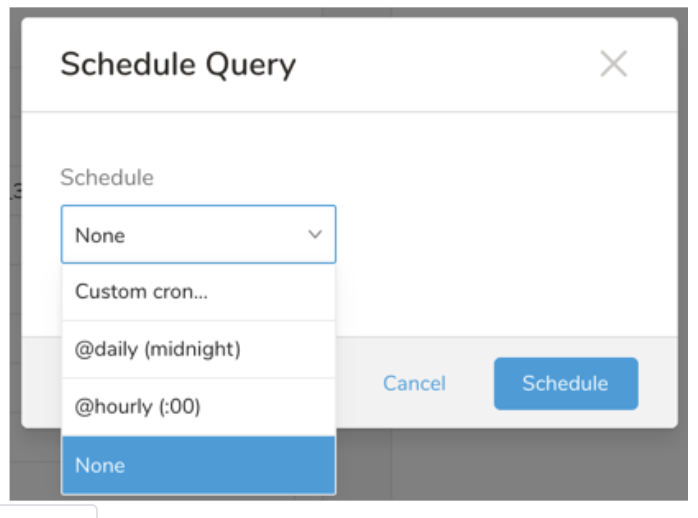
Drop-down Value Description Custom cron... Review Custom cron... details. @daily (midnight) Run once a day at midnight (00:00 am) in the specified time zone. @hourly (:00) Run every hour at 00 minutes. None No schedule.
| Cron Value | Description |
|---|---|
0 * * * * | Run once an hour. |
0 0 * * * | Run once a day at midnight. |
0 0 1 * * | Run once a month at midnight on the morning of the first day of the month. |
| "" | Create a job that has no scheduled run time. |
 *    *    *    *    *
 -    -    -    -    -
 |    |    |    |    |
 |    |    |    |    +----- day of week (0 - 6) (Sunday=0)
 |    |    |    +---------- month (1 - 12)
 |    |    +--------------- day of month (1 - 31)
 |    +-------------------- hour (0 - 23)
 +------------------------- min (0 - 59)
The following named entries can be used:
- Day of Week: sun, mon, tue, wed, thu, fri, sat.
- Month: jan, feb, mar, apr, may, jun, jul, aug, sep, oct, nov, dec.
A single space is required between each field. The values for each field can be composed of:
| Field Value | Example | Example Description |
|---|---|---|
| A single value, within the limits displayed above for each field. | ||
A wildcard '*' to indicate no restriction based on the field. | '0 0 1 * *' | Configures the schedule to run at midnight (00:00) on the first day of each month. |
A range '2-5', indicating the range of accepted values for the field. | '0 0 1-10 * *' | Configures the schedule to run at midnight (00:00) on the first 10 days of each month. |
A list of comma-separated values '2,3,4,5', indicating the list of accepted values for the field. | 0 0 1,11,21 * *' | Configures the schedule to run at midnight (00:00) every 1st, 11th, and 21st day of each month. |
A periodicity indicator '*/5' to express how often based on the field's valid range of values a schedule is allowed to run. | '30 */2 1 * *' | Configures the schedule to run on the 1st of every month, every 2 hours starting at 00:30. '0 0 */5 * *' configures the schedule to run at midnight (00:00) every 5 days starting on the 5th of each month. |
A comma-separated list of any of the above except the '*' wildcard is also supported '2,*/5,8-10'. | '0 0 5,*/10,25 * *' | Configures the schedule to run at midnight (00:00) every 5th, 10th, 20th, and 25th day of each month. |
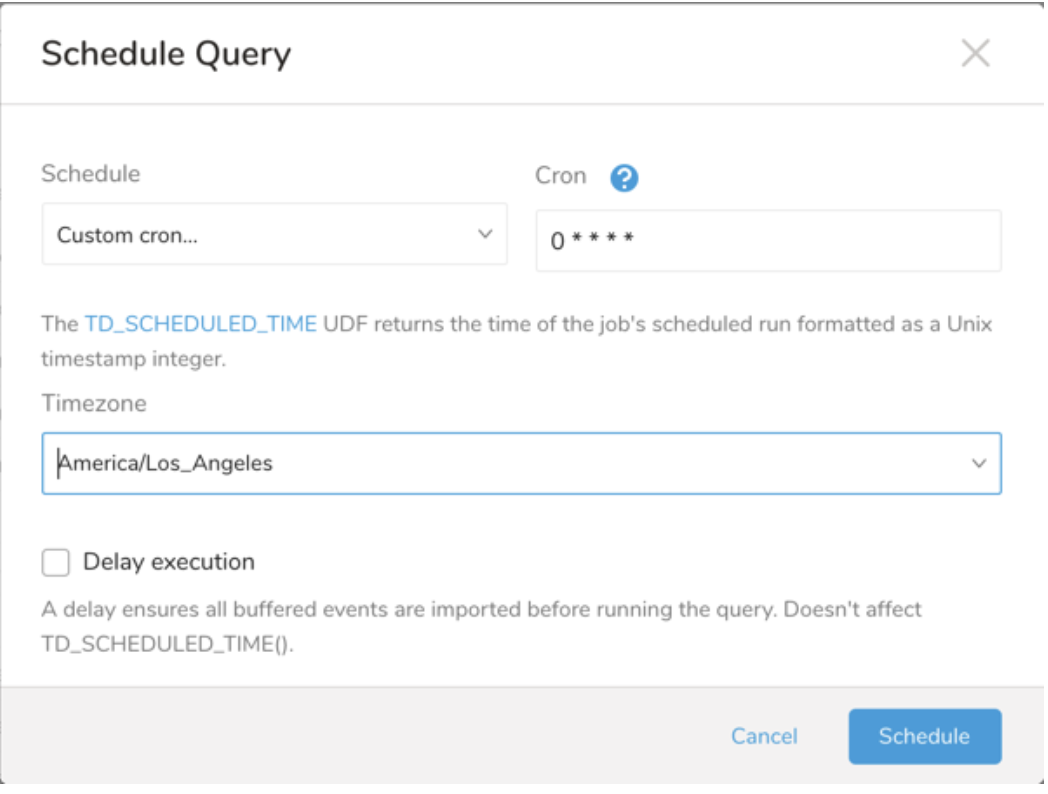
- (Optional) You can delay the start time of a query by enabling the Delay execution.
Save the query with a name and run, or just run the query. Upon successful completion of the query, the query result is automatically exported to the specified destination.
Scheduled jobs that continuously fail due to configuration errors may be disabled on the system side after several notifications.
(Optional) You can delay the start time of a query by enabling the Delay execution.
You can also send segment data to the target platform by creating an activation in the Audience Studio.
- Navigate to Audience Studio.
- Select a parent segment.
- Open the target segment, right-mouse click, and then select Create Activation.
- In the Details panel, enter an Activation name and configure the activation according to the previous section on Configuration Parameters.
- Customize the activation output in the Output Mapping panel.
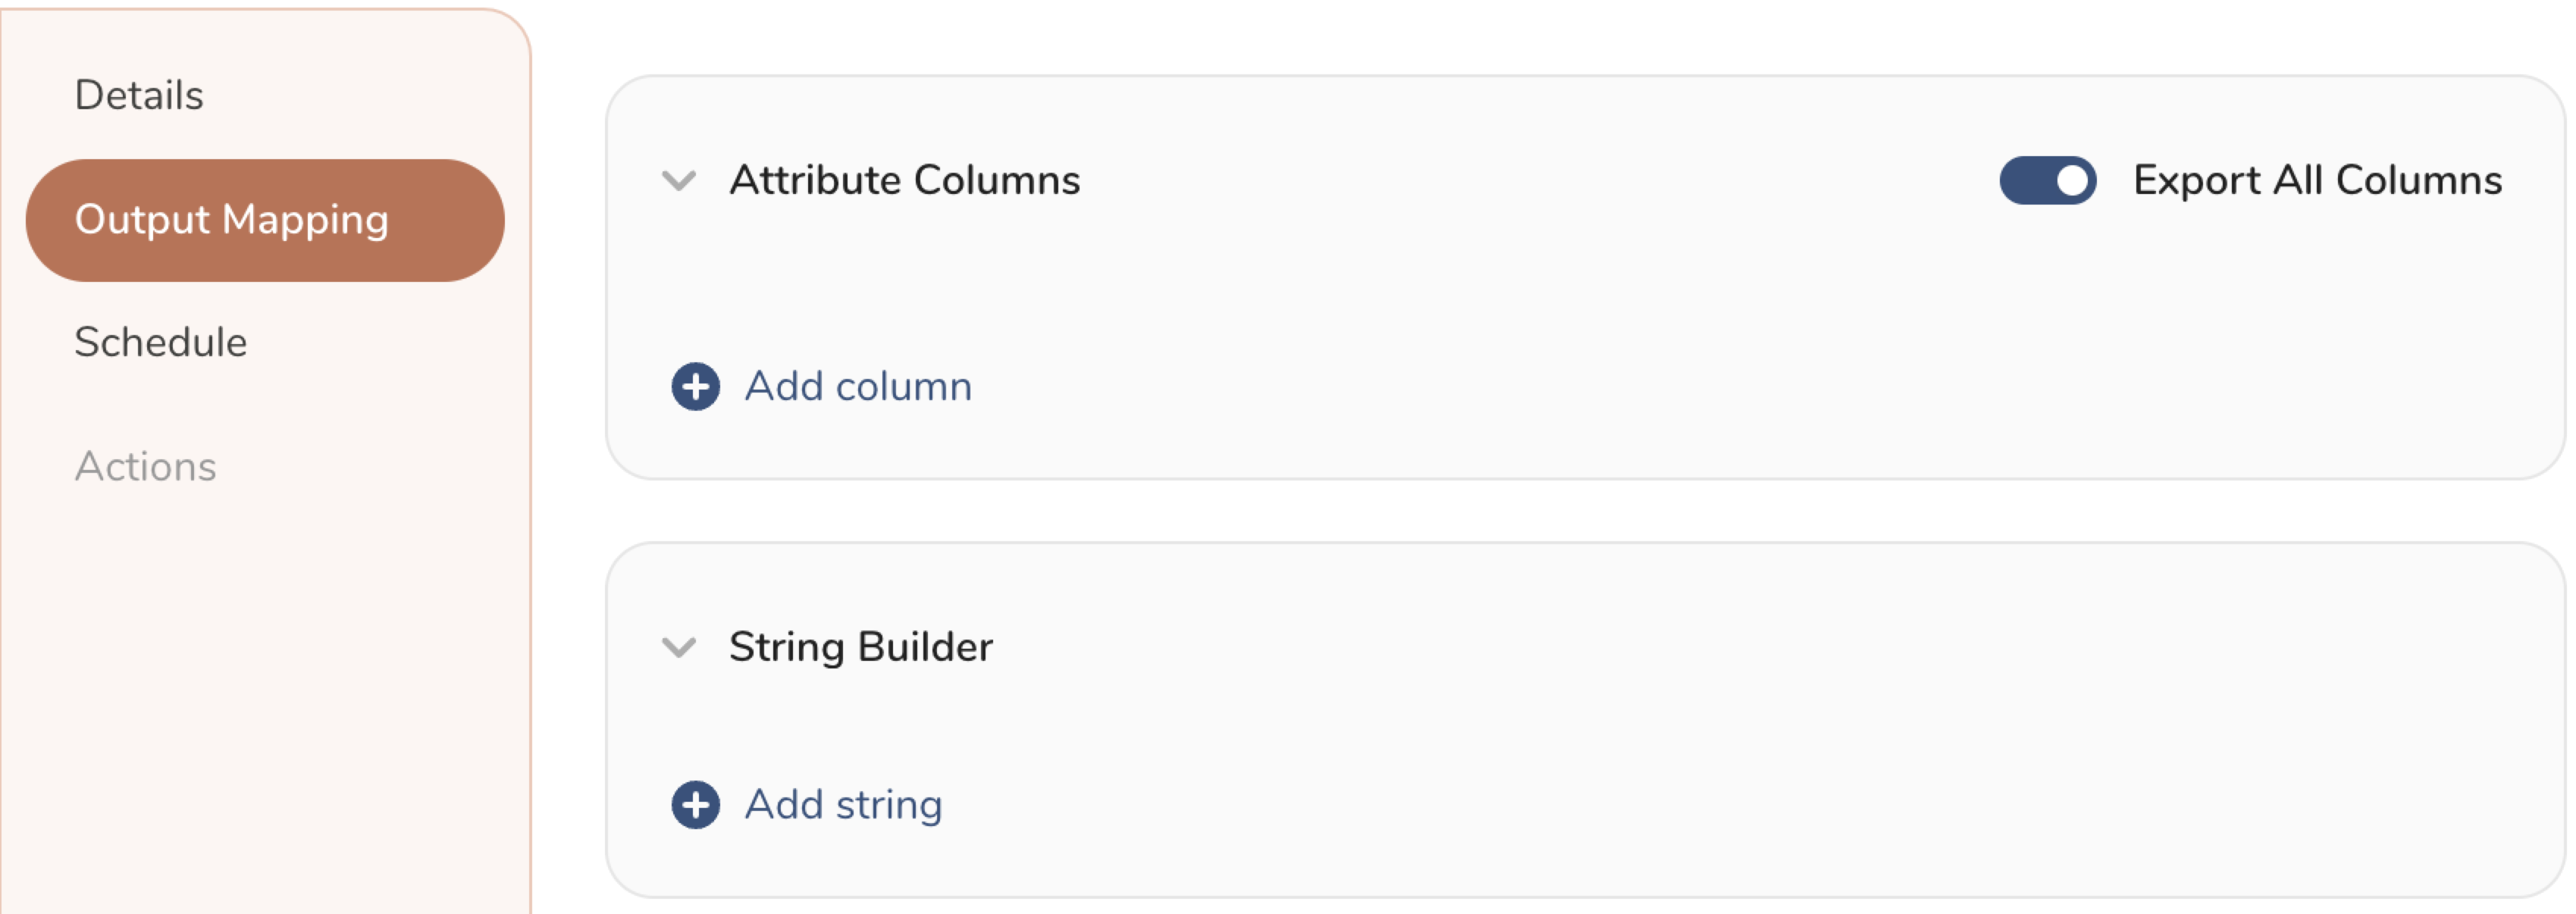
- Attribute Columns
- Select Export All Columns to export all columns without making any changes.
- Select + Add Columns to add specific columns for the export. The Output Column Name pre-populates with the same Source column name. You can update the Output Column Name. Continue to select + Add Columnsto add new columns for your activation output.
- String Builder
- + Add string to create strings for export. Select from the following values:
- String: Choose any value; use text to create a custom value.
- Timestamp: The date and time of the export.
- Segment Id: The segment ID number.
- Segment Name: The segment name.
- Audience Id: The parent segment number.
- + Add string to create strings for export. Select from the following values:
- Set a Schedule.
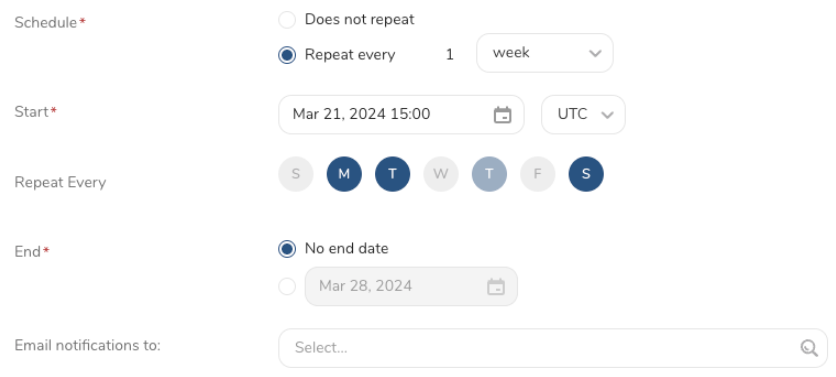
- Select the values to define your schedule and optionally include email notifications.
- Select Create.
If you need to create an activation for a batch journey, review Creating a Batch Journey Activation.
CLIをSFTPへの結果エクスポートに使用することもできます。
次の例では、キーにバックスラッシュでエスケープされた改行があります。
$ td query --result '{"type":"sftp","host":"xx.xx.xx.xx","port":22,"username":"xxxx","secret_key_file":"{\"content\":\"-----BEGIN RSA PRIVATE KEY-----\nABCDEFJ\nABCDEFJ\n-----END RSA PRIVATE KEY-----\"}","secret_key_passphrase":"xxxxxx", "user_directory_is_root":true,"path_prefix":"/path/to/file.csv","rename_file_after_upload":false,"header_line":true,"quote_policy":"MINIMAL","delimiter":",","null_string":"","newline":"CRLF"}' -d sample_datasets "select * from www_access" -T presto例:
$ td query \
--result '{"type":"sftp","host":"xx.xx.xx.xx","port":22,"auth_method":"Password","username":"xxxx","password":"xxxxx","user_directory_is_root":true,"path_prefix":"/path/to/file.csv","rename_file_after_upload":false,"header_line":true,"quote_policy":"MINIMAL","delimiter":",","null_string":"","newline":"CRLF"}' \
-d sample_datasets "select * from www_access" -T prestoTreasure Workflow内で、この統合を使用してデータをエクスポートすることを指定できます。サンプルワークフローについては、Treasure Boxesをご覧ください。
- Embulk-encoder-Encryptionドキュメント: Embulk Encoder Encryption PGP
Q: SFTPサーバーに接続できません。どうすればよいですか?
A: 確認すべき事項は次のとおりです:
- プロトコルが有効であることを確認してください。SFTPを使用する場合は、この統合を使用できます。FTP/FTPSを使用する場合は、FTP Server Import Integrationで接続を試みてください。
- ファイアウォールを使用している場合は、許可されているIP範囲とポートを確認してください。サーバー管理者は、セキュリティ上の理由からデフォルトのポート番号をTCP 22から変更することがあります。
- プライベートキーがOpenSSH形式であることを確認してください。Treasure Dataは「PuTTY」などの他の形式をサポートしていません。
- Treasure Dataは、OpenSSH 7.8以降、プライベートキーのデフォルト形式をサポートしていません。'-m PEM'オプションを使用してキーを再生成してください。
Q: SFTPサーバーにアップロードしたファイルが見つかりません。何が起こりましたか?
A: SFTPサーバーがAppendモードをサポートしていない場合、統合は「SFTP Exception: no such file」というエラーでファイルを更新できない可能性があります。安定性の理由から、統合はファイルコンテンツをバッチでアップロードします。したがって、SFTPサーバーでAppendモードを有効にする必要があります。SFTPサーバーでAppendモードを有効にできない場合は、temp_file_thresholdを0に設定してこの機能をバイパスする必要があります。
注意: 暗号化してアップロードする前にファイルを圧縮してください。
組み込みでない暗号化を使用して復号化すると、ファイルは.gzや.bz2などの圧縮形式に戻ります。
組み込み暗号化を使用して復号化すると、ファイルは生データに戻ります。