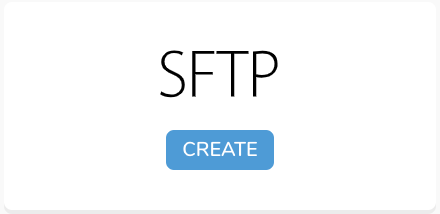
SFTPのData Connectorを使用すると、SFTPサーバーに保存されているファイルをTreasure Dataにインポートできます。
SFTP_V2 Server Import Integrationについては、SFTP_V2 Server Import Integrationを参照してください。
SFTP Server Import統合は、積極的な開発や保守の対象ではなくなります。Treasure DataはSFTP_V2 Server Import Integration統合の使用を推奨します。
Treasure Dataの基本知識。
プライベートキーがOpenSSH 7.8より前のバージョン形式である必要があります。OpenSSH 7.8以降を使用する場合は、'-m PEM'オプションを使用してプライベートキーを生成してください。
このコネクタを使用する前に、環境に有効なプロトコルを決定してください。
- SFTPを使用する場合は、この統合をSFTPに使用できます。
- FTPまたはFTPSを使用する場合は、FTP Import Integrationで接続を試みてください。
- ファイアウォールを使用している場合は、許可されているIP範囲とポートを確認してください。サーバー管理者は、セキュリティ上の理由からデフォルトのポート番号をTCP 22から変更することがあります。
- 「PuTTY」およびその他の形式はサポートされていません。
インストールと設定後、インポートの成功に関する情報を提供できる警告とエラーについてジョブログを確認してください。
- STOREDおよびDEFLATE圧縮方式のみをサポートします。
- マルチパートgzipファイルは機能しない場合があります。
- v.1では接続タイムアウト設定が正しく機能しないため、インポートジョブがタイムアウトする代わりに長時間実行される可能性があります。
If your security policy requires IP whitelisting, you must add Treasure Data's IP addresses to your allowlist to ensure a successful connection.
Please find the complete list of static IP addresses, organized by region, at the following document
TD Consoleを使用してデータコネクタを作成できます。
データ接続を設定する場合、統合にアクセスするための認証を提供する必要があります。Treasure Dataでは、認証を設定してからソース情報を指定できます。
- TD Consoleを開きます。
- Integrations Hub > Catalogに移動します。
- SFTPを検索して選択します。
 4. Createを選択すると、次のダイアログが開きます。
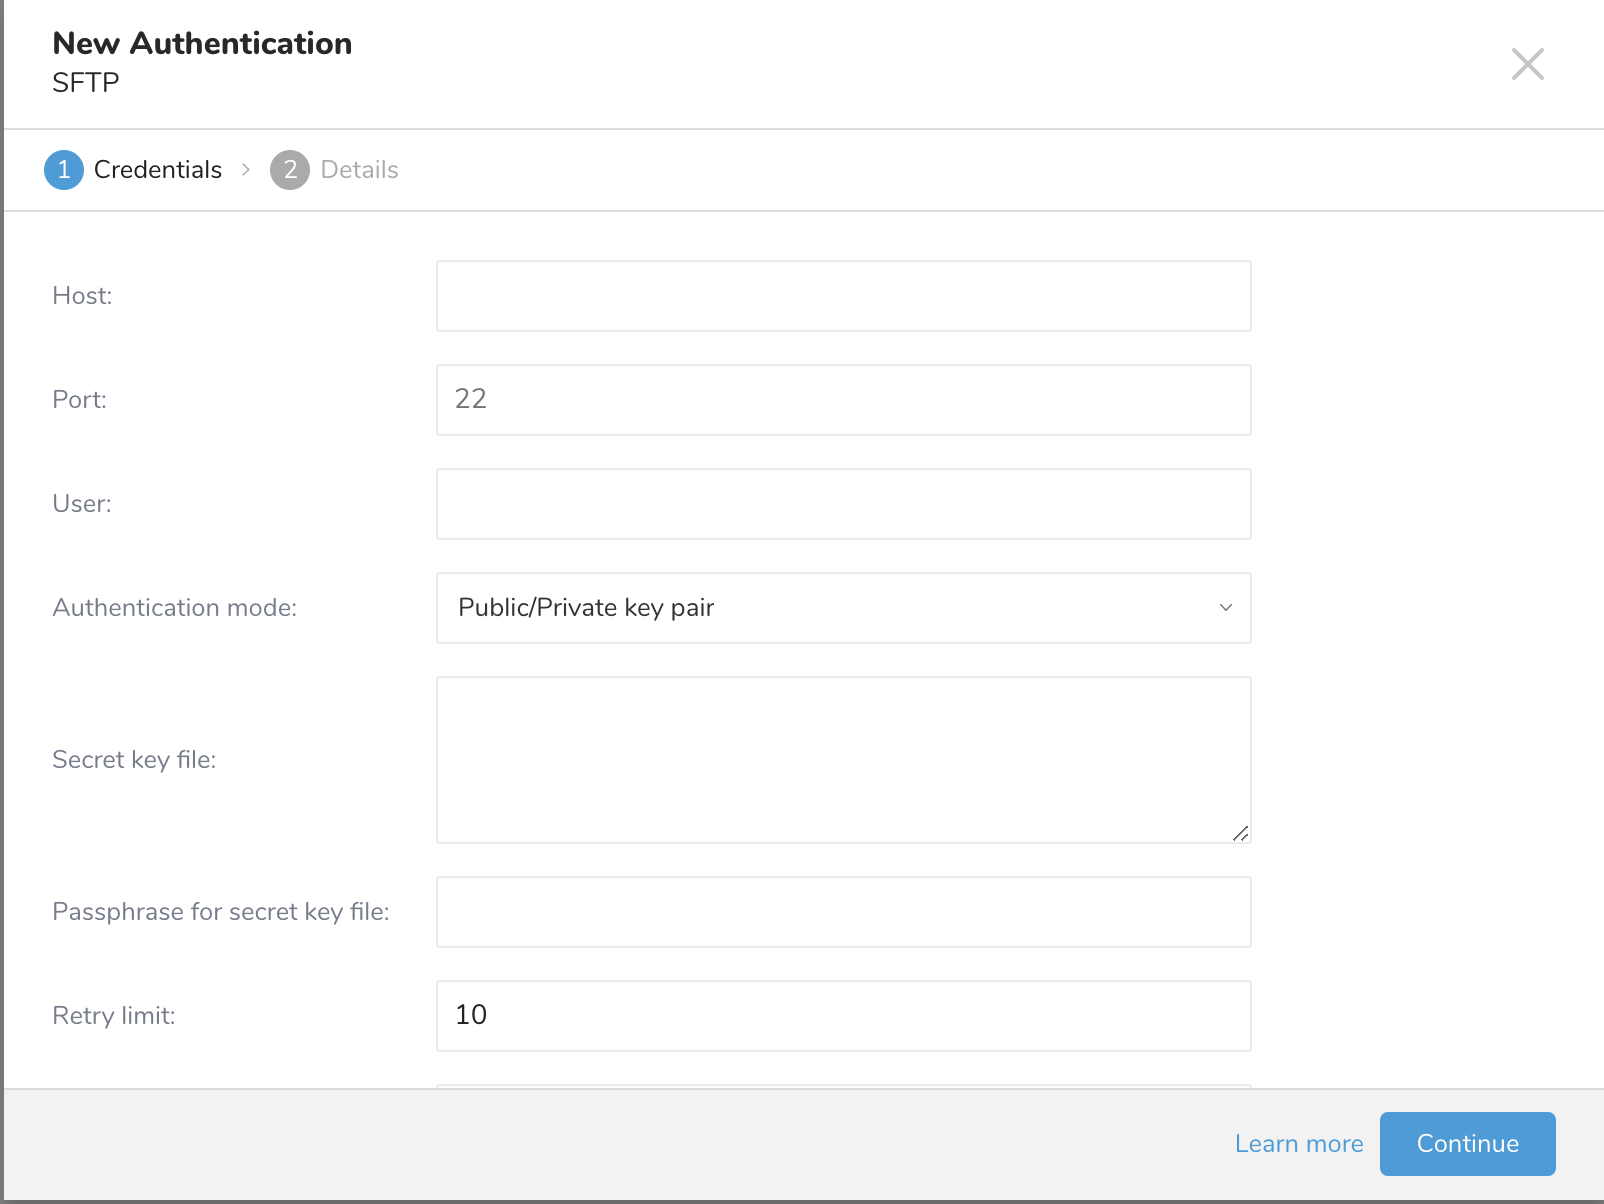 5. リモートSFTPインスタンスに必要な資格情報を入力します。
- Host: リモートSFTPインスタンスのホスト情報(例: IPアドレス)。
- Port: リモートSFTPインスタンスの接続ポート。デフォルトのポート番号は22です。
- User: リモートFTPインスタンスへの接続に使用されるユーザー名。
- Authentication mode: SFTPサーバーでの認証方法。
- Secret key file: Authentication Modeとしてpublic / private key pairが選択されている場合は必須です。(DSA、RSA、およびECDSAがサポートされています。)
- Passphrase for secret key file: (オプション)必要な場合は、提供されたシークレットファイルのパスフレーズを提供します。
- Retry limit: 失敗した接続を再試行する回数(デフォルト10)。
- Timeout: 接続タイムアウト(秒)(デフォルト600)。
- Continueを選択します。接続の名前を入力します。
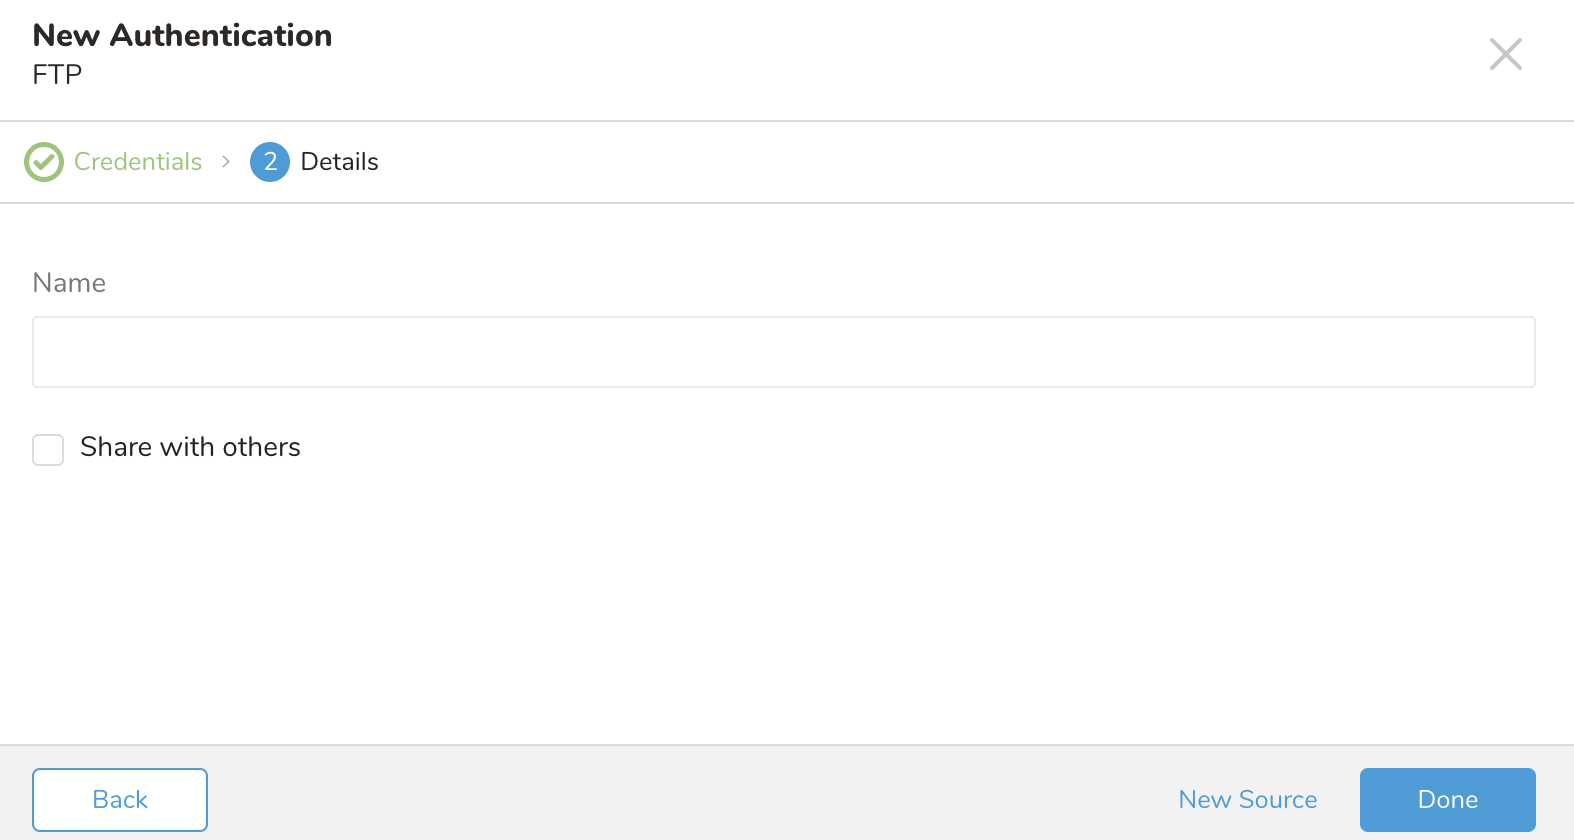
- 組織内の他のユーザーとこの接続を共有する場合は、Share with othersチェックボックスをオンにします。このボックスがオフの場合、この接続は自分にのみ表示されます。
- Doneを選択します。
SFTPサーバーからTreasure Dataにデータを取得するには、アドホックの1回限りまたは定期的な間隔での定期的な転送を設定できます。認証された接続を作成した後、自動的にAuthenticationsに移動します。
- 作成した接続を検索します。
- New Sourceを選択します。
接続を作成
- Data TransferフィールドにSourceの名前を入力します。
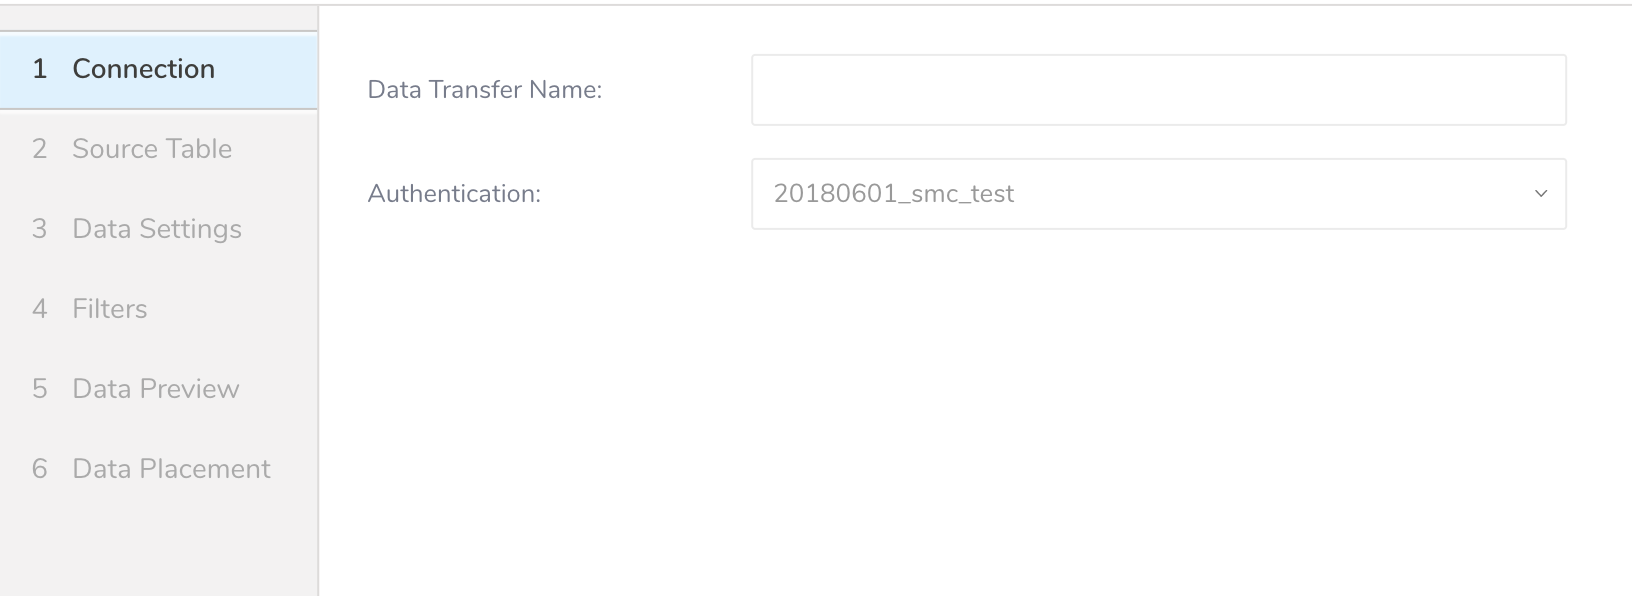
- Nextをクリックします。
- Sourceダイアログが開きます。
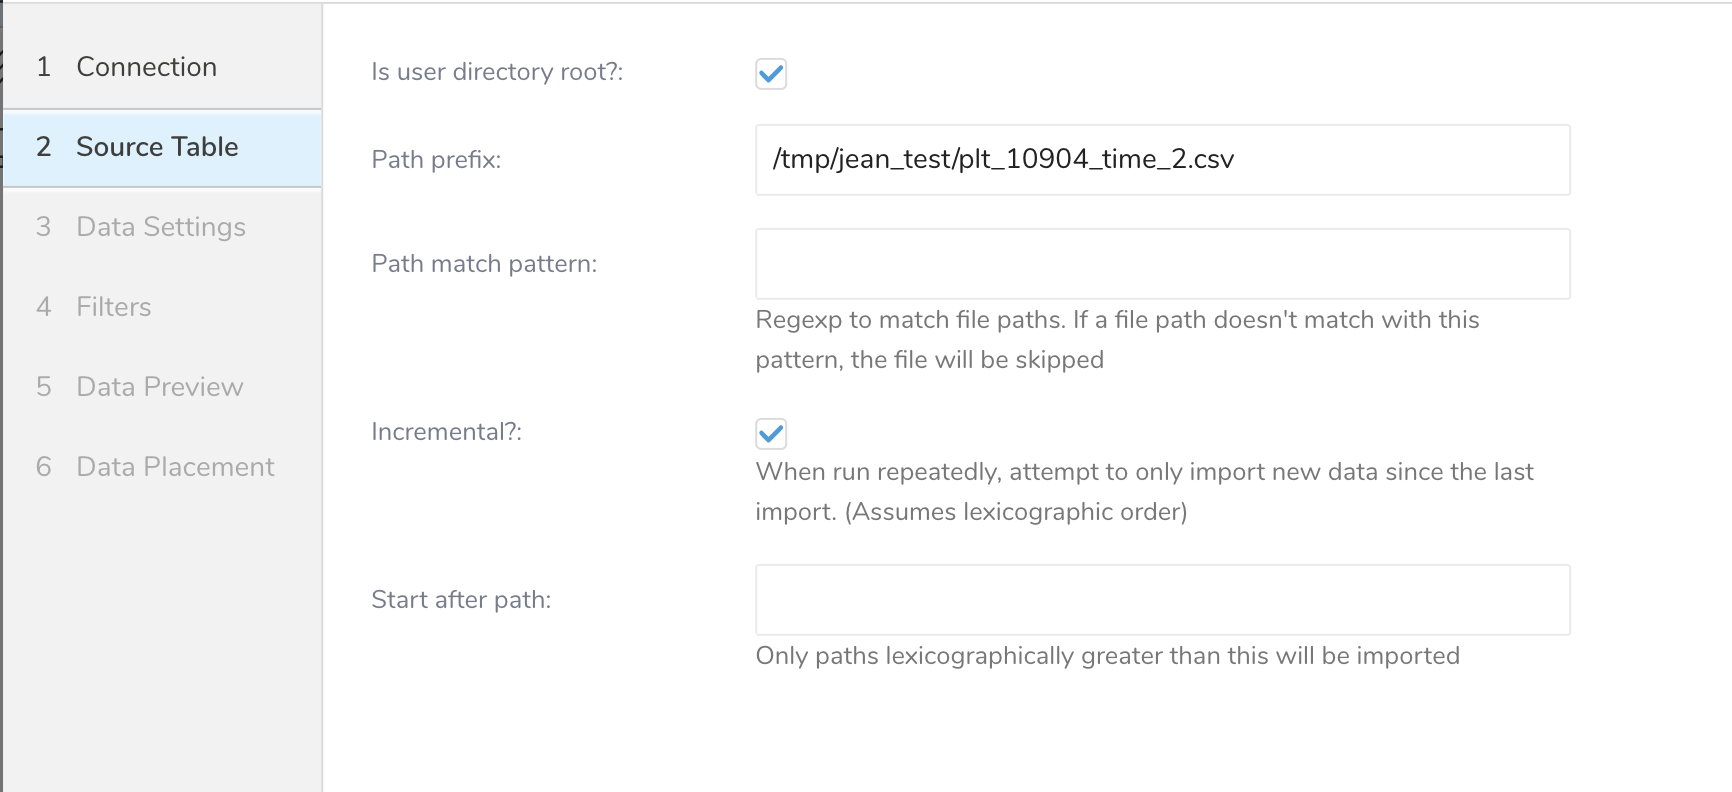
- 次のパラメータを編集します。
| Parameters | Description |
|---|---|
| User directory root | Missing |
| Path prefix | ターゲットファイルのプレフィックス(文字列、必須) |
| Path match pattern | ファイルパスをクエリするための正規表現を入力します。ファイルパスが指定されたパターンと一致しない場合、ファイルはスキップされます。たとえば、パターン .csv$ # を指定すると、そのパスがパターンと一致しない場合、ファイルはスキップされます。 |
| Incremental | 増分読み込みを有効にします(ブール値、オプション。デフォルト: true。増分読み込みが有効になっている場合、次の実行の設定差分にはlast_pathパラメータが含まれるため、次の実行ではパスの前のファイルがスキップされます。それ以外の場合、last_pathは含まれません。 |
| Start after path | これより辞書順に大きいパスのみがインポートされます。 |
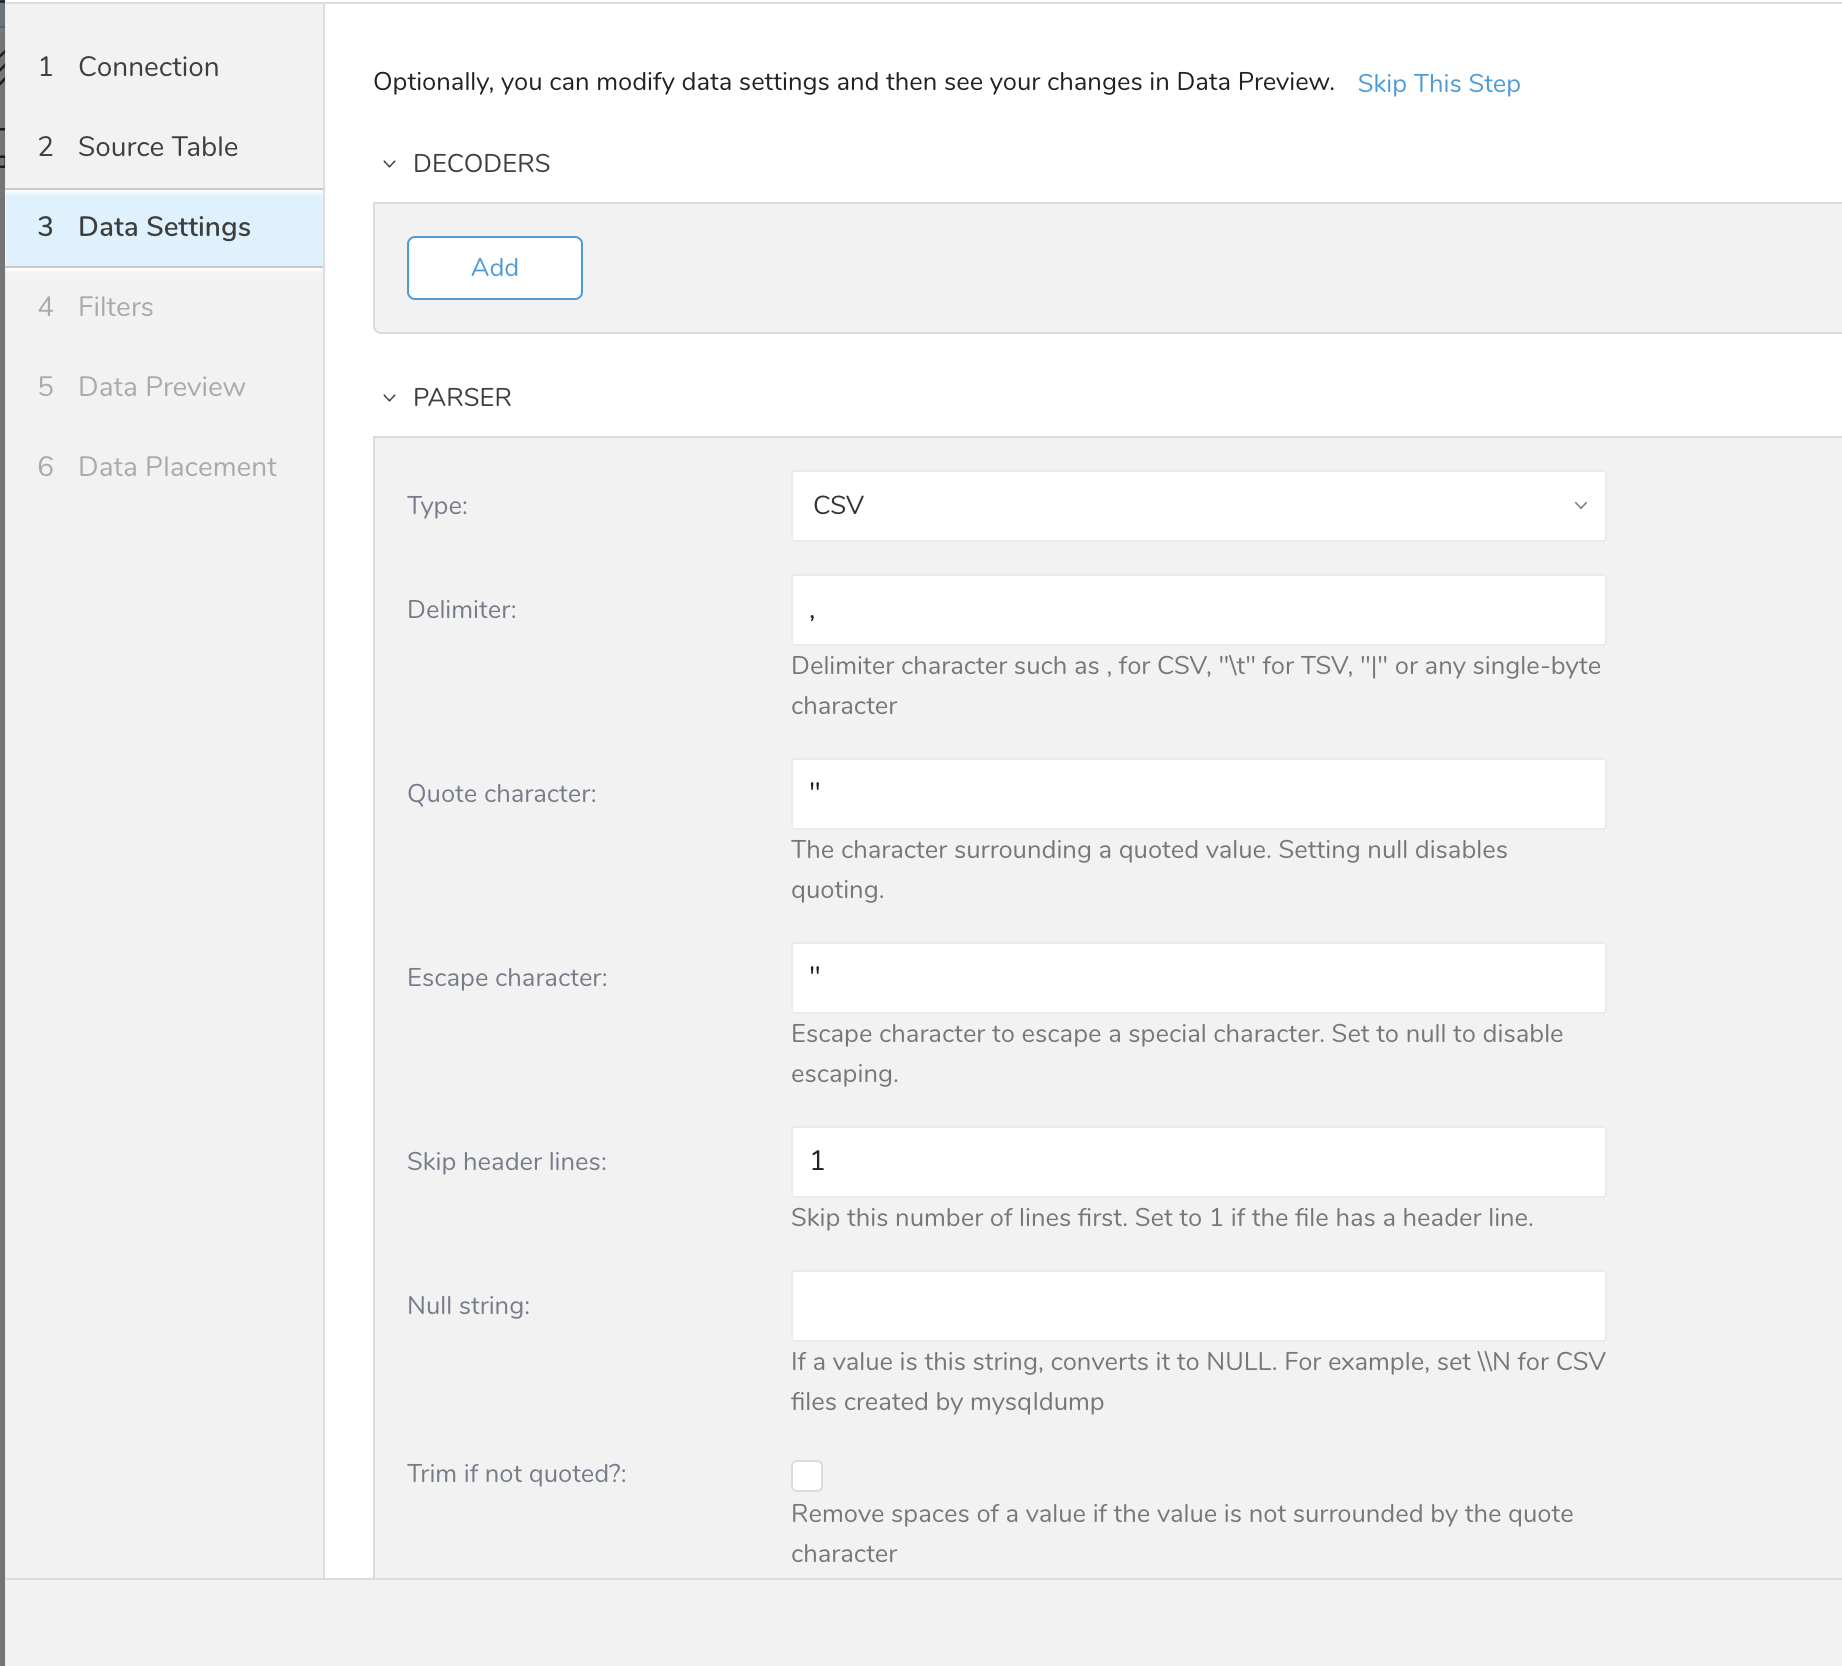
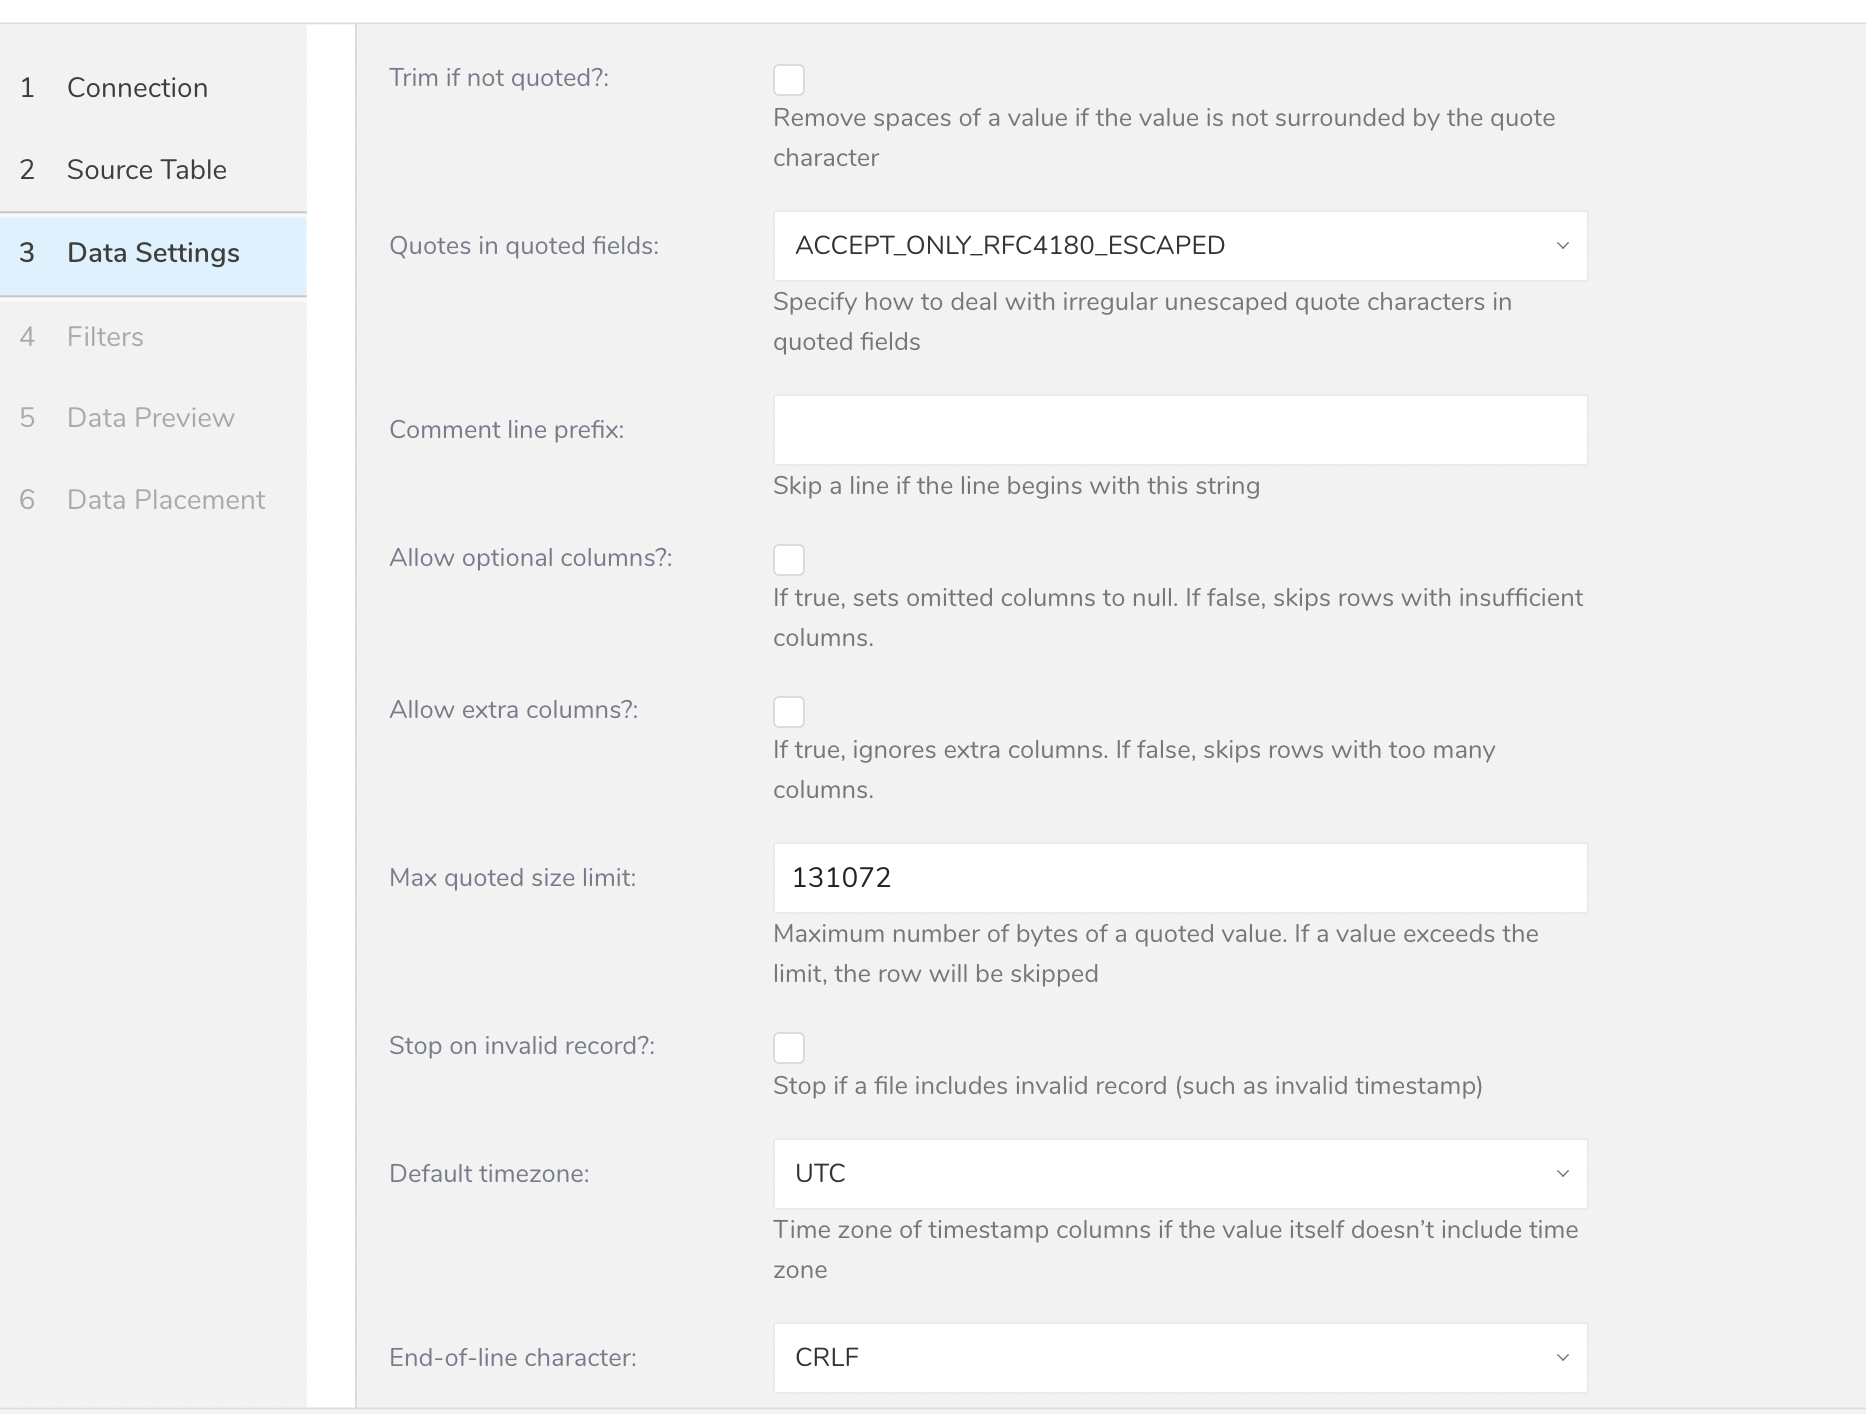
- Nextを選択します。Data Settingsページが開きます。
- (オプション)データ設定を編集します。
Filters are available in the Create Source or Edit Source import settings for your S3, FTP, or SFTP connectors.
Import Integration Filters enable you to modify your imported data after you have completed Editing Data Settings for your import.
To apply import integration filters:
- Select Next in Data Settings.The Filters dialog opens.
- Select the filter option you want to add.
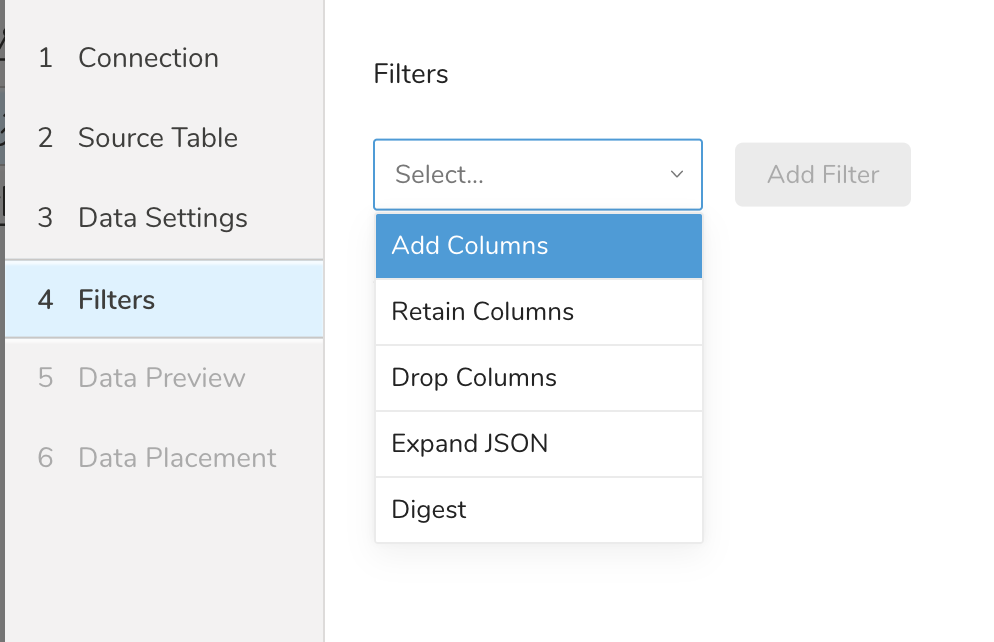
- Select Add Filter. The parameter dialog for that filter opens.
- Edit the parameters. For information on each filter type, see one of the following:
- Retaining Columns Filter
- Adding Columns Filter
- Dropping Columns Filter
- Expanding JSON Filter
- Digesting Filter
- Optionally, to add another filter of the same type, select Add within the specific column filter dialog.
- Optionally, to add another filter of a different type, select the filter option from the list and repeat the same steps.
- After you have added the filters you want, select **Next.**The Data Preview dialog opens.
You can see a preview of your data before running the import by selecting Generate Preview. Data preview is optional and you can safely skip to the next page of the dialog if you choose to.
- Select Next. The Data Preview page opens.
- If you want to preview your data, select Generate Preview.
- Verify the data.
For data placement, select the target database and table where you want your data placed and indicate how often the import should run.
Select Next. Under Storage, you will create a new or select an existing database and create a new or select an existing table for where you want to place the imported data.
Select a Database > Select an existing or Create New Database.
Optionally, type a database name.
Select a Table> Select an existing or Create New Table.
Optionally, type a table name.
Choose the method for importing the data.
- Append (default)-Data import results are appended to the table. If the table does not exist, it will be created.
- Always Replace-Replaces the entire content of an existing table with the result output of the query. If the table does not exist, a new table is created.
- Replace on New Data-Only replace the entire content of an existing table with the result output when there is new data.
Select the Timestamp-based Partition Key column. If you want to set a different partition key seed than the default key, you can specify the long or timestamp column as the partitioning time. As a default time column, it uses upload_time with the add_time filter.
Select the Timezone for your data storage.
Under Schedule, you can choose when and how often you want to run this query.
- Select Off.
- Select Scheduling Timezone.
- Select Create & Run Now.
- Select On.
- Select the Schedule. The UI provides these four options: @hourly, @daily and @monthly or custom cron.
- You can also select Delay Transfer and add a delay of execution time.
- Select Scheduling Timezone.
- Select Create & Run Now.
After your transfer has run, you can see the results of your transfer in Data Workbench > Databases.
コマンドラインインターフェイスからSFTPデータコネクタを使用することもできます。次の手順では、CLIを使用してデータをインポートする方法を説明します。
最新のTreasure Data Toolbeltをインストールします。
$ td --version
0.11.10次の例に示すように、SFTPの詳細を含むseed.ymlを準備します。2つの認証方法をサポートしています: Public / Private Key PairとPassword。
次の内容でseed.ymlを作成します。
in:
  type: sftp
  host: HOST
  port: <PORT, default is 22>
  user: USER
  secret_key_file:
 content: |
-----BEGIN RSA PRIVATE KEY-----
Proc-Type: 4,ENCRYPTED
DEK-Info: AES-128-CBC...
...
-----END RSA PRIVATE KEY-----
  secret_key_passphrase: PASSPHRASE
  user_directory_is_root: true
  timeout: 600
  path_prefix: /path/to/sample
out:
  mode: append
exec: {}secret_key_fileにはOpenSSH形式が必要です。
次の内容でseed.ymlを作成します。
in:
  type: sftp
  host: HOST
  port: <PORT, default is 22>
  auth_method: password
  user: USER
  password: PASSWORD
  user_directory_is_root: true
  timeout: 600
  path_prefix: /path/to/sample
out:
  mode: append
  exec: {}
パスワードには次の特殊文字を使用できます: "#$!*@"
プロキシを使用している場合は、次のように追加情報を追加します:
in:
  type: sftp
  host: HOST
  port: <PORT, default is 22>
  ....
  proxy:
    type: http
    host: PROXY_HOST
    port: PROXY_PORT
    user: PROXY_USER
    password: PROXY_PASSWORD
    command: SOMETHING COMMAND IF NEEDED
SFTPのData Connectorは、指定されたプレフィックスに一致するすべてのファイルをインポートします(例: path_prefix: path/to/sample_ –> path/to/sample_201501.csv.gz, path/to/sample_201502.csv.gz, …, path/to/sample_201505.csv.gz)。
connector:guessを使用します。このコマンドは、ソースファイルを自動的に読み取り、ファイル形式を評価(推測するロジックを使用)します。
$ td connector:guess seed.yml -o load.ymlload.ymlを開くと、ファイル形式、エンコーディング、列名、型を含む推測されたファイル形式定義が表示されます。この例では、CSVファイルをロードしようとしています。
in:
  type: sftp
  host: HOST
  port: <PORT, default is 22>
  user: USER
  secret_key_file:
 content: |
-----BEGIN RSA PRIVATE KEY-----
Proc-Type: 4,ENCRYPTED
DEK-Info: AES-128-CBC...
...
-----END RSA PRIVATE KEY-----
  secret_key_passphrase: PASSPHRASE
  user_directory_is_root: true
  timeout: 600
  path_prefix: /path/to/sample
  parser:
 skip_header_lines: 1
 charset: UTF-8
 newline: CRLF
 type: csv
 delimiter: ','
 quote: '"'
 columns:
 - {name: id, type: long}
 - {name: account, type: long}
 - {name: time, type: timestamp, format: "%Y-%m-%d %H:%M:%S"}
 - {name: purchase, type: timestamp, format: "%Y%m%d"}
 - {name: comment, type: string}
 - {name: json_column, type: json}
out:
  mode: append
exec: {}次に、previewコマンドを使用して、システムがファイルを解析する方法をプレビューできます。
$ td connector:preview load.yml
+-------+---------+----------+---------------------+
| id | company | customer | created_at |
+-------+---------+----------+---------------------+
| 11200 | AA Inc. | David | 2015-03-31 06:12:37 |
| 20313 | BB Imc. |Tom | 2015-04-01 01:00:07 |
| 32132 | CC Inc. | Fernando | 2015-04-01 10:33:41 |
| 40133 | DD Inc. | Cesar | 2015-04-02 05:12:32 |
| 93133 | EE Inc. |  Jake | 2015-04-02 14:11:13 |
+-------+---------+----------+---------------------+
guessコマンドは、ソースデータのサンプル行を使用して列定義を推測するため、ソースデータファイルに3行以上、2列以上が必要です。
システムが列名または列タイプを予期せず検出した場合は、load.ymlを直接変更して再度プレビューしてください。
現在、Data Connectorは「boolean」、「long」、「double」、「string」、および「timestamp」タイプの解析をサポートしています。
データロードジョブを実行する前に、ローカルのデータベースとテーブルを作成する必要があります。次の手順に従います:
$ td database:create td_sample_db
$ td table:create td_sample_db td_sample_tableロードジョブを送信します。データのサイズによっては数時間かかる場合があります。データを保存するTreasure Dataデータベースとテーブルを指定します。
Treasure Dataのストレージは時間でパーティション化されているため、--time-columnオプションを指定することをお勧めします。オプションが提供されていない場合、データコネクタは最初のlongまたはtimestamp列をパーティション化時間として選択します。--time-columnで指定する列のタイプは、longおよびtimestampタイプのいずれかである必要があります。
データに時間列がない場合は、add_timeフィルターオプションを使用して時間列を追加できます。詳細については、add_time filter pluginを参照してください。
$ td connector:issue load.yml --database td_sample_db --table td_sample_table --time-column created_atconnector:issueコマンドは、すでにdatabase(td_sample_db)とtable(td_sample_table)を作成していることを前提としています。データベースまたはテーブルがTDに存在しない場合、connector:issueコマンドは失敗するため、データベースとテーブルを手動で作成するか、td connector:issueコマンドで--auto-create-tableオプションを使用してデータベースとテーブルを自動作成します:
$ td connector:issue load.yml --database td_sample_db --table td_sample_table --time-column created_at --auto-create-tableData Connectorはサーバー側でレコードをソートしません。時間ベースのパーティション化を効果的に使用するには、事前にファイル内のレコードをソートしてください。
timeというフィールドがある場合は、--time-columnオプションを指定する必要はありません。
$ td connector:issue load.yml --database td_sample_db --table td_sample_table増分SFTPファイルインポートのために定期的なData Connector実行をスケジュールできます。高可用性を確保するために、スケジューラーを慎重に設定しています。この機能を使用することで、ローカルデータセンターでcronデーモンを使用する必要がなくなります。
スケジュールされたインポートの場合、SFTPのData Connectorは、指定されたプレフィックスに一致するすべてのファイル(例: path_prefix: path/to/sample_ –> path/to/sample_201501.csv.gz, path/to/sample_201502.csv.gz, …, path/to/sample_201505.csv.gz)を最初にインポートし、次の実行のために最後のパス(path/to/sample_201505.csv.gz)を記憶します。
2回目以降の実行では、アルファベット順(辞書順)で最後のパスの後に来るファイルのみをインポートします。(path/to/sample_201506.csv.gz, …)
td connector:createコマンドを使用して新しいスケジュールを作成できます。以下が必要です: スケジュールの名前、cronスタイルのスケジュール、データが保存されるデータベースとテーブル、およびData Connector設定ファイル。
$ td connector:create
 daily_import
 "10 0 * * *"
 td_sample_db
 td_sample_table
 load.yml
Treasure Dataのストレージは時間でパーティション化されているため、--time-columnオプションを指定することをお勧めします。
$ td connector:create
 daily_import
 "10 0 * * *"
 td_sample_db
 td_sample_table
 load.yml
--time-column created_atcronパラメータは、3つの特別なオプション:@hourly、@daily、および@monthlyも受け入れます。
デフォルトでは、スケジュールはUTCタイムゾーンで設定されます。-tまたは--timezoneオプションを使用して、タイムゾーンでスケジュールを設定できます。--timezoneオプションは、'Asia/Tokyo'、'America/Los_Angeles'などの拡張タイムゾーン形式のみをサポートします。PST、CSTなどのタイムゾーンの略語はサポートされていません。予期しないスケジュールになる可能性があります。
td connector:listコマンドを実行することで、現在スケジュールされているエントリのリストを表示できます。
$ td connector:listtd connector:showは、スケジュールエントリの実行設定を表示します。
$ td connector:show daily_import
Name  : daily_import
Cron  : 10 0 * * *
Timezone : UTC
Delay : 0
Database : td_sample_db
Table : td_sample_table
Config
---
in:
  type: sftp
  host: HOST
  port: <PORT, default is 22>
  auth_method: password
  user: USER
  password: PASSWORD
  path_prefix: /sftp/file/path/prefix
  parser:
 charset: UTF-8
 ...
td connector:historyは、スケジュールエントリの実行履歴を表示します。個々の実行の結果を調査するには、td job jobidを使用します。
% td connector:history daily_importSFTPサーバーからファイルをインポートするサンプルワークフローについては、Treasure Boxesをご覧ください。