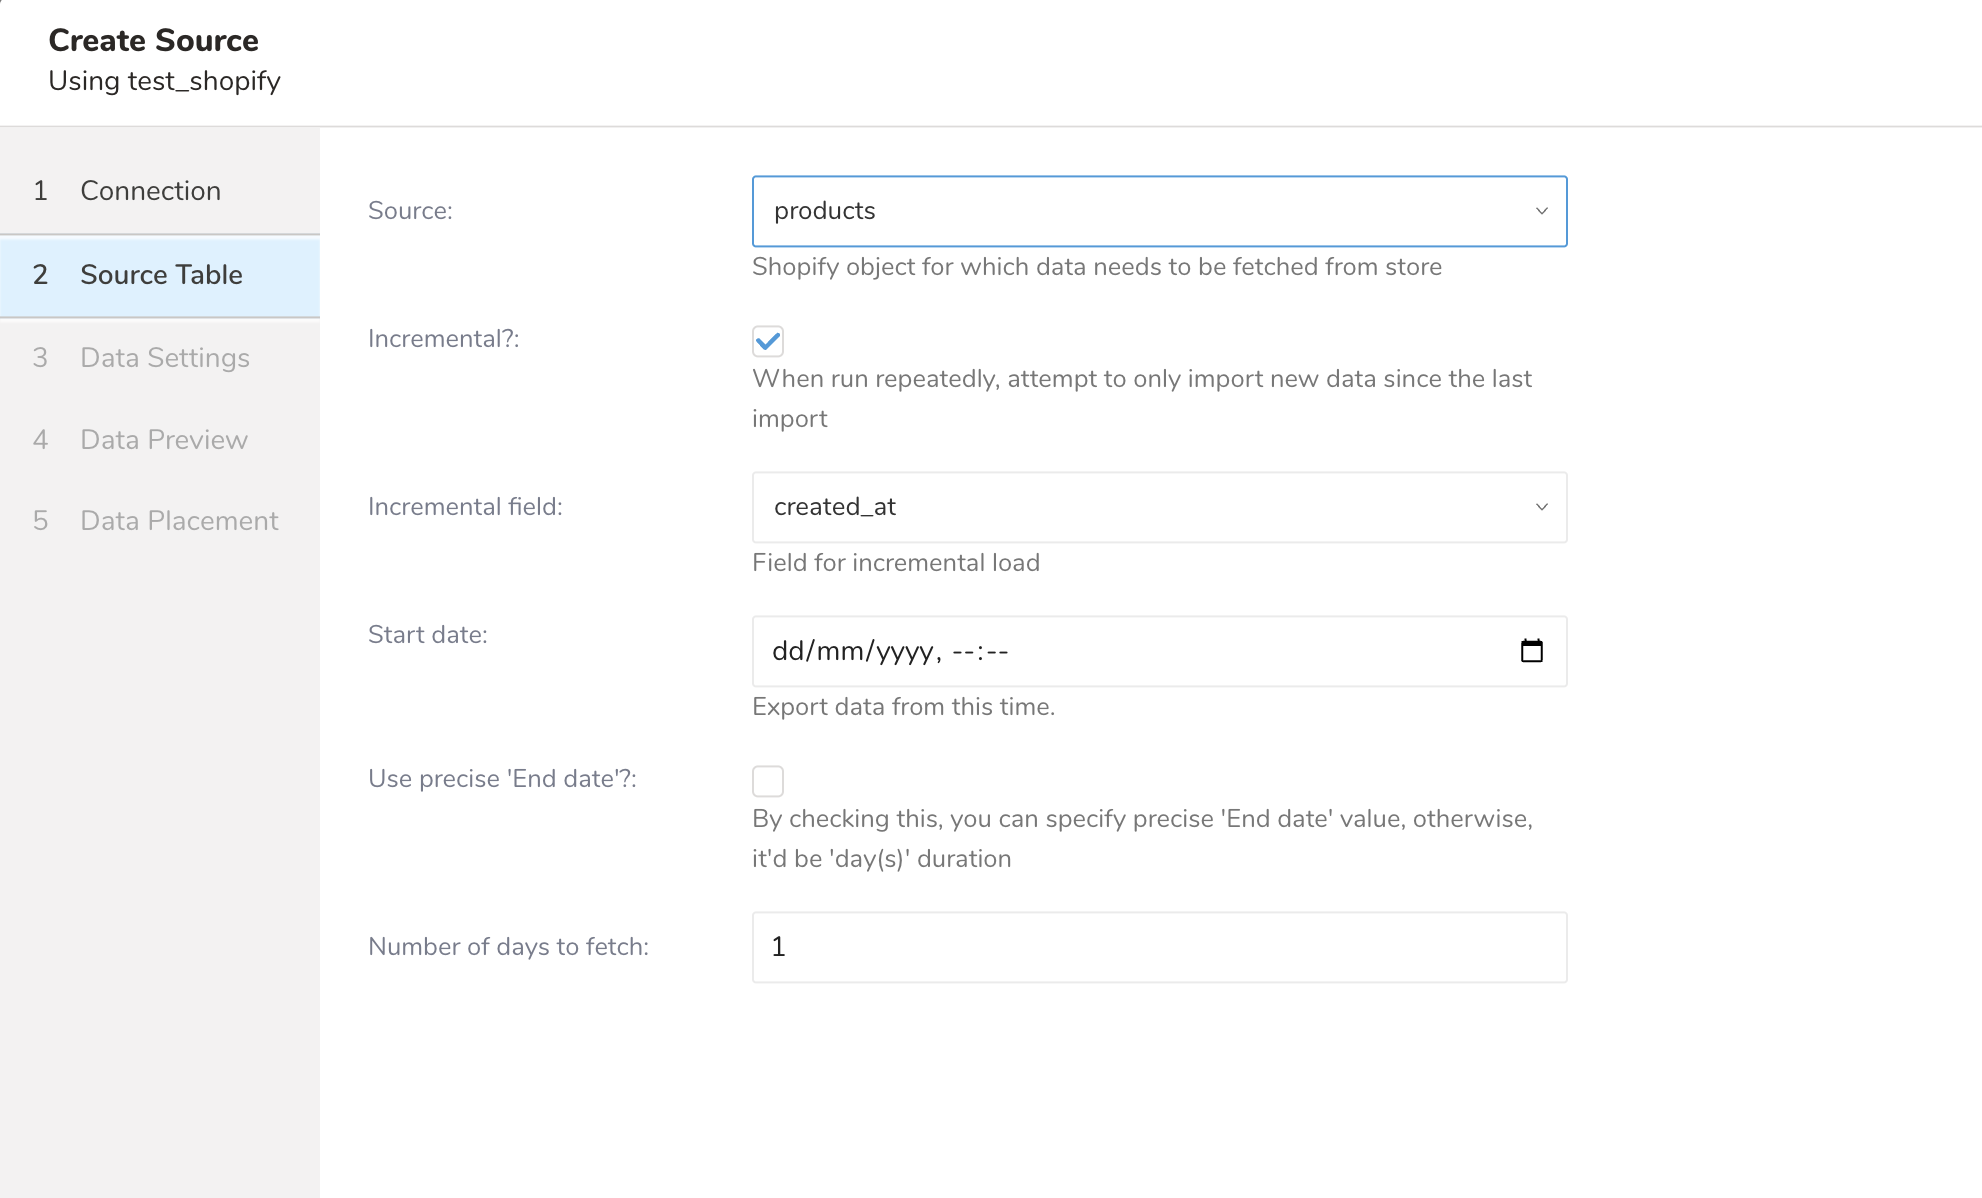
Shopify Import Integrationでは、TD CLIを使用して接続を設定できます。
ターミナルを開き、以下のコマンドを実行して最新のTreasure Data Toolbeltをインストールします。
$ td --version
0.15.0次の例に示すように、Shopifyアカウントのアクセス情報を使用して、ロードファイル(例:load.yml)を準備します。
in:
  type: shopify
  apikey: xxxxxxxx
  password: xxxxxxx
  target: products
  store_name: xxxxxxx
  from_date: '2016-09-07'
  fetch_days: 2 (optional)  incremental_field: created_at
out:
  mode: replace
この例は、Shopify Productオブジェクトのダンプを示しています。API Keyとpasswordの値は、Shopifyによって提供される有効なAPI Keyとpasswordです。store_nameの値は、データを取得する必要があるストアの名前です。targetオプションを使用して、ストアからデータを取得する必要があるオブジェクトをShopifyで指定できます。
in:
  type: shopify
  apikey: xxxxxxxx
  password: xxxxxxx
  target: orders
  store_name: xxxxxxx
  from_date: '2016-09-07T00:00:00.000Z'
  to_date: '2016-09-07T01:00:00.000Z' # 1-hour duration
  incremental_field: created_at
out:
  mode: replace
この例は、2016年9月7日午前0時から2016年9月7日午前1時までのShopify Orderオブジェクトのダンプを指定する方法を示しています。
Shopify認証情報を取得するには、次の手順を実行します。
- https://www.shopify.com/でサインアップして、ユーザー用のオンラインストアを作成します。
- ユーザーに関する詳細を入力します。
- ビジネスに関する追加の詳細を入力します。
- プライベートアプリを作成します。
- ユーザーは、ストアのAPI認証情報を確認して使用し、さまざまな外部アプリケーションと接続できます。
次の表は、Shopify import integrationの設定パラメータについて説明しています。
| Name | Description | Value | Default Value | Required |
|---|---|---|---|---|
| type | インポートのソース。 | "shopify" | Yes | |
| apikey | Shopifyが提供するAPI Key。 | String. | Yes | |
| password | Shopifyが提供するpassword。 | String. | Yes | |
| store_name | レコードを取得するShopifyストア名。スペースは使用せず、ハイフン(-)を使用します。 | String. | Yes | |
| target | ストアからデータを取得する必要があるShopifyオブジェクト。サポートされているターゲットは、products、customers、transactions、orders、inventory、metafieldsです。 | String. | Yes | |
| order_status | インポートする注文ステータスを指定します。指定されていない場合、デフォルトはopenです。サポートされているステータス:open、any、closed、canceled。 | String. | "open" | No |
| retry_initial_wait_msec | 指定されたターゲットのShopify APIを呼び出してデータを取得するための各リトライロジックの初期待機時間(ミリ秒単位)を提供するパラメータ。 | Integer. | No | |
| retry_limit | 指定されたターゲットのShopify APIを呼び出してデータを取得する試行回数を提供するパラメータ。 | Integer. | No | |
| max_retry_wait_msec | 指定されたターゲットのShopify APIを呼び出してデータを取得する各リトライの最大待機時間(ミリ秒単位)を提供するパラメータ。 | Integer. | No | |
| from_date | レコードを取得する日時を指定するパラメータ。incrementalがfalseに設定されている場合、products、customers、transactions、ordersオブジェクトからデータをインポートするときにcreated_atがfrom_dateと見なされます。 | Date. (Date Format : yyyy-MM-dd or yyyy-MM-dd'T'hh:mm:ss.SSS'Z') | Yes | |
to_date | レコードを取得する許容期間を指定するパラメータ。(Date Format : yyyy-MM-dd'T'hh:mm:ss.SSS'Z')。
incrementalモードでは、from_dateとto_dateは初期インポートパラメータに基づいて自動的に計算されます。
| Date. (Date Format : yyyy-MM-dd or yyyy-MM-dd'T'hh:mm:ss.SSS'Z') | No. (省略した場合、data connectorはfetch_days設定によって期間を計算します) | |
| fetch_days | to_dateが指定されていない場合、このパラメータはfrom_dateからレコードを取得する期間を計算するために使用されます。 | Integer. | 1 | No |
| incremental | trueの場合、このパラメータはインクリメンタルロードを有効にします。 | Boolean。 | False | いいえ |
| incremental_field | インクリメンタルロードに使用するフィールド。サポートされるフィールド: created_at または updated_at。「transactions」ターゲットは updated_at をサポートしていません。 | String。 | "created_at" | いいえ |
| metafield_resource | メタフィールドを取得するShopifyリソース。 | String。サポートされるリソース: product、customer、order、online store、shop。 | はい(ターゲットがmetafieldsの場合) | |
| product_objects | メタフィールドを取得するproductのShopifyサブオブジェクト。 | String。サポートされるproductサブオブジェクト: product、product variant、product image、collection。 | "product" | はい(ターゲットがmetafieldsで、metafield_resourceがproductの場合) |
| date_type | メタフィールドに使用するフィールド。サポートされるフィールド: created_at または updated_at。 | String。 | はい(ターゲットがmetafieldsの場合) | |
| product_ids | メタフィールドを取得するプロダクトIDのリスト。カンマ区切り。 | String。 | はい(ターゲットがmetafieldsで、metafield_resourceがproductで、product_objectsがproductの場合) | |
| product_variant_ids | メタフィールドを取得するバリアントIDのリスト。カンマ区切り。 | String。 | はい(ターゲットがmetafieldsで、metafield_resourceがproductで、product_objectsがproduct_variantの場合) | |
| product_image_ids | メタフィールドを取得する画像IDのリスト。カンマ区切り。 | String。 | はい(ターゲットがmetafieldsで、metafield_resourceがproductで、product_objectsがproduct_imageの場合) | |
| collection_ids | メタフィールドを取得するコレクションIDのリスト。カンマ区切り。 | String。 | はい(ターゲットがmetafieldsで、metafield_resourceがproductで、product_objectsがcollectionの場合) | |
| customer_ids | メタフィールドを取得するカスタマーIDのリスト。カンマ区切り。 | String。 | はい(ターゲットがmetafieldsで、metafield_resourceがcustomerの場合) | |
| order_objects | メタフィールドを取得するorderのShopifyサブオブジェクト。 | String。サポートされるorderサブオブジェクト: order、draft order | "order" | はい(ターゲットがmetafieldsで、metafield_resourceがorderの場合) |
| order_ids | メタフィールドを取得するオーダーIDのリスト。カンマ区切り。 | String。 | はい(ターゲットがmetafieldsで、metafield_resourceがorderで、order_objectsがorderの場合) | |
| draft_order_ids | メタフィールドを取得する下書きオーダーIDのリスト。カンマ区切り。 | String。 | はい(ターゲットがmetafieldsで、metafield_resourceがorderで、order_objectsがdraft_orderの場合) | |
| online_store_objects | メタフィールドを取得するonline storeのShopifyサブオブジェクト。 | String。サポートされるonline_storeサブオブジェクト: blog、article、page | "blog" | はい(ターゲットがmetafieldsで、metafield_resourceがonline_storeの場合) |
| blog_ids | メタフィールドを取得するブログIDのリスト。カンマ区切り。 | String。 | はい(ターゲットがmetafieldsで、metafield_resourceがonline_storeで、order_objectsがblogの場合) | |
| article_ids | メタフィールドを取得する記事IDのリスト。カンマ区切り。 | String。 | はい(ターゲットがmetafieldsで、metafield_resourceがonline_storeで、order_objectsがarticleの場合) | |
| page_ids | メタフィールドを取得するページIDのリスト。カンマ区切り。 | String。 | はい(ターゲットがmetafieldsで、metafield_resourceがonline_storeで、order_objectsがpageの場合) | |
| fetch_all_customers_metafields | すべての顧客のメタフィールドのダウンロードを有効にします。customer_idsと連携します。 | String。 | いいえ |
サポートされるターゲットは、products、customers、transactions、orders、inventory、およびmeta fieldsです。


サポートされているオブジェクト: Inventory Items, Locations, Inventory Levels   

サポートされているリソース: product, customer, order, online store, shop  リソース Product とオブジェクト ID  リソース Customer とオブジェクト ID  リソース Order とオブジェクト ID  リソース Online Store とオブジェクト ID  リソース Shop とオブジェクト ID 
td connector:preview コマンドを使用して、インポートされるデータをプレビューできます。
$ td connector:preview load.yml
+---------+--------------+------------------+----
| id:long | title:string | body_html:string | ...
+---------+--------------+------------------+----
| 1       | "33"         | pbody_htmlp  |
| 2       | "34"         | pbody_htmlp  |
| 3       | "35"         | pbody_htmlp  |
| 4       | "36"         | pbody_htmlp  |
| 6       | "37"         | pbody_htmlp  |
+---------+--------------+------------------+----ロードジョブを送信します。データサイズによっては数時間かかることがあります。ユーザーは、データが保存されるデータベースとテーブルを指定する必要があります。
Treasure Data のストレージは時間によってパーティション分割されているため(Data Partitioning も参照)、--time-column オプションを指定することを推奨します。このオプションが指定されていない場合、データコネクタは最初の long または timestamp カラムをパーティショニング時間として選択します。--time-column で指定されたカラムのタイプは、long または timestamp のいずれかである必要があります。
データに時間カラムがない場合は、add_time フィルターオプションを使用して追加できます。詳細は add_time filter plugin を参照してください。
$ td connector:issue load.yml --database td_sample_db --table td_sample_table --time-column created_at上記のコマンドは、既に database(td_sample_db) と table(td_sample_table) を作成していることを前提としています。データベースまたはテーブルが TD に存在しない場合、このコマンドは失敗します。データベースとテーブルを手動で作成するか、td connector:issue コマンドで --auto-create-table オプションを使用してデータベースとテーブルを自動作成してください。
$ td connector:issue load.yml --database td_sample_db --table td_sample_table --time-column created_at --auto-create-table| "--time-column" オプションで、Time Format カラムを「パーティショニングキー」に割り当てることができます。 |
定期的な Shopify インポートのために、定期的なデータコネクタ実行をスケジュールできます。Treasure Data のスケジューラーのロード分散と運用は、高可用性を実現するために最適化されています。Treasure Data のスケジューラーを使用することで、ローカルデータセンターに cron デーモンを配置する必要がなくなります。
新しいスケジュールは、td connector:create コマンドを使用して作成できます。スケジュールの名前、cron 形式のスケジュール、データが保存されるデータベースとテーブル、およびデータコネクタ設定ファイルを指定します。これらの値は必須です。
$ td connector:create \
    daily_shopify_import \
    "10 0 * * *" \
    td_sample_db \
    td_sample_table \
    load.yml
cron パラメータは、@hourly、@daily、@monthly の3つのオプションも受け入れます。 |
デフォルトでは、スケジュールは UTC タイムゾーンで設定されます。-t または --timezone オプションを使用して、タイムゾーンでスケジュールを設定できます。--timezone オプションは、'Asia/Tokyo'、'America/Los Angeles' などの拡張タイムゾーン形式のみをサポートします。PST や CST などのタイムゾーンの略語はサポートされておらず、予期しないスケジュールになる可能性があります。
td connector:list でスケジュールされたエントリのリストを確認できます。
$ td connector:list
+-----------------------+--------------+----------+-------+--------------+-----------------+----------------------------+
| Name                  | Cron         | Timezone | Delay | Database     | Table           | Config                     |
+-----------------------+--------------+----------+-------+--------------+-----------------+----------------------------+
| daily_shopify_import  | 10 0 * * *   | UTC      | 0     | td_sample_db | td_sample_table | {"type"=>"shopify", ... }  |
+-----------------------+--------------+----------+-------+--------------+-----------------+----------------------------+td connector:show は、スケジュールエントリの実行設定を表示します。
% td connector:show daily_shopify_import
Name     : daily_shopify_import
Cron     : 10 0 * * *
Timezone : UTC
Delay    : 0
Database : td_sample_db
Table    : td_sample_table
td connector:history は、スケジュールエントリの実行履歴を表示します。個々の実行の結果を調査するには、td job jobid を使用してください。
% td connector:history daily_shopify_import
+--------+---------+---------+--------------+-----------------+----------+---------------------------+----------+
| JobID  | Status  | Records | Database     | Table           | Priority | Started                   | Duration |
+--------+---------+---------+--------------+-----------------+----------+---------------------------+----------+
| 578066 | success | 10000   | td_sample_db | td_sample_table | 0        | 2015-04-18 00:10:05 +0000 | 160      |
| 577968 | success | 10000   | td_sample_db | td_sample_table | 0        | 2015-04-17 00:10:07 +0000 | 161      |
| 577914 | success | 10000   | td_sample_db | td_sample_table | 0        | 2015-04-16 00:10:03 +0000 | 152      |
| 577872 | success | 10000   | td_sample_db | td_sample_table | 0        | 2015-04-15 00:10:04 +0000 | 163      |
| 577810 | success | 10000   | td_sample_db | td_sample_table | 0        | 2015-04-14 00:10:04 +0000 | 164      |
| 577766 | success | 10000   | td_sample_db | td_sample_table | 0        | 2015-04-13 00:10:04 +0000 | 155      |
| 577710 | success | 10000   | td_sample_db | td_sample_table | 0        | 2015-04-12 00:10:05 +0000 | 156      |
| 577610 | success | 10000   | td_sample_db | td_sample_table | 0        | 2015-04-11 00:10:04 +0000 | 157      |
+--------+---------+---------+--------------+-----------------+----------+---------------------------+----------+
8 rows in settd connector:delete はスケジュールを削除します。
$ td connector:delete daily_shopify_importデータ配置については、データを配置するターゲットデータベースとテーブルを選択し、インポートを実行する頻度を指定します。
Next を選択します。Storage の下で、新しいデータベースを作成するか既存のデータベースを選択し、インポートしたデータを配置する新しいテーブルを作成するか既存のテーブルを選択します。
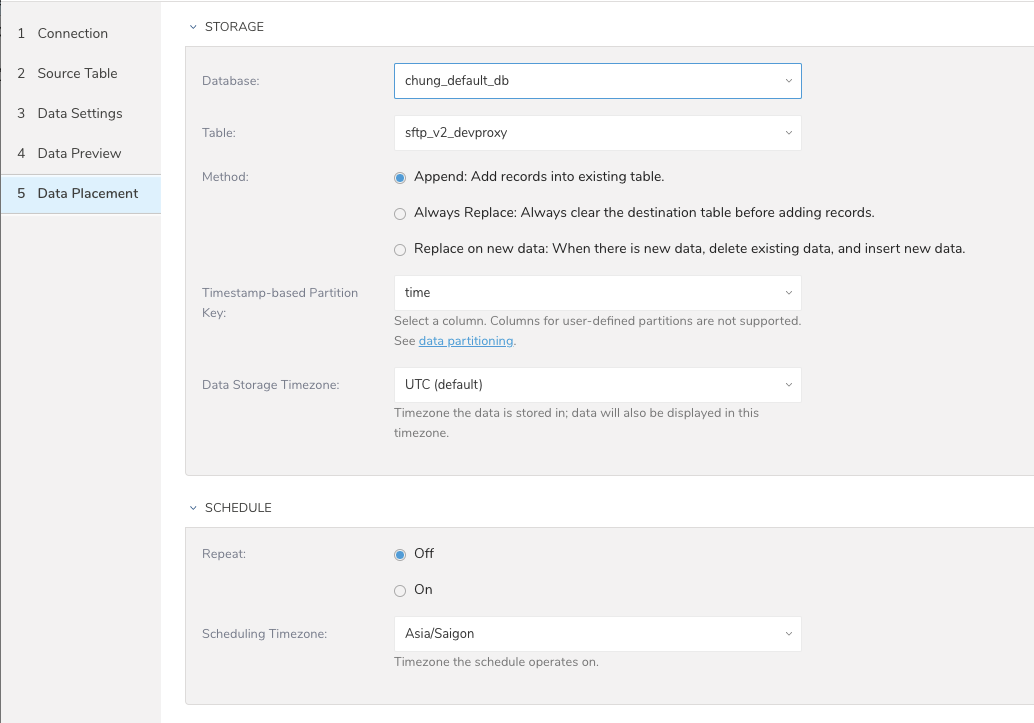
Database を選択 > Select an existing または Create New Database を選択。
オプションで、データベース名を入力します。
Table を選択 > Select an existing または Create New Table を選択。
オプションで、テーブル名を入力します。
データをインポートする方法を選択します。
- Append(デフォルト)- データインポートの結果がテーブルに追加されます。 テーブルが存在しない場合は、作成されます。
- Always Replace - クエリの結果出力で既存のテーブルの内容全体を置き換えます。テーブルが存在しない場合は、新しいテーブルが作成されます。
- Replace on New Data - 新しいデータがある場合にのみ、結果出力で既存のテーブルの内容全体を置き換えます。
Timestamp-based Partition Key カラムを選択します。 デフォルトキーとは異なるパーティションキーシードを設定する場合は、long または timestamp カラムをパーティショニング時間として指定できます。デフォルトの時間カラムとして、add_time フィルターで upload_time を使用します。
データストレージの Timezone を選択します。
Schedule の下で、このクエリを実行するタイミングと頻度を選択できます。
- 一度実行:
- Off を選択。
- Scheduling Timezone を選択。
- Create & Run Now を選択。
クエリを繰り返す:
- On を選択。
- Schedule を選択。UI には、@hourly、@daily、@monthly、またはカスタム cron の4つのオプションがあります。
- Delay Transfer を選択して、実行時間の遅延を追加することもできます。
- Scheduling Timezone を選択。
- Create & Run Now を選択。
転送が実行された後、Data Workbench > Databases で転送の結果を確認できます。