Treasure DataでTableau Serverを使用すると、膨大な量のデータをインタラクティブに探索し、組織全体でデータ情報を共有できます。
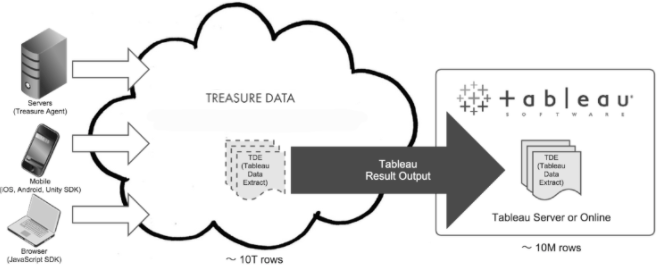
Tableau Serverへのエクスポートのサンプルワークフローについては、Treasure Boxesを参照してください。
- Treasure Dataの基本知識。
- Tableau Serverのライセンスとそのインストール。
- HTTPS(SSL)を設定する必要があります。Tableau ServerでSSLを設定してください。
Tableauはタイムスタンプの小数秒をサポートしていません。クエリでTIMESTAMP型にキャストする前に、小数秒を削除してください(例: subtle()関数を使用)。
最大結果レコードは250,000,000レコードです。これを超えると、ログに次のメッセージが表示されます: Extract file records limit exceeded: 250000000.
最小のTimestamp値は1000-01-01 00:00:00です。これを超えると、ログに無効な日付値メッセージが表示されます。
REST API経由でTableau Server 10.5に公開された.hyperエクストラクトは、Tableau Consoleで.tdeファイル拡張子を持ちます。これらのエクストラクトは依然として.hyperファイル形式であり、他の.hyperエクストラクトと同様に機能します。この問題は2018.1で修正されています。詳細: Tableau Server 2018.1 Release Notes (Issue ID 754677を検索)
ネストされたProjectに属するData SourceはREST APIを使用して追加できません。Resource Not Foundエラーが返されます。Replaceモードにはこの問題はありません。修正はTableau Server 2018.1.4で予定されています。このエラーが発生した場合は、最新バージョンのTableau Serverにアップグレードすることをお勧めします。
PATで認証する場合、そのPATを使用して一度に1つのプロセスしか実行できません(ユーザー名とパスワードで認証する場合とは異なります)。最初のジョブがまだ実行中に同じPATを使用して2番目の認証を実行すると、最初のジョブの認証/承認が削除され、エラーが発生します。 ジョブログに次のメッセージが表示されます:
2021-12-26 07:55:47.926 +0000 [WARN] (0001:transaction): Retrying 2/7 after 2 seconds. Message: javax.ws.rs.WebApplicationException: HTTP 401 Unauthorized
....
2021-12-26 07:57:53.523 +0000 [ERROR] (main): org.embulk.util.retryhelper.RetryGiveupException: java.lang.NullPointerException
Tableauは、Tableau製品スイート全体でTDEファイル形式のサポートを廃止します。2022年6月に2022.2のリリースから、Tableau OnlineとPublicはTDEコンテンツの公開を許可しなくなります。2023年3月にリリース2023.1から、Tableau Server、Desktop、PrepはTDEファイル形式をサポートしなくなります。
TableauはHyperと呼ばれるテクノロジーでデータエンジンを更新しました。これを活用するには、既存のTreasure Data出力設定を更新する必要があります。新しいTreasure Data設定は自動的に最新バージョンを使用します。
既存の設定をアップグレードするには:
- Queriesに移動し、スケジュールされたクエリを選択します。
- Query Editorで、Export Resultsターゲットを選択します。
- 保存済みのTableau接続を選択します。
- Site IDの値を入力します。これはマルチテナントTableau Serverに必須です(デフォルトサイトにサインインする場合は空のままにします)。
- Data Source Typeに'hyper'を選択します。
- Doneを選択して設定を保存します。
レガシーTableauから現在のTableauに移行する場合、タイムゾーン設定を変更する必要はありません。デフォルト値(UTC)のままにすることができます。この記事のtimezoneも参照してください。
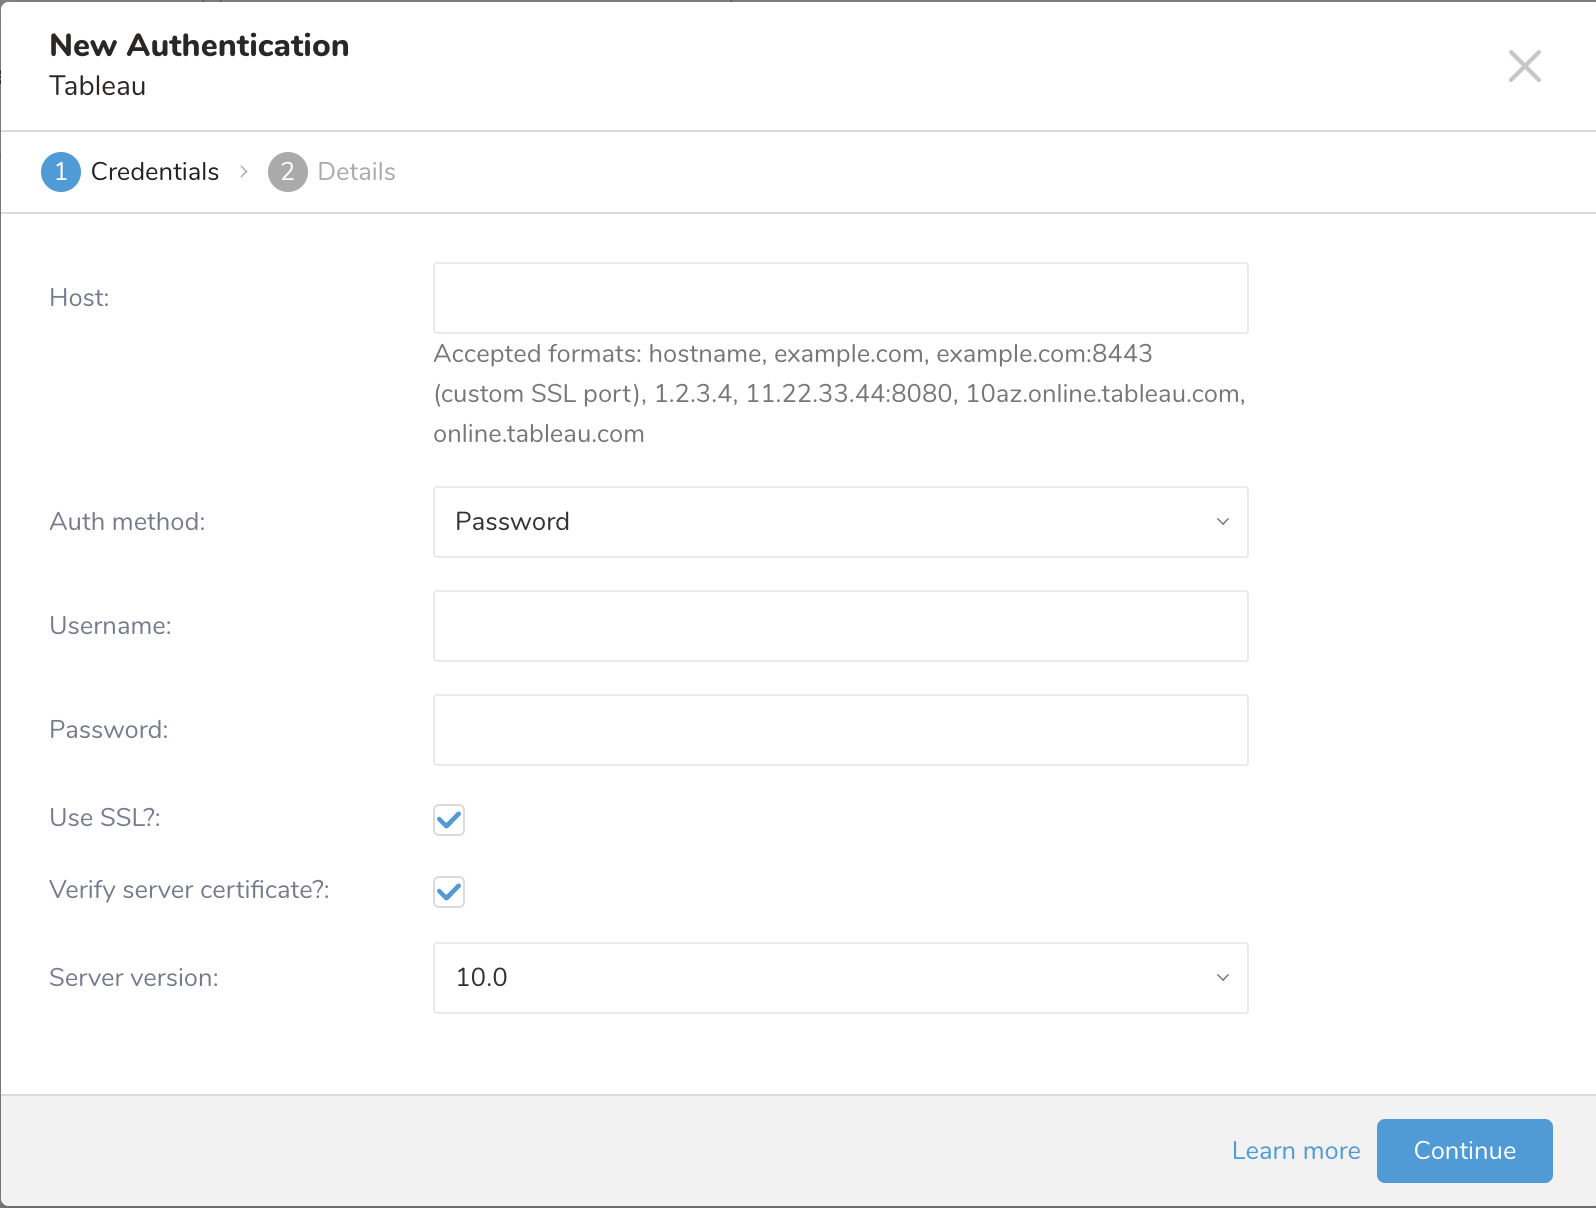
Tableauアプリ内のコマンドラインから、またはTableau管理者から、次の情報を取得します:
- Host
- Username
- Password
- Server Version
Tableauに接続するためのユーザープロファイルには、読み取りとエクスポートの権限が必要です。
site属性に使用する値を決定するには、Tableau Serverにサインインし、URLの/site/の後に表示される値を確認します。たとえば、次のURLでは、siteの値はMarketingTeamです:
https://MyServer/#/site/MarketingTeam/projects
site属性が空の文字列の場合、デフォルトサイトにサインインしています。サインイン時にサイトを指定しない場合でも、常に特定のサイトにサインインしています。
Tableau ServerのREST APIリファレンスを読んでください。
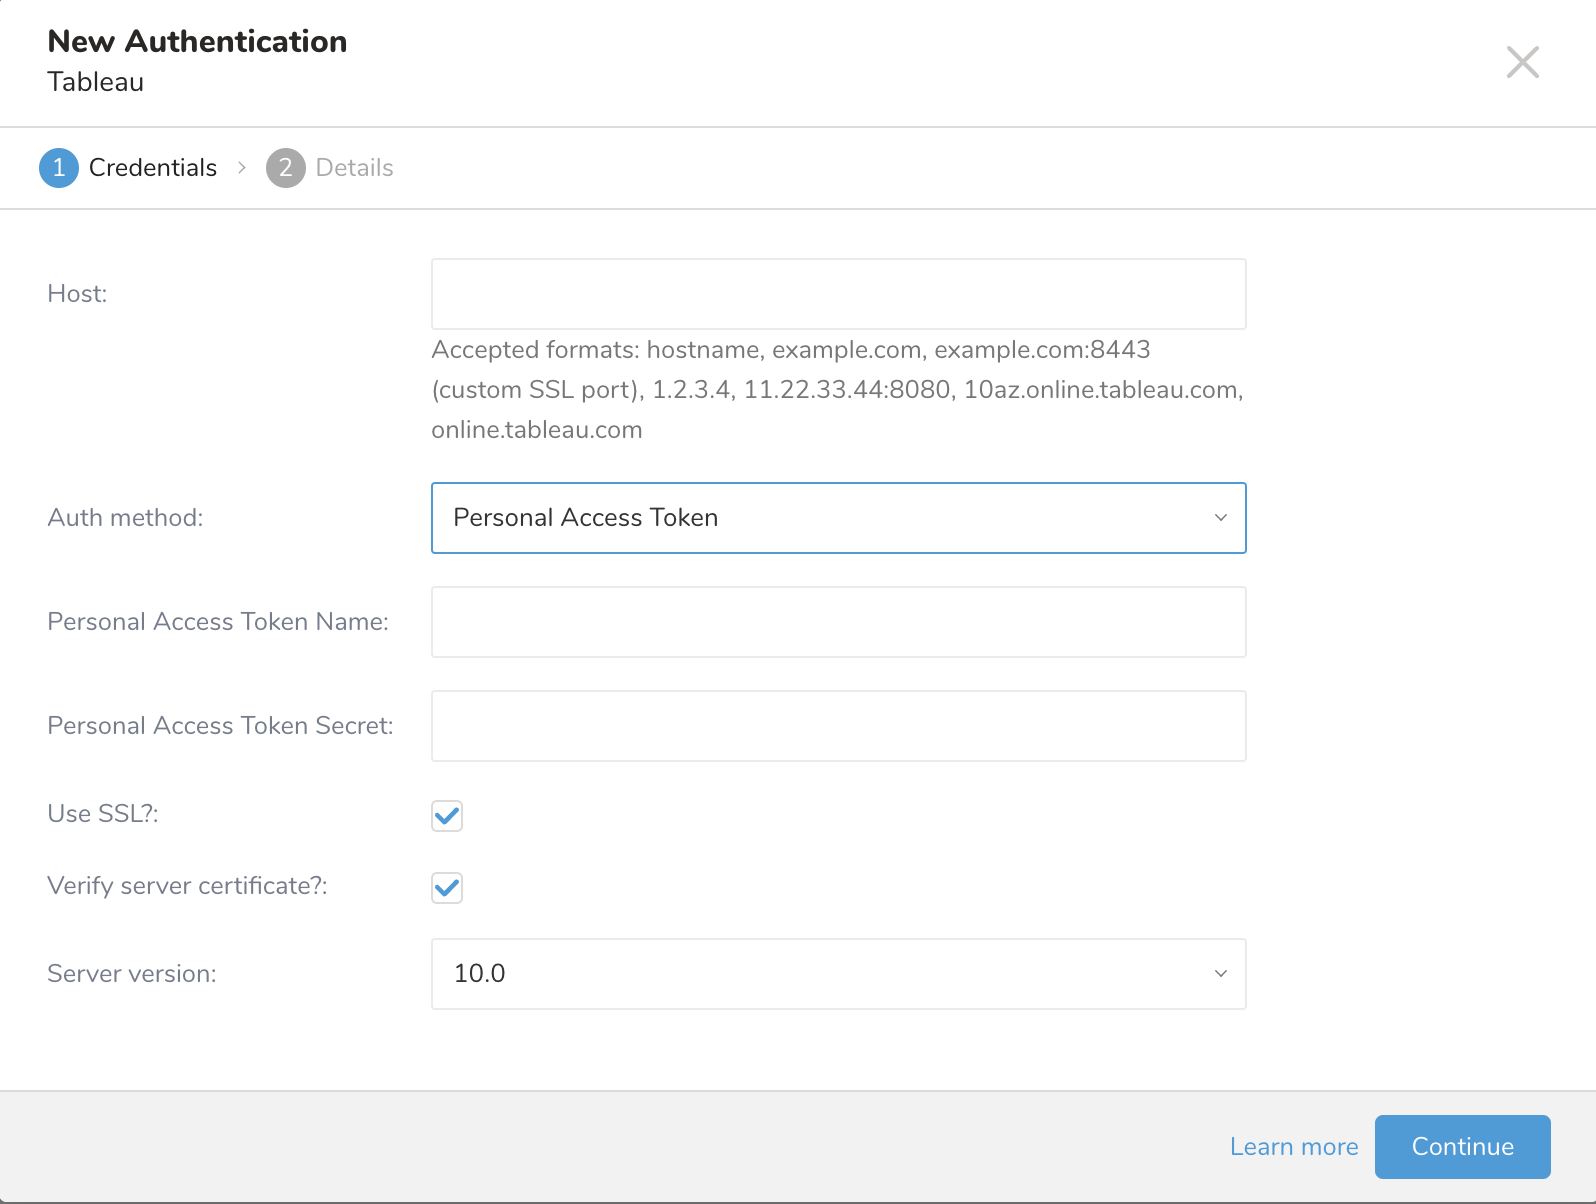
Tableau OnlineのUser/Passwordによる認証方法は廃止され、PAT(personal access token)に置き換えられました。
PATを取得するには: https://help.tableau.com/current/pro/desktop/en-us/useracct.htm#create-and-revoke-personal-access-tokens
Tableau Serverには少なくとも1つの'Default'プロジェクトが必要です。このプロジェクトは削除または名前変更できません。Project Nameオプションを省略すると、'Default'プロジェクトが使用されます。
一部のまれなケース、主に英語以外のTableau Serverでは、'Default'プロジェクト名がローカライズされており、Project Nameを指定しないとジョブが失敗します(名前として'Default'を持つプロジェクトが見つからなかったため)。
クエリを実行する前に、Treasure Dataでデータ接続を作成して設定する必要があります。データ接続の一部として、統合にアクセスするための認証を提供します。
TD Consoleを開きます。
Integrations Hub > Catalogに移動します。
Tableauを検索して選択します。
Create Authenticationを選択します。
認証するための認証情報を入力します。
接続の名前を入力します。
Doneを選択します。
| Parameter | Values | Description |
|---|---|---|
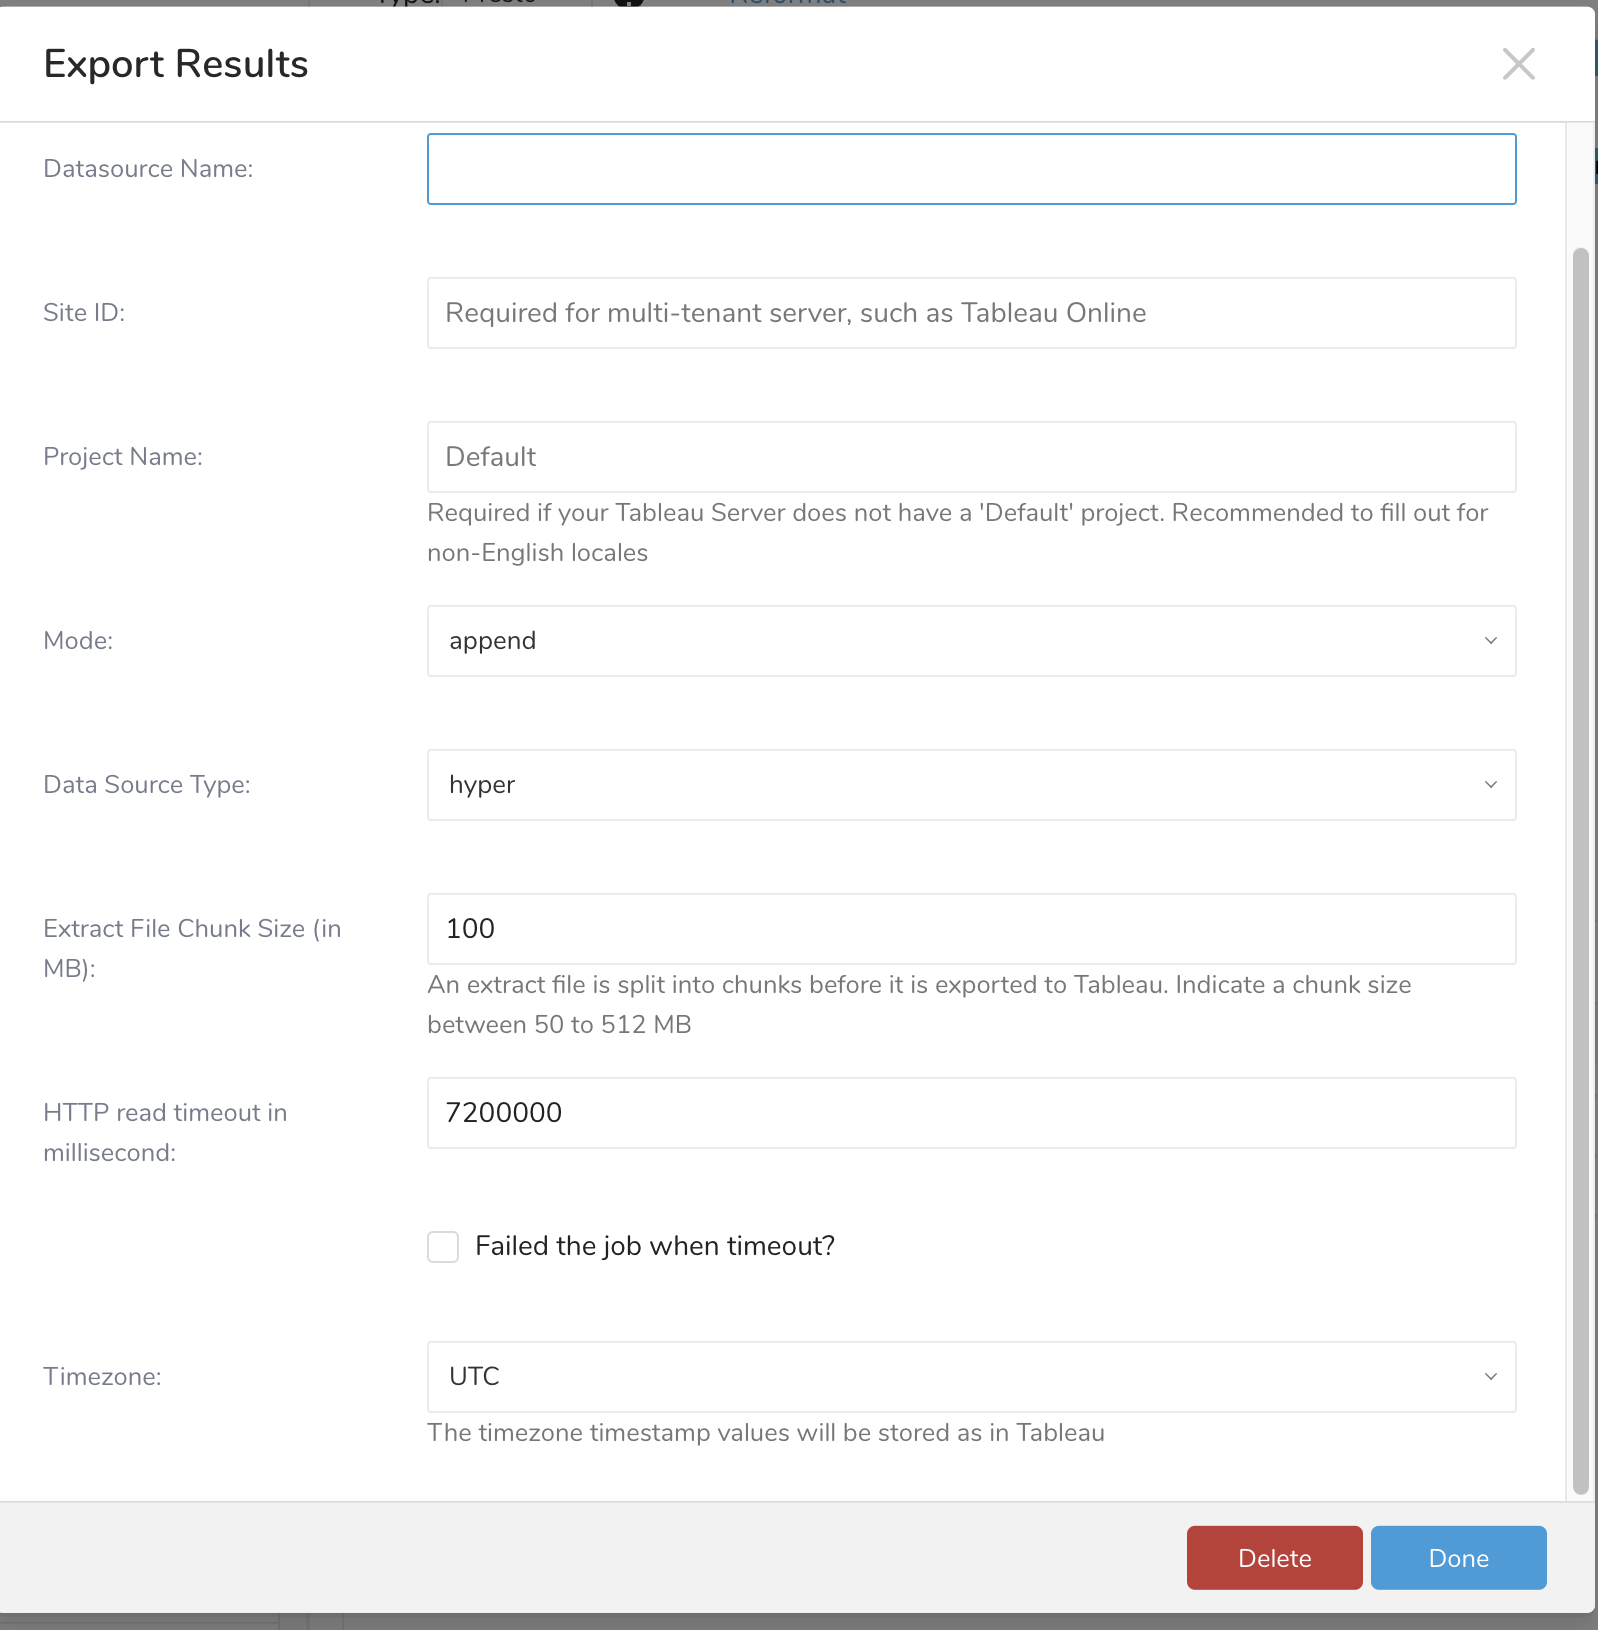
| Datasource Name | このデータエクスポートに使用する名前。 | |
| Site ID | Tableau Onlineなどのマルチテナントサーバー設定に必要です。特定のSiteがない場合は、Tableau Serverに空文字列を設定します。サインインするサイトのURL(オプション)。site属性に使用する値を決定するには、Tableau Serverにサインインし、URLの/site/の後に表示される値を確認します。たとえば、次のURLでは、siteの値はMarketingTeamです:https://MyServer/#/site/MarketingTeam/projects。site属性が空の文字列の場合、デフォルトサイトにサインインしています。サインイン時にサイトを指定しない場合でも、常に特定のサイトにサインインしています。Tableau Serverの[REST APIリファレンス](https://help.tableau.com/current/api/rest_api/en-us/REST/rest_api_ref.htm#Sign_In?TocPath=API%2520Reference | |
| Project Name | Tableau Serverに'Default'プロジェクトがない場合は必須です。英語以外のロケールの場合は、記入することをお勧めします。Tableau Serverに移動してプロジェクトのリストを取得してください。 | |
| Mode | append replace | replaceは毎回Data Sourceを置き換え、appendは既存のData Sourceに追加します。Append Modeは、Tableauの仕様により、既存のデータソースから挿入されたデータをエクスポートする場合、新しい列を無視します。 |
| Data Source Type | hyper tde | Hyperfilesには、1つ以上のテーブル分のデータが含まれています。tdeはTableauデータ抽出用のファイル形式です。 |
| Extract File Chunk Size | エクストラクトファイルは、Tableauにエクスポートされる前にチャンクに分割されます。50〜512 MBのチャンクサイズを指定します。毎回アップロードされるチャンクファイルサイズ(MB単位)、デフォルト: 200、最小: 100、最大: 1024 | |
| HTTP read timeout | ミリ秒単位の値 | |
| Failed the job when timeout? | チェックすると、データソースの公開タイムアウト時に実行中のジョブが失敗します。 | |
| Timezone | タイムスタンプ値がTableauに保存されるタイムゾーン。Timestamp(タイムゾーン非依存)からTableau DateTime(タイムゾーン依存)に変換する際に使用するTimezone ID。タイムスタンプ値はタイムゾーンに依存しません。たとえば、1548979200。Tableau DateTimeには、日、時、分などが含まれます。コネクタは、タイムスタンプ値からTableau DateTimeに変換するために、ターゲットタイムゾーンを知る必要があります。クエリにTIMESTAMP列が含まれているか、DateTime列をキャストしている場合、値はDateTimeとしてTableauサーバーにエクスポートされます。これは変換があることを意味し、ターゲットタイムゾーンを提供する必要があります。Treasure DataはUTCタイムゾーンを使用してDateTime値を保存します。ほとんどの場合、値を別のタイムゾーンに変換する必要がない限り、Treasure Dataからの値を保持するために、timezoneをデフォルト(UTC)として設定したままにします。 |
次のクエリ例では、アクセスログのサンプルデータセットを使用し、1日あたりのHTTPメソッドの分布を計算します。便宜上、Datetime列をTableauで文字列からTIMESTAMPにキャストします。
HIVE:
SELECT
  CAST(TD_TIME_FORMAT(time, "yyyy-MM-dd 00:00:00") AS TIMESTAMP) AS "dates",
  method AS `Method`,
  COUNT(1) AS `Count`
FROM
  www_access
GROUP BY
  TD_TIME_FORMAT(time, "yyyy-MM-dd 00:00:00"),
  method
PRESTO:
便宜上、PrestoクエリではTD_TIME_STRINGの代わりにTD_TIME_FORMATを使用することをお勧めします。
SELECT
  CAST(TD_TIME_FORMAT(time, 'yyyy-MM-dd 00:00:00') AS TIMESTAMP) AS "dates",
  method AS `Method`,
  COUNT(1) AS `Count`
FROM
  www_access
GROUP BY
  TD_TIME_FORMAT(time, 'yyyy-MM-dd 00:00:00'),
methodYou can use Scheduled Jobs with Result Export to periodically write the output result to a target destination that you specify.
Treasure Data's scheduler feature supports periodic query execution to achieve high availability.
When two specifications provide conflicting schedule specifications, the specification requesting to execute more often is followed while the other schedule specification is ignored.
For example, if the cron schedule is '0 0 1 * 1', then the 'day of month' specification and 'day of week' are discordant because the former specification requires it to run every first day of each month at midnight (00:00), while the latter specification requires it to run every Monday at midnight (00:00). The latter specification is followed.
Navigate to Data Workbench > Queries
Create a new query or select an existing query.
Next to Schedule, select None.

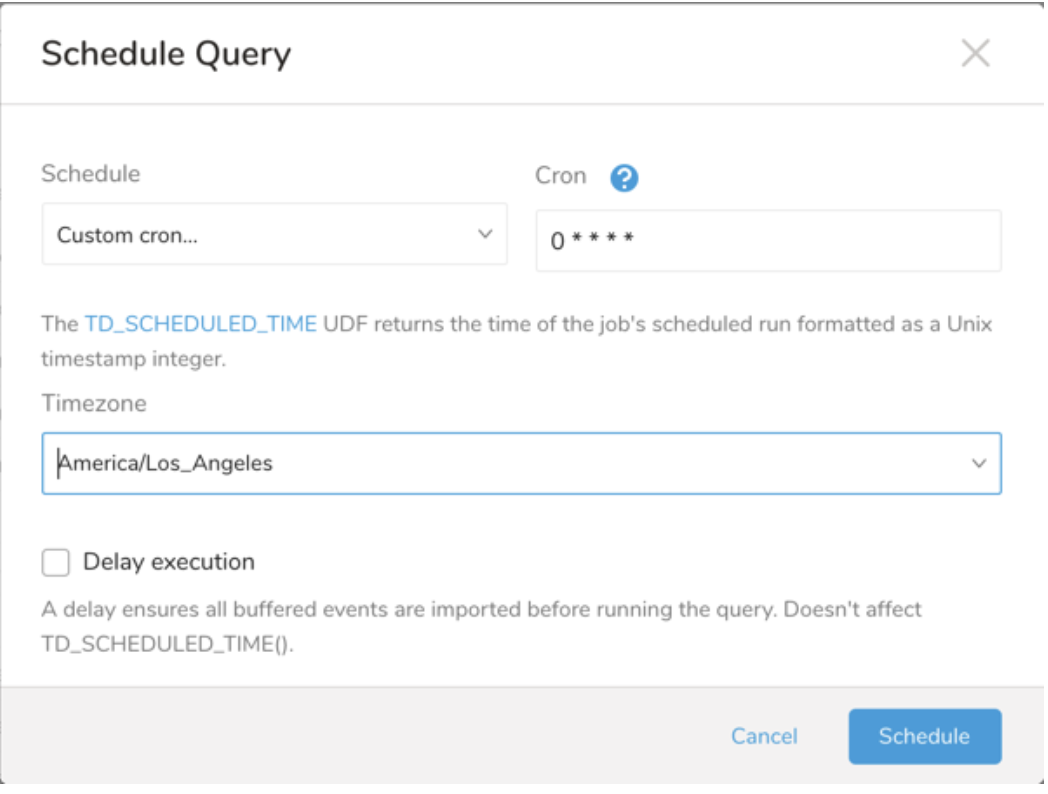
In the drop-down, select one of the following schedule options:
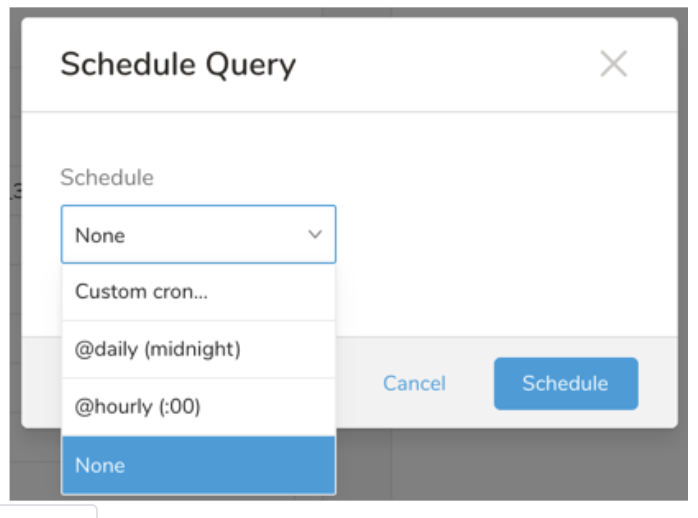
Drop-down Value Description Custom cron... Review Custom cron... details. @daily (midnight) Run once a day at midnight (00:00 am) in the specified time zone. @hourly (:00) Run every hour at 00 minutes. None No schedule.
| Cron Value | Description |
|---|---|
0 * * * * | Run once an hour. |
0 0 * * * | Run once a day at midnight. |
0 0 1 * * | Run once a month at midnight on the morning of the first day of the month. |
| "" | Create a job that has no scheduled run time. |
 *    *    *    *    *
 -    -    -    -    -
 |    |    |    |    |
 |    |    |    |    +----- day of week (0 - 6) (Sunday=0)
 |    |    |    +---------- month (1 - 12)
 |    |    +--------------- day of month (1 - 31)
 |    +-------------------- hour (0 - 23)
 +------------------------- min (0 - 59)
The following named entries can be used:
- Day of Week: sun, mon, tue, wed, thu, fri, sat.
- Month: jan, feb, mar, apr, may, jun, jul, aug, sep, oct, nov, dec.
A single space is required between each field. The values for each field can be composed of:
| Field Value | Example | Example Description |
|---|---|---|
| A single value, within the limits displayed above for each field. | ||
A wildcard '*' to indicate no restriction based on the field. | '0 0 1 * *' | Configures the schedule to run at midnight (00:00) on the first day of each month. |
A range '2-5', indicating the range of accepted values for the field. | '0 0 1-10 * *' | Configures the schedule to run at midnight (00:00) on the first 10 days of each month. |
A list of comma-separated values '2,3,4,5', indicating the list of accepted values for the field. | 0 0 1,11,21 * *' | Configures the schedule to run at midnight (00:00) every 1st, 11th, and 21st day of each month. |
A periodicity indicator '*/5' to express how often based on the field's valid range of values a schedule is allowed to run. | '30 */2 1 * *' | Configures the schedule to run on the 1st of every month, every 2 hours starting at 00:30. '0 0 */5 * *' configures the schedule to run at midnight (00:00) every 5 days starting on the 5th of each month. |
A comma-separated list of any of the above except the '*' wildcard is also supported '2,*/5,8-10'. | '0 0 5,*/10,25 * *' | Configures the schedule to run at midnight (00:00) every 5th, 10th, 20th, and 25th day of each month. |
- (Optional) You can delay the start time of a query by enabling the Delay execution.
Save the query with a name and run, or just run the query. Upon successful completion of the query, the query result is automatically exported to the specified destination.
Scheduled jobs that continuously fail due to configuration errors may be disabled on the system side after several notifications.
(Optional) You can delay the start time of a query by enabling the Delay execution.
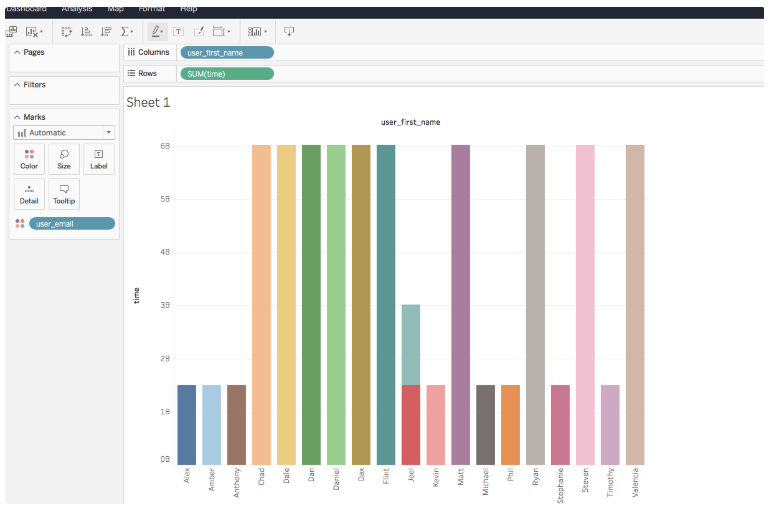
Tableau Serverを開きます。
左上のバーでData Sourcesを選択します。 TDEファイルを含むデータソースのリストを表示できます。

New Workbookを選択して、ブラウザからチャートとダッシュボードを作成します。
グラフを作成するには、左側のナビゲーションからディメンションとメジャーを右上のナビゲーションにドラッグアンドドロップします。
Saveを選択して結果を保存します。
You can also send segment data to the target platform by creating an activation in the Audience Studio.
- Navigate to Audience Studio.
- Select a parent segment.
- Open the target segment, right-mouse click, and then select Create Activation.
- In the Details panel, enter an Activation name and configure the activation according to the previous section on Configuration Parameters.
- Customize the activation output in the Output Mapping panel.
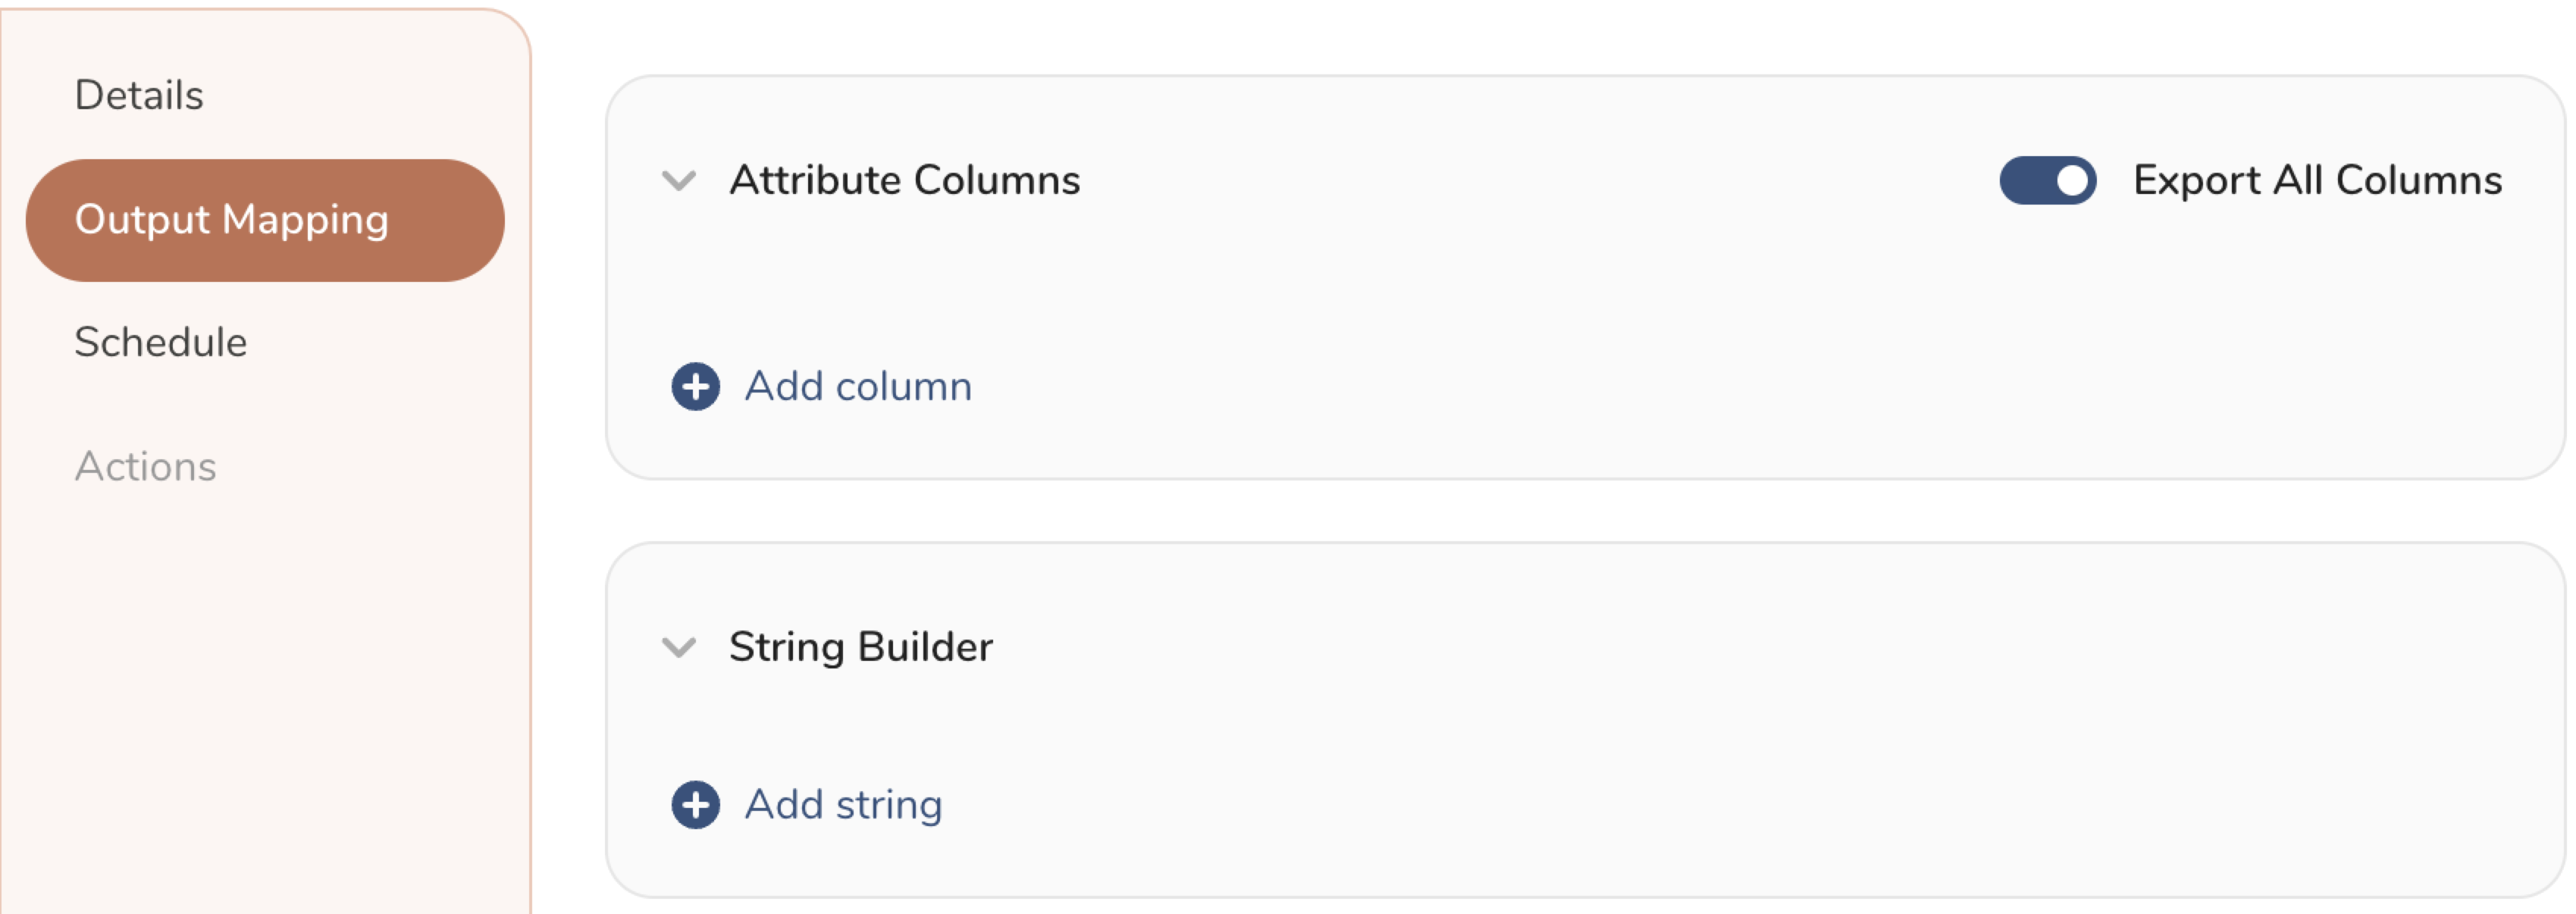
- Attribute Columns
- Select Export All Columns to export all columns without making any changes.
- Select + Add Columns to add specific columns for the export. The Output Column Name pre-populates with the same Source column name. You can update the Output Column Name. Continue to select + Add Columnsto add new columns for your activation output.
- String Builder
- + Add string to create strings for export. Select from the following values:
- String: Choose any value; use text to create a custom value.
- Timestamp: The date and time of the export.
- Segment Id: The segment ID number.
- Segment Name: The segment name.
- Audience Id: The parent segment number.
- + Add string to create strings for export. Select from the following values:
- Set a Schedule.
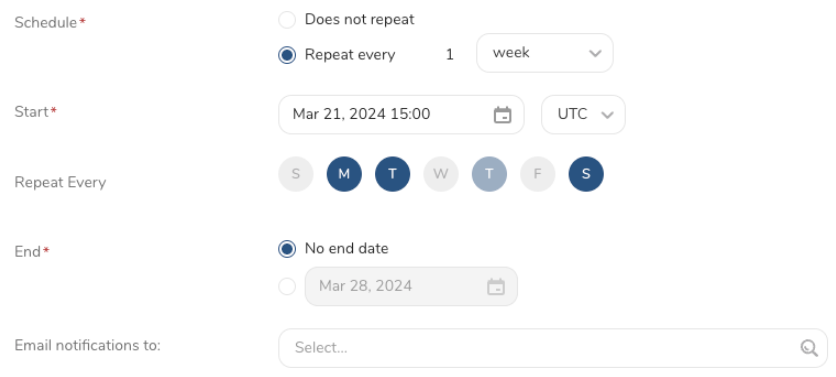
- Select the values to define your schedule and optionally include email notifications.
- Select Create.
If you need to create an activation for a batch journey, review Creating a Batch Journey Activation.
Treasure Workflow内で、このデータコネクタを使用してデータをエクスポートすることを指定できます。
詳細はUsing Workflows to Export Data with the TD Toolbeltを参照してください。
timezone: UTC

_export:
  td:
    database: sample_datasets
  tableau:
    datasource: datasource_name
    site_id: site_id
    project: project_name
    mode: append
    legacy: false
    datasource_type: hyper

+td-result-output-tableau:
  td>: queries/sample.sql
  result_connection: tableau_connection
  result_settings:
    datasource: ${tableau.datasource}
    site: ${tableau.site_id}
    project: ${tableau.project}
    mode: ${tableau.mode}
    legacy: ${tableau.legacy}
    target_type: ${datasource_type}