For Shopify Import Integration, you can use the TD CLI to configure a connection.
Open a terminal and run the following command to install the newest Treasure Data Toolbelt.
$ td --version
0.15.0
Prepare the load file (such as, load.yml) as shown in the following example, with your Shopify account access information.
in:
  type: shopify
  apikey: xxxxxxxx
  password: xxxxxxx
  target: products
  store_name: xxxxxxx
  from_date: '2016-09-07'
  fetch_days: 2 (optional)  incremental_field: created_at
out:
  mode: replace
This example shows a dump of Shopify Product objects. The values for API Key and password are valid API Key and password provided by Shopify. The value store_name is the name of the store for which data needs to be fetched. You can Shopify an object for which data needs to be fetched from the store using the target option.
in:
  type: shopify
  apikey: xxxxxxxx
  password: xxxxxxx
  target: orders
  store_name: xxxxxxx
  from_date: '2016-09-07T00:00:00.000Z'
  to_date: '2016-09-07T01:00:00.000Z' # 1-hour duration
  incremental_field: created_at
out:
  mode: replace
The example shows how to specify a dump of Shopify Order objects from Sep 7, 2016, 12 AM to Sep 7, 2016, 1 AM.
To get Shopify Credentials, complete the following steps:
- Sign up at https://www.shopify.com/ to create an online store for the user.
- Enter the details about the user.
- Enter additional details about a business.
- Create a private app.
- The user can see and use the store's API credentials and connect with different external applications.
The following table describes the configuration parameters for the Shopify import integration:
| Name | Description | Value | Default Value | Required |
|---|---|---|---|---|
| type | The source of the import. | "shopify" | Yes | |
| apikey | Shopify provided API Key. | String. | Yes | |
| password | Shopify provided password. | String. | Yes | |
| store_name | Shopify store name that records are fetched from. No spaces, use hyphens (-). | String. | Yes | |
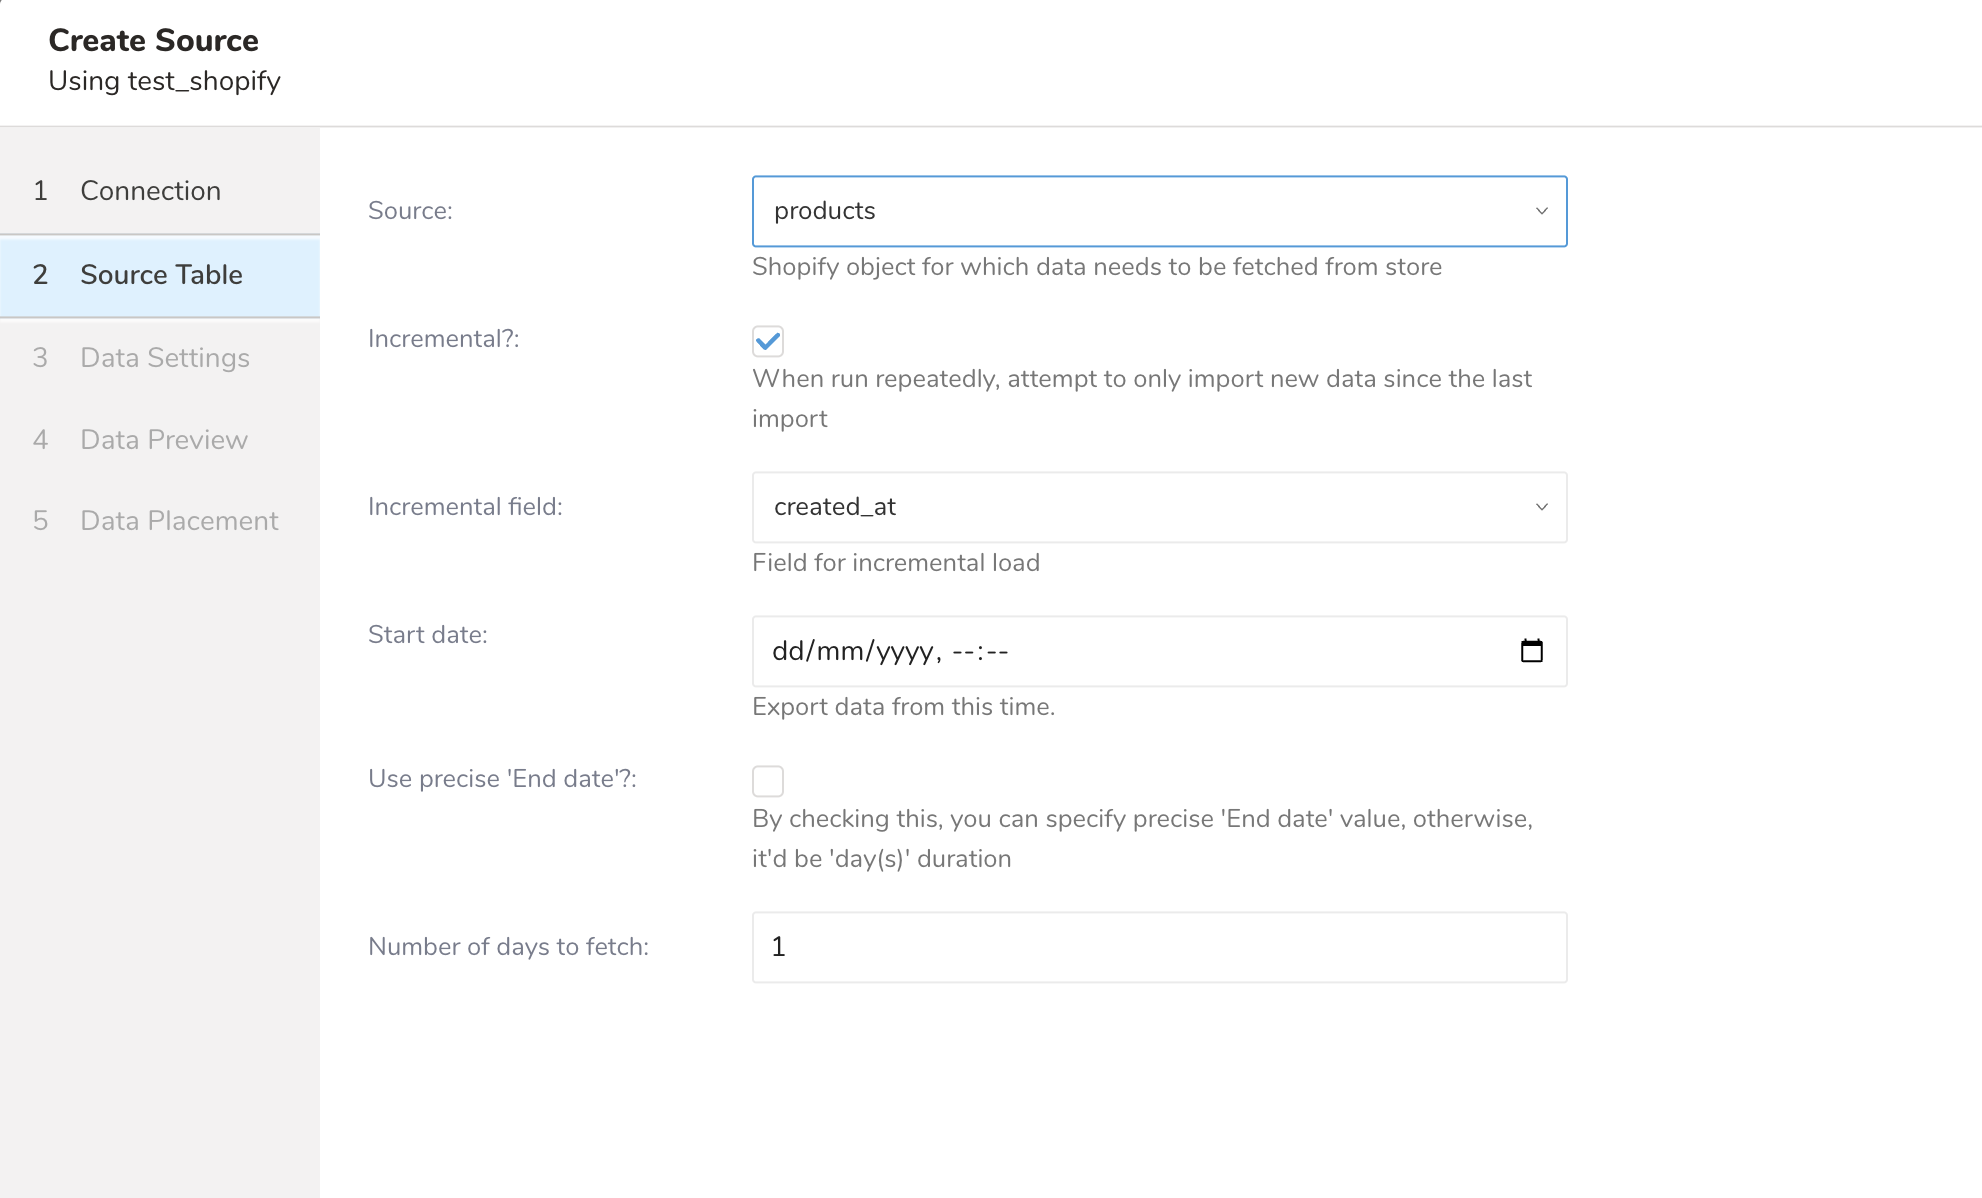
| target | Shopify object that data needs to be fetched from store. Supported targets are products, customers, transactions, orders, inventory, and metafields. | String. | Yes | |
| order_status | Specify order status to import. Default open if not specified. Supported statuses: open, any, closed, canceled. | String. | "open" | No |
| retry_initial_wait_msec | Parameter that provides the initial wait time (in milliseconds) for each retry logic to call the Shopify API for a specified target to fetch data. | Integer. | No | |
| retry_limit | Parameter that provides the number of attempts to call the Shopify API for a specified target to fetch data. | Integer. | No | |
| max_retry_wait_msec | Parameter that provides the maximum wait time (in milliseconds) for each retry to call Shopify API for a specified target to fetch data. | Integer. | No | |
| from_date | Parameter that specifies the date and time from which to fetch records. When incremental is set to false, created_at is considered the from_date when you import data from products, customers, transactions, orders object. | Date. (Date Format : yyyy-MM-dd or yyyy-MM-dd’T'hh:mm:ss.SSS'Z') | Yes | |
to_date | Parameter that specifies the allowable duration to fetch records. (Date Format : yyyy-MM-dd'T'hh:mm:ss.SSS'Z').
In incremental mode, from_date and to_date are calculated automatically based on initial import parameters.
| Date. (Date Format : yyyy-MM-dd or yyyy-MM-dd’T'hh:mm:ss.SSS'Z') | No. (If omitted, the data connector calculates duration by fetch_days config) | |
| fetch_days | If no to_date is specified, this parameter is used to calculate the duration to fetch records from from_date. | Integer. | 1 | No |
| incremental | If true, this parameter enables incremental loading. | Boolean. | False | No |
| incremental_field | Field used for incremental loading. Supported fields: created_at or updated_at. The "transactions" target doesn't support updated_at. | String. | "created_at" | No |
| metafield_resource | Shopify resource to get metafield from. | String. Supported Resource are: product, customer, order, online store, shop. | Yes (if the target is metafields) | |
| product_objects | Shopify sub-object of product to get metafield from. | String. Supported product-sub-objects: product, product variant, product image, collection. | "product" | Yes (if the target is metafields and metafield_resource is product) |
| date_type | Field used for metafields. Supported fields: created_at or updated_at. | String. | Yes (if the target is metafields) | |
| product_ids | List of product id to get meta fields, separated by comma. | String. | Yes (if the target is metafields, metafield_resource is product and product_objects is product) | |
| product_variant_ids | List of variant id to get meta fields, separated by comma. | String. | Yes (if the target is metafields, metafield_resource is product and product_objects is product_variant) | |
| product_image_ids | List of image id to get meta fields, separated by comma. | String. | Yes (if the target is metafields, metafield_resource is product and product_objects is product_image) | |
| collection_ids | List of collection id to get meta fields, separated by comma. | String. | Yes (if the target is metafields, metafield_resource is product and product_objects is collection) | |
| customer_ids | List of customer id to get meta fields, separated by comma. | String. | Yes (if the target is metafields, metafield_resource is customer) | |
| order_objects | Shopify sub-object of order to get metafield from. | String. Supported order-sub-objects: order, draft order | "order" | Yes (if the target is metafields and metafield_resource is order) |
| order_ids | List of order id to get meta fields, separated by comma. | String. | Yes (if the target is metafields, metafield_resource is order and order_objects is order) | |
| draft_order_ids | List of draft_order id to get meta fields, separated by comma. | String. | Yes (if the target is metafields, metafield_resource is order and order_objects is draft_order) | |
| online_store_objects | Shopify sub-object of online store to get metafield from. | String. Supported online_store-sub-objects: blog, article, page | "blog" | Yes (if the target is metafields, metafield_resource is online_store) |
| blog_ids | List of blog id to get meta fields, separated by comma. | String. | Yes (if the target is metafields, metafield_resource is online_store and order_objects is blog) | |
| article_ids | List of article id to get meta fields, separated by comma. | String. | Yes (if the target is metafields, metafield_resource is online_store and order_objects is article) | |
| page_ids | List of page id to get meta fields, separated by comma. | String. | Yes (if the target is metafields, metafield_resource is online_store and order_objects is page) | |
| fetch_all_customers_metafields | Enable downloading of all the customer's meta fields, work with customer_ids. | String. | No |
Supported targets are products, customers, transactions, orders, inventory, and meta fields.


Supported Objects are: Inventory Items, Locations, Inventory Levels   

Supported Resource are: product, customer, order, online store, shop  Resource Product and Object IDs  Resource Customer and Object IDs  Resource Order and Object IDs  Resource Online Store and Object IDs  Resource Shop and Object IDs 
You can preview data to be imported using the command td connector:preview.
$ td connector:preview load.yml
+---------+--------------+------------------+----
| id:long | title:string | body_html:string | ...
+---------+--------------+------------------+----
| 1       | "33"         | pbody_htmlp  |
| 2       | "34"         | pbody_htmlp  |
| 3       | "35"         | pbody_htmlp  |
| 4       | "36"         | pbody_htmlp  |
| 6       | "37"         | pbody_htmlp  |
+---------+--------------+------------------+----Submit the load job. It may take a couple of hours depending on the data size. Users need to specify the database and table where their data are stored.
It is recommended to specify the --time-column option, because Treasure Data’s storage is partitioned by time (see also Data Partitioning) If the option is not given, the data connector chooses the first long or timestamp column as the partitioning time. The type of the column specified by --time-column must be either of type long and timestamp.
If your data doesn’t have a time column you can add it using the add_time filter option. More details at add_time filter plugin.
$ td connector:issue load.yml --database td_sample_db --table td_sample_table --time-column created_atThe preceding command assumes that you have already created database(td_sample_db) and table(td_sample_table). If the database or the table does not exist in TD, this command fails. Create the database and table manually or use the --auto-create-table option with the td connector:issue command to auto create the database and table:
$ td connector:issue load.yml --database td_sample_db --table td_sample_table --time-column created_at --auto-create-table| You can assign Time Format column to the "Partitioning Key" by "--time-column" option. |
You can schedule periodic Data Connector executions for periodic Shopify imports. The load distribution and operation of Treasure Data’s scheduler is optimized to achieve high availability. By using Treasure Data’s scheduler, you no longer need a cron daemon on your local data center.
A new schedule can be created using the td connector:create command. Specify the name of the schedule, the cron-style schedule, the database and table where the data is stored, and the data connector configuration file. The values are required.
$ td connector:create \
    daily_shopify_import \
    "10 0 * * *" \
    td_sample_db \
    td_sample_table \
    load.yml
The cron parameter also accepts these three options: @hourly, @daily and @monthly. |
By default, the schedule is set up in UTC timezone. You can set the schedule in a timezone using -t or —timezone option. The --timezone option supports only extended timezone formats like ‘Asia/Tokyo,’ ‘America/Los Angeles’ etc. Timezone abbreviations like PST and CST are unsupported and may lead to unexpected schedules.
You can see the list of scheduled entries by td connector:list.
$ td connector:list
+-----------------------+--------------+----------+-------+--------------+-----------------+----------------------------+
| Name                  | Cron         | Timezone | Delay | Database     | Table           | Config                     |
+-----------------------+--------------+----------+-------+--------------+-----------------+----------------------------+
| daily_shopify_import  | 10 0 * * *   | UTC      | 0     | td_sample_db | td_sample_table | {"type"=>"shopify", ... }  |
+-----------------------+--------------+----------+-------+--------------+-----------------+----------------------------+td connector:show shows the execution setting of a schedule entry.
% td connector:show daily_shopify_import
Name     : daily_shopify_import
Cron     : 10 0 * * *
Timezone : UTC
Delay    : 0
Database : td_sample_db
Table    : td_sample_table
td connector:history shows the execution history of a schedule entry. To investigate the results of each individual execution, use td job jobid.
% td connector:history daily_shopify_import
+--------+---------+---------+--------------+-----------------+----------+---------------------------+----------+
| JobID  | Status  | Records | Database     | Table           | Priority | Started                   | Duration |
+--------+---------+---------+--------------+-----------------+----------+---------------------------+----------+
| 578066 | success | 10000   | td_sample_db | td_sample_table | 0        | 2015-04-18 00:10:05 +0000 | 160      |
| 577968 | success | 10000   | td_sample_db | td_sample_table | 0        | 2015-04-17 00:10:07 +0000 | 161      |
| 577914 | success | 10000   | td_sample_db | td_sample_table | 0        | 2015-04-16 00:10:03 +0000 | 152      |
| 577872 | success | 10000   | td_sample_db | td_sample_table | 0        | 2015-04-15 00:10:04 +0000 | 163      |
| 577810 | success | 10000   | td_sample_db | td_sample_table | 0        | 2015-04-14 00:10:04 +0000 | 164      |
| 577766 | success | 10000   | td_sample_db | td_sample_table | 0        | 2015-04-13 00:10:04 +0000 | 155      |
| 577710 | success | 10000   | td_sample_db | td_sample_table | 0        | 2015-04-12 00:10:05 +0000 | 156      |
| 577610 | success | 10000   | td_sample_db | td_sample_table | 0        | 2015-04-11 00:10:04 +0000 | 157      |
+--------+---------+---------+--------------+-----------------+----------+---------------------------+----------+
8 rows in settd connector:delete removes the schedule.
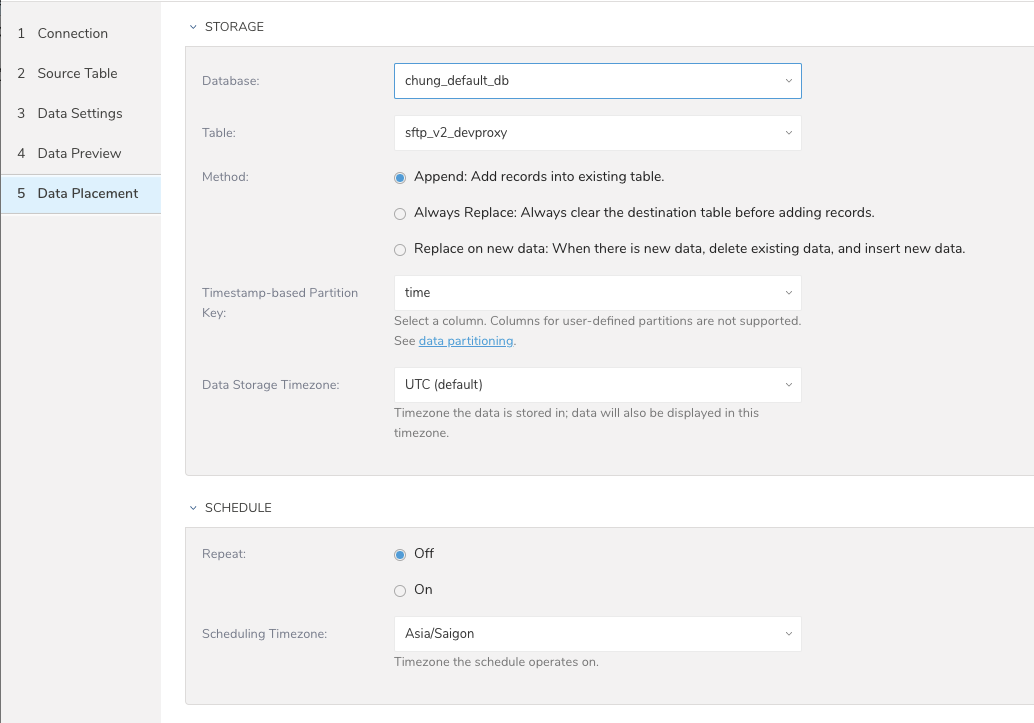
$ td connector:delete daily_shopify_importFor data placement, select the target database and table where you want your data placed and indicate how often the import should run.
Select Next. Under Storage you will create a new or select an existing database and create a new or select an existing table for where you want to place the imported data.
Select a Database > Select an existing or Create New Database.
Optionally, type a database name.
Select a Table> Select an existing or Create New Table.
Optionally, type a table name.
Choose the method for importing the data.
- Append (default)-Data import results are appended to the table.
If the table does not exist, it will be created. - Always Replace-Replaces the entire content of an existing table with the result output of the query. If the table does not exist, a new table is created.
- Replace on New Data-Only replace the entire content of an existing table with the result output when there is new data.
- Append (default)-Data import results are appended to the table.
Select the Timestamp-based Partition Key column.
If you want to set a different partition key seed than the default key, you can specify the long or timestamp column as the partitioning time. As a default time column, it uses upload_time with the add_time filter.Select the Timezone for your data storage.
Under Schedule, you can choose when and how often you want to run this query.
- Run once:
- Select Off.
- Select Scheduling Timezone.
- Select Create & Run Now.
Repeat the query:
- Select On.
- Select the Schedule. The UI provides these four options: @hourly, @daily and @monthly or custom cron.
- You can also select Delay Transfer and add a delay of execution time.
- Select Scheduling Timezone.
- Select Create & Run Now.
After your transfer has run, you can see the results of your transfer in Data Workbench > Databases.