SendGridは、クラウドベースのSMTPプロバイダーで、メールサーバーを維持することなくメールを送信できます。Treasure Dataの統合により、すべてのマーケティングメールキャンペーンのためにプロファイルセグメントをSendgridに簡単にエクスポートできます。
- Treasure Dataの基本知識
- Sendgrid JSONメールテンプレートの知識
Sendgridコネクタ機能を使用する際には、いくつかのレート制限と制約があります: Mail SendおよびSend Test Marketing Mail。
- 添付ファイルを含むメールの合計サイズは、30MB未満である必要があります。
- 受信者の合計数は1000以下である必要があります。これには、personalizationsアレイに含める各オブジェクト全体のto、cc、およびbccパラメータ内で定義されたすべての受信者が含まれます。
- カスタム引数の合計長は10000バイト未満である必要があります。
- fromフィールドではUnicodeエンコーディングはサポートされていません。
- to.name、cc.name、およびbcc.nameのパーソナライゼーションには、
;または,文字を含めることはできません。 - 置換の場合、NULL値は""(空文字列)に切り捨てられます。置換が数値列の場合は、文字列に変換されます。
- メッセージはバッチで送信されるため、セッション全体をロールバックしません。エラーメッセージはコンソールにログ記録されますが、ジョブは続行されます。
- Sendgrid JSONメールテンプレートに関する強力な知識が必須です。
- Mail Send操作では:
- Template IDは、Personalization Bodyで定義されたsubstitutionを上書きします。
- Skip invalid recordsは、無効なpersonalization bodyにのみ適用されます。
- Send Test Marketing Mail操作では:
- Unsubscribe URLまたはSuppression group IDのいずれかのみを入力する必要があります。
- Skip invalid recordsは無効なメールに適用されます。
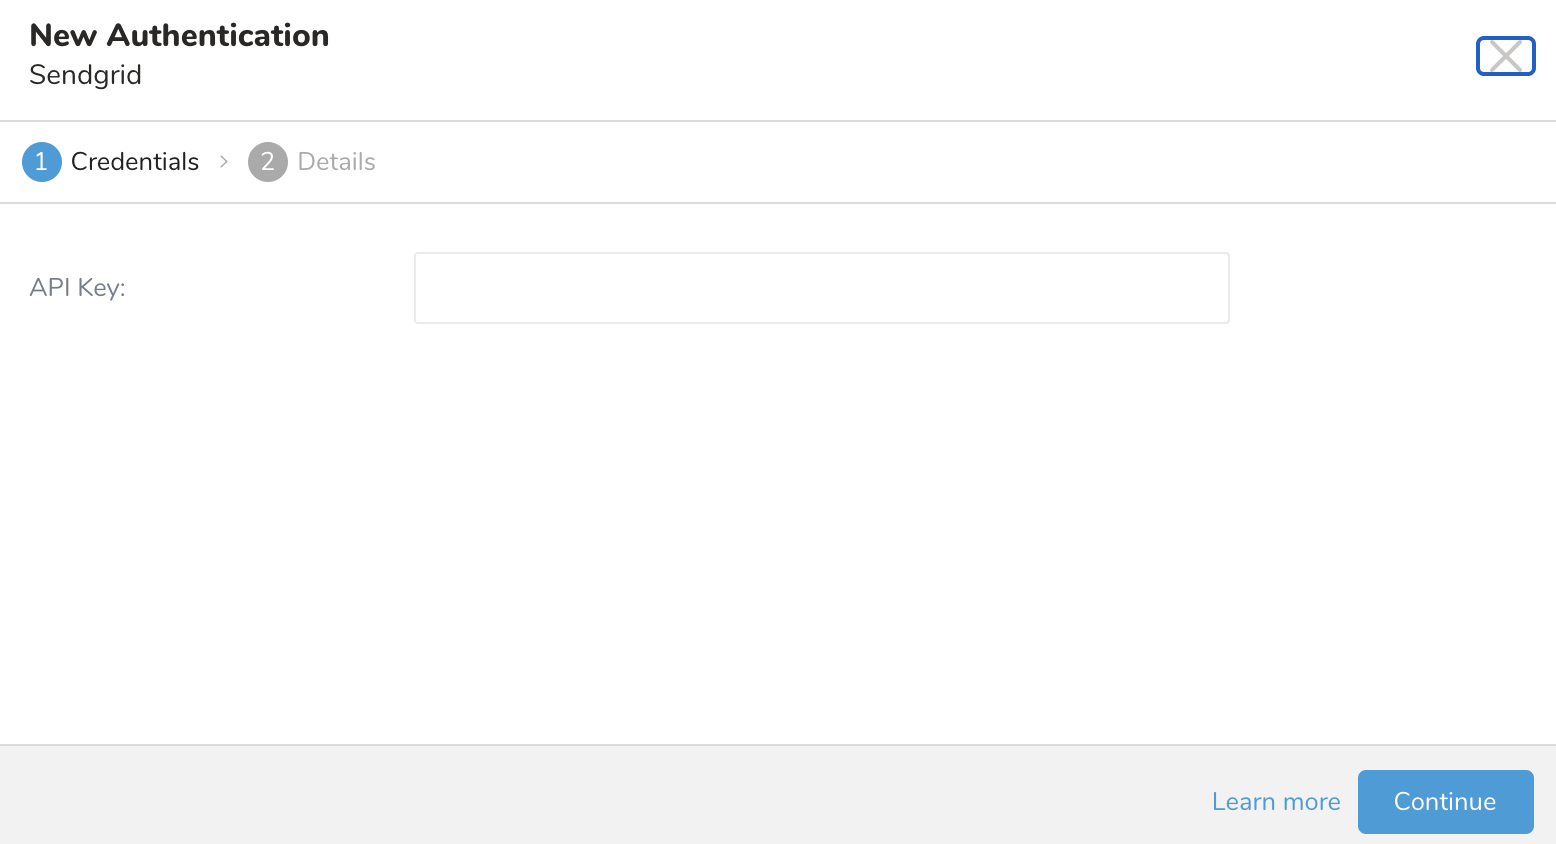
Sendgridアプリケーションへの接続を確立するには、APIキーが必要です。
アプリケーション、メールクライアント、またはWebサイトはすべて、API(Application Programming Interface)キーを使用してSendGridサービスへのアクセスを認証できます。SendGridのすべてのサービスに接続するためにAPIキーを使用することをお勧めします。これらは、ユーザー名とパスワードを使用するよりも推奨される代替手段です。なぜなら、APIキーはユーザー名とパスワードを変更することなく、いつでも取り消すことができるためです。
Sendgrid APIキーには以下が含まれます:
- Full Accessは、APIキーが請求とメールアドレス検証を除くアカウントのすべての部分のGET、PATCH、PUT、DELETEおよびPOSTエンドポイントにアクセスできるようにします。
- Restricted Accessは、請求とメールアドレス検証を除くアカウントのすべての部分のアクセスレベルをカスタマイズします。
- Billing Accessは、APIキーがアカウントの請求エンドポイントにアクセスできるようにします。
Sendgrid内で:
- 左側のナビゲーションバーのSettingsに移動します。
- API Keysを選択します。
- Treasure Dataへの接続に使用する必要があるAPIキーの値をコピーまたは書き留めます。
Treasure Dataでは、クエリを実行する前にデータ接続を作成して設定する必要があります。データ接続の一部として、統合にアクセスするための認証を提供します。
- TD Consoleを開きます。
- Integrations Hub > Catalogに移動します。
- Sendgridを検索して選択します。
- 認証するための資格情報を入力します。
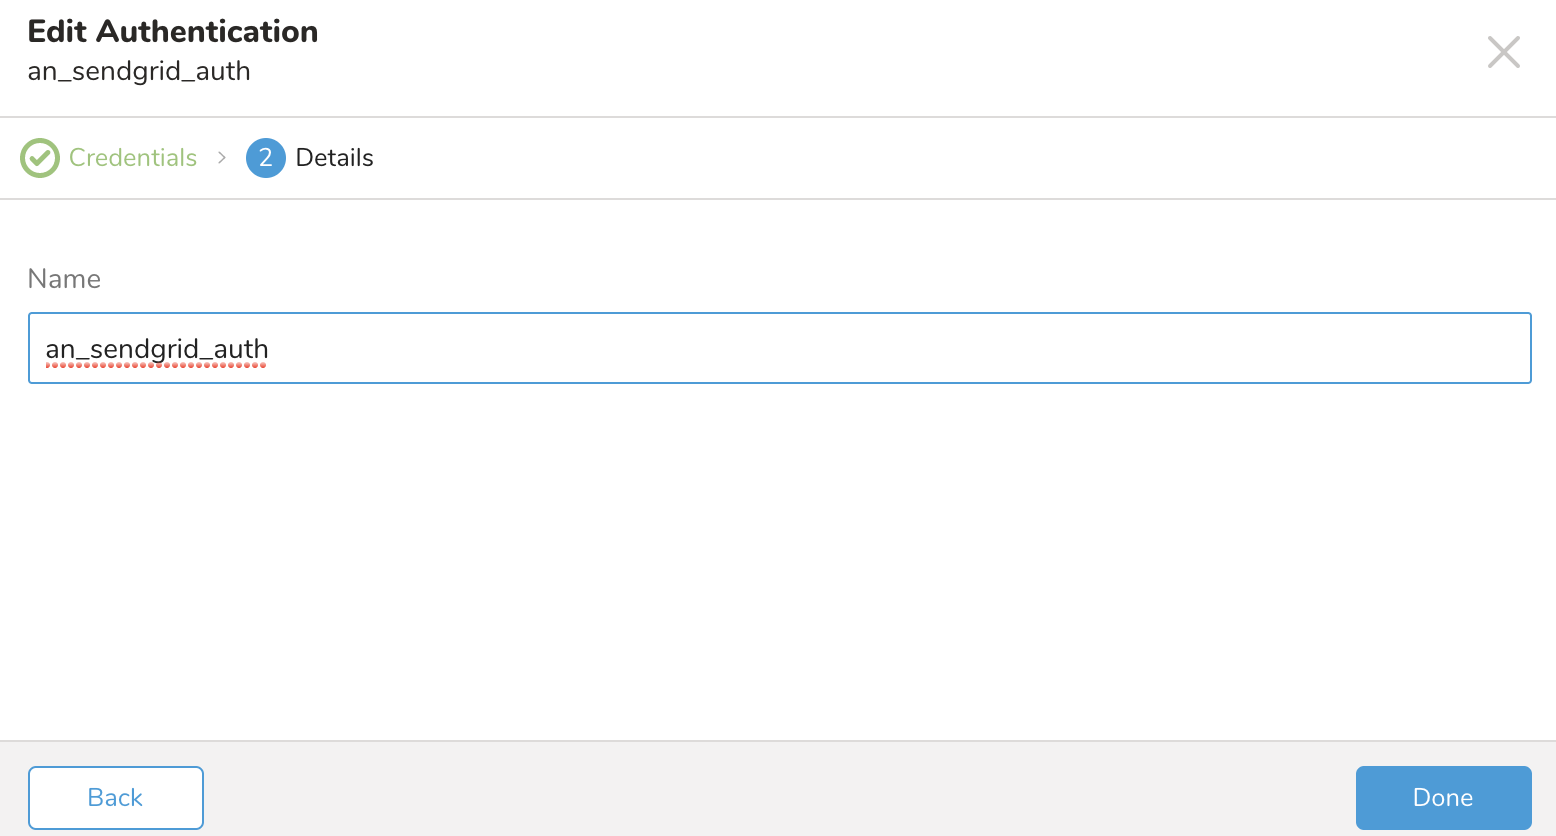
- 接続の名前を入力します。
- Doneを選択します。
- Creating a Destination Integrationの手順を完了します。
- Data Workbench > Queriesに移動します。
- データをエクスポートするクエリを選択します。
- クエリを実行して結果セットを検証します。
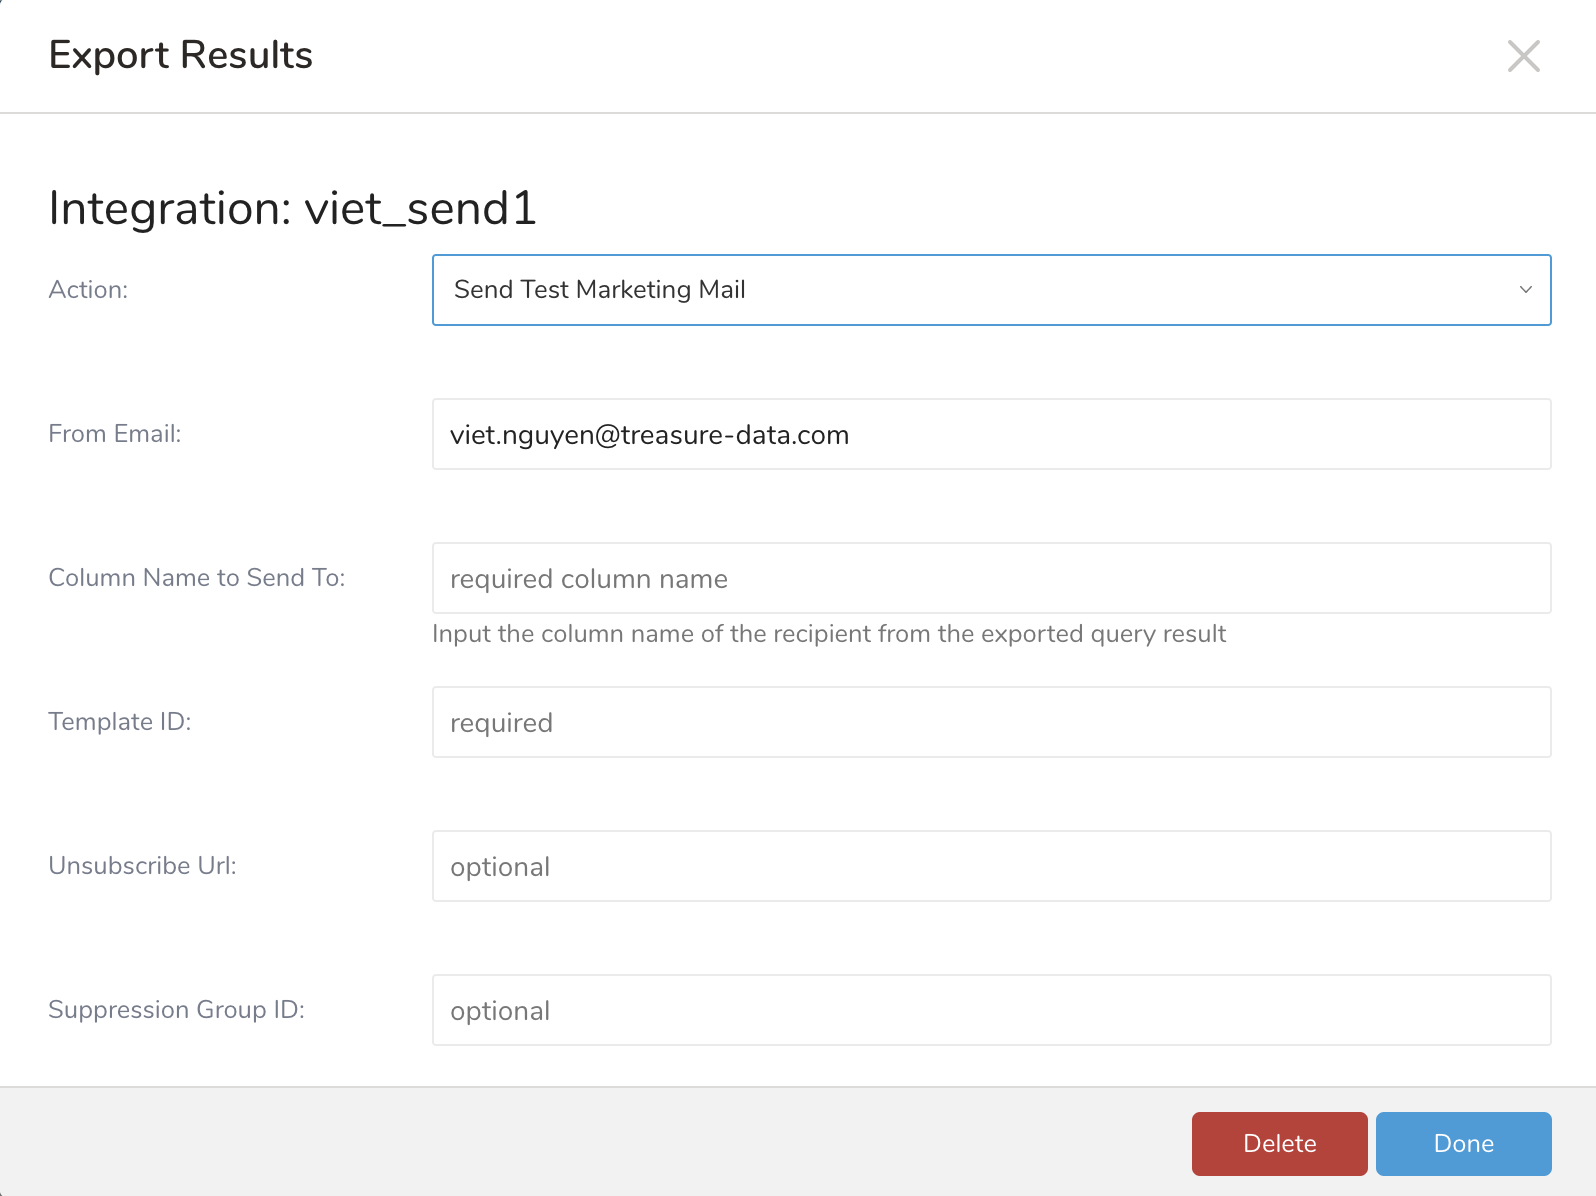
- Export Resultsを選択します。
- 既存の統合認証を選択します。

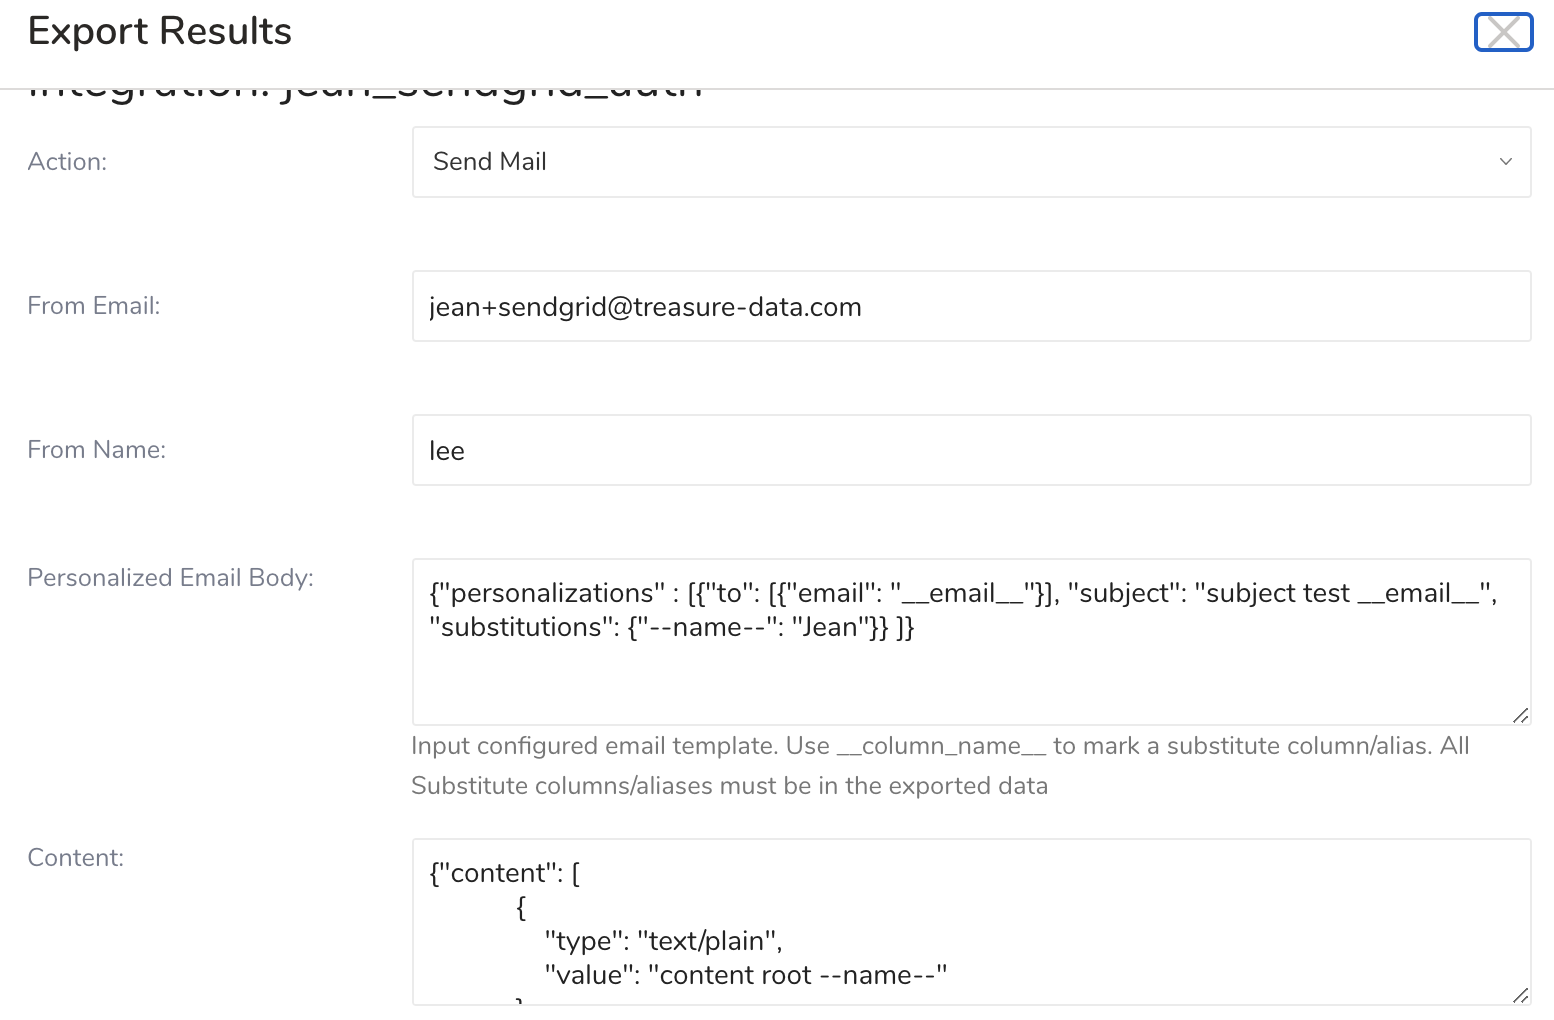
- 追加のExport Resultsの詳細を定義します。エクスポート統合コンテンツで統合パラメータを確認します。 例えば、Export Results画面が異なる場合や、入力する追加の詳細がない場合があります:

- Doneを選択します。
- クエリを実行します。
- 指定した宛先にデータが移動したことを検証します。
| Parameter | Req. or Optional | Description |
|---|---|---|
| Action | Required |
|
| From Email | Required | メール値を次の形式で入力します: name@domain |
| From Name | optional | |
| Column Name to Send | Required | Send Test Marketing Mailの場合。エクスポートされたクエリ結果から受信者の列名を入力します |
Personalized Email Body | Required | 設定されたメールテンプレートを入力します。__column_name__を使用して置換列/エイリアスをマークします。すべての置換列/エイリアスはエクスポートされたデータに含まれている必要があります。 例: {"personalizations" : [{"to": [{"email": "__email__"}], "subject": "subject test __email__", "substitutions": {"--name--": "meg"}} ]} |
| Content | Required | 例:{"content": [
{
"type": "text/plain",
"value": "content root --name--"
}
]} |
Number of Recipients per API Call | Required | Sendgridへの各リクエスト呼び出しに対して、コネクタはこの数までpersonalizationsボディを構築します 最小: 1、最大: 1000、デフォルト: 1000 例: Export SQLクエリが50,000レコードを返し、デフォルト設定1000の場合、コネクタはSendgridに50リクエストを送信し、リクエストごとに1000のパーソナライゼーションを含めます |
| Attachments | optional | JSON文字列 |
Template ID | optional | Send Mailの場合はオプション。指定すると、このテンプレートIDはPersonalized email bodyのSubstitutionsを上書きします。 Send Test Marketing Mailの場合は必須。 |
| Unsubscribe Group ID | optional | 受信者に受け取りたいメールのタイプをより詳細に制御できるようにすることで、特定のグループからのメッセージをオプトアウトできるようにします。 |
| Unsubscribe Url | optional | |
| Suppression Group ID | optional | 購読解除グループを指定するために使用される方法。 |
| Mail Settings | optional | JSON文字列 |
| Tracking Settings | optional | JSON文字列 |
SELECT
  to_email as email
FROM
email_2_recordsYou can use Scheduled Jobs with Result Export to periodically write the output result to a target destination that you specify.
Treasure Data's scheduler feature supports periodic query execution to achieve high availability.
When two specifications provide conflicting schedule specifications, the specification requesting to execute more often is followed while the other schedule specification is ignored.
For example, if the cron schedule is '0 0 1 * 1', then the 'day of month' specification and 'day of week' are discordant because the former specification requires it to run every first day of each month at midnight (00:00), while the latter specification requires it to run every Monday at midnight (00:00). The latter specification is followed.
Navigate to Data Workbench > Queries
Create a new query or select an existing query.
Next to Schedule, select None.

In the drop-down, select one of the following schedule options:
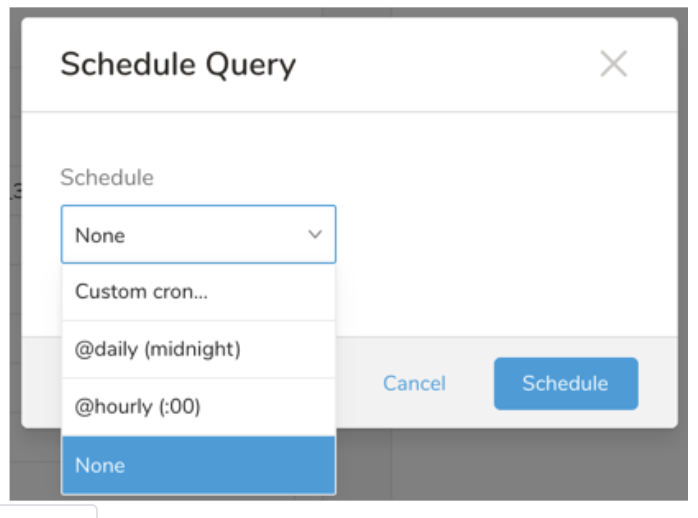
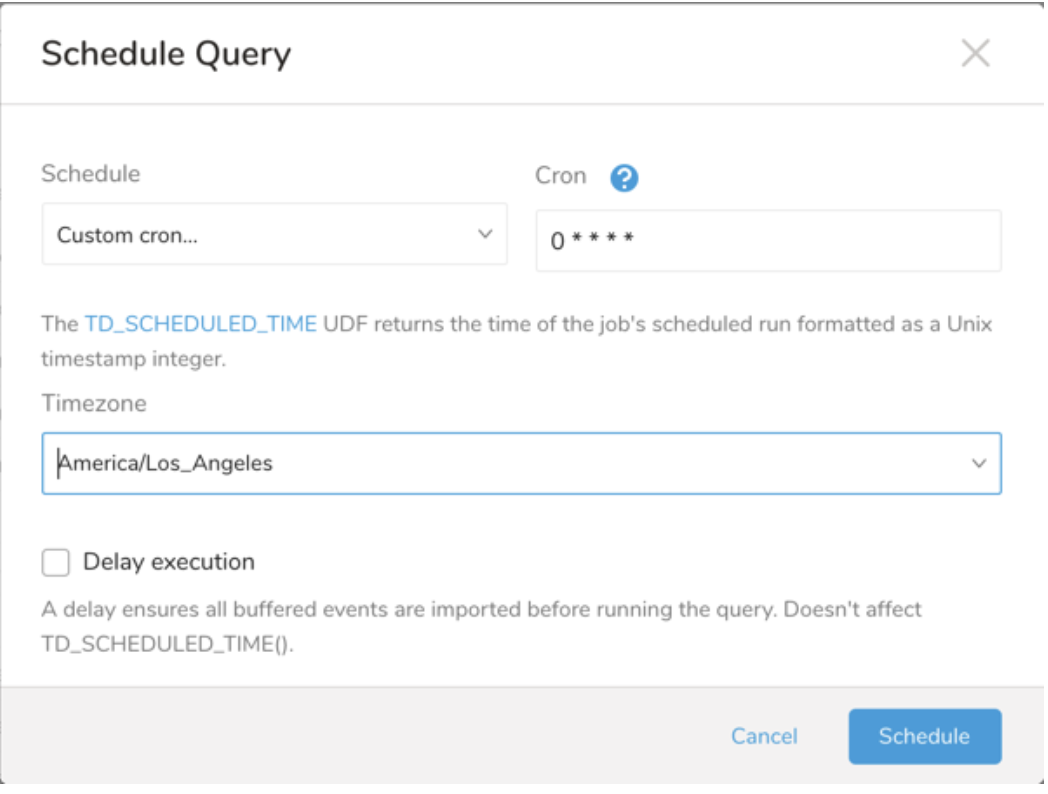
Drop-down Value Description Custom cron... Review Custom cron... details. @daily (midnight) Run once a day at midnight (00:00 am) in the specified time zone. @hourly (:00) Run every hour at 00 minutes. None No schedule.
| Cron Value | Description |
|---|---|
0 * * * * | Run once an hour. |
0 0 * * * | Run once a day at midnight. |
0 0 1 * * | Run once a month at midnight on the morning of the first day of the month. |
| "" | Create a job that has no scheduled run time. |
 *    *    *    *    *
 -    -    -    -    -
 |    |    |    |    |
 |    |    |    |    +----- day of week (0 - 6) (Sunday=0)
 |    |    |    +---------- month (1 - 12)
 |    |    +--------------- day of month (1 - 31)
 |    +-------------------- hour (0 - 23)
 +------------------------- min (0 - 59)
The following named entries can be used:
- Day of Week: sun, mon, tue, wed, thu, fri, sat.
- Month: jan, feb, mar, apr, may, jun, jul, aug, sep, oct, nov, dec.
A single space is required between each field. The values for each field can be composed of:
| Field Value | Example | Example Description |
|---|---|---|
| A single value, within the limits displayed above for each field. | ||
A wildcard '*' to indicate no restriction based on the field. | '0 0 1 * *' | Configures the schedule to run at midnight (00:00) on the first day of each month. |
A range '2-5', indicating the range of accepted values for the field. | '0 0 1-10 * *' | Configures the schedule to run at midnight (00:00) on the first 10 days of each month. |
A list of comma-separated values '2,3,4,5', indicating the list of accepted values for the field. | 0 0 1,11,21 * *' | Configures the schedule to run at midnight (00:00) every 1st, 11th, and 21st day of each month. |
A periodicity indicator '*/5' to express how often based on the field's valid range of values a schedule is allowed to run. | '30 */2 1 * *' | Configures the schedule to run on the 1st of every month, every 2 hours starting at 00:30. '0 0 */5 * *' configures the schedule to run at midnight (00:00) every 5 days starting on the 5th of each month. |
A comma-separated list of any of the above except the '*' wildcard is also supported '2,*/5,8-10'. | '0 0 5,*/10,25 * *' | Configures the schedule to run at midnight (00:00) every 5th, 10th, 20th, and 25th day of each month. |
- (Optional) You can delay the start time of a query by enabling the Delay execution.
Save the query with a name and run, or just run the query. Upon successful completion of the query, the query result is automatically exported to the specified destination.
Scheduled jobs that continuously fail due to configuration errors may be disabled on the system side after several notifications.
(Optional) You can delay the start time of a query by enabling the Delay execution.
You can also send segment data to the target platform by creating an activation in the Audience Studio.
- Navigate to Audience Studio.
- Select a parent segment.
- Open the target segment, right-mouse click, and then select Create Activation.
- In the Details panel, enter an Activation name and configure the activation according to the previous section on Configuration Parameters.
- Customize the activation output in the Output Mapping panel.
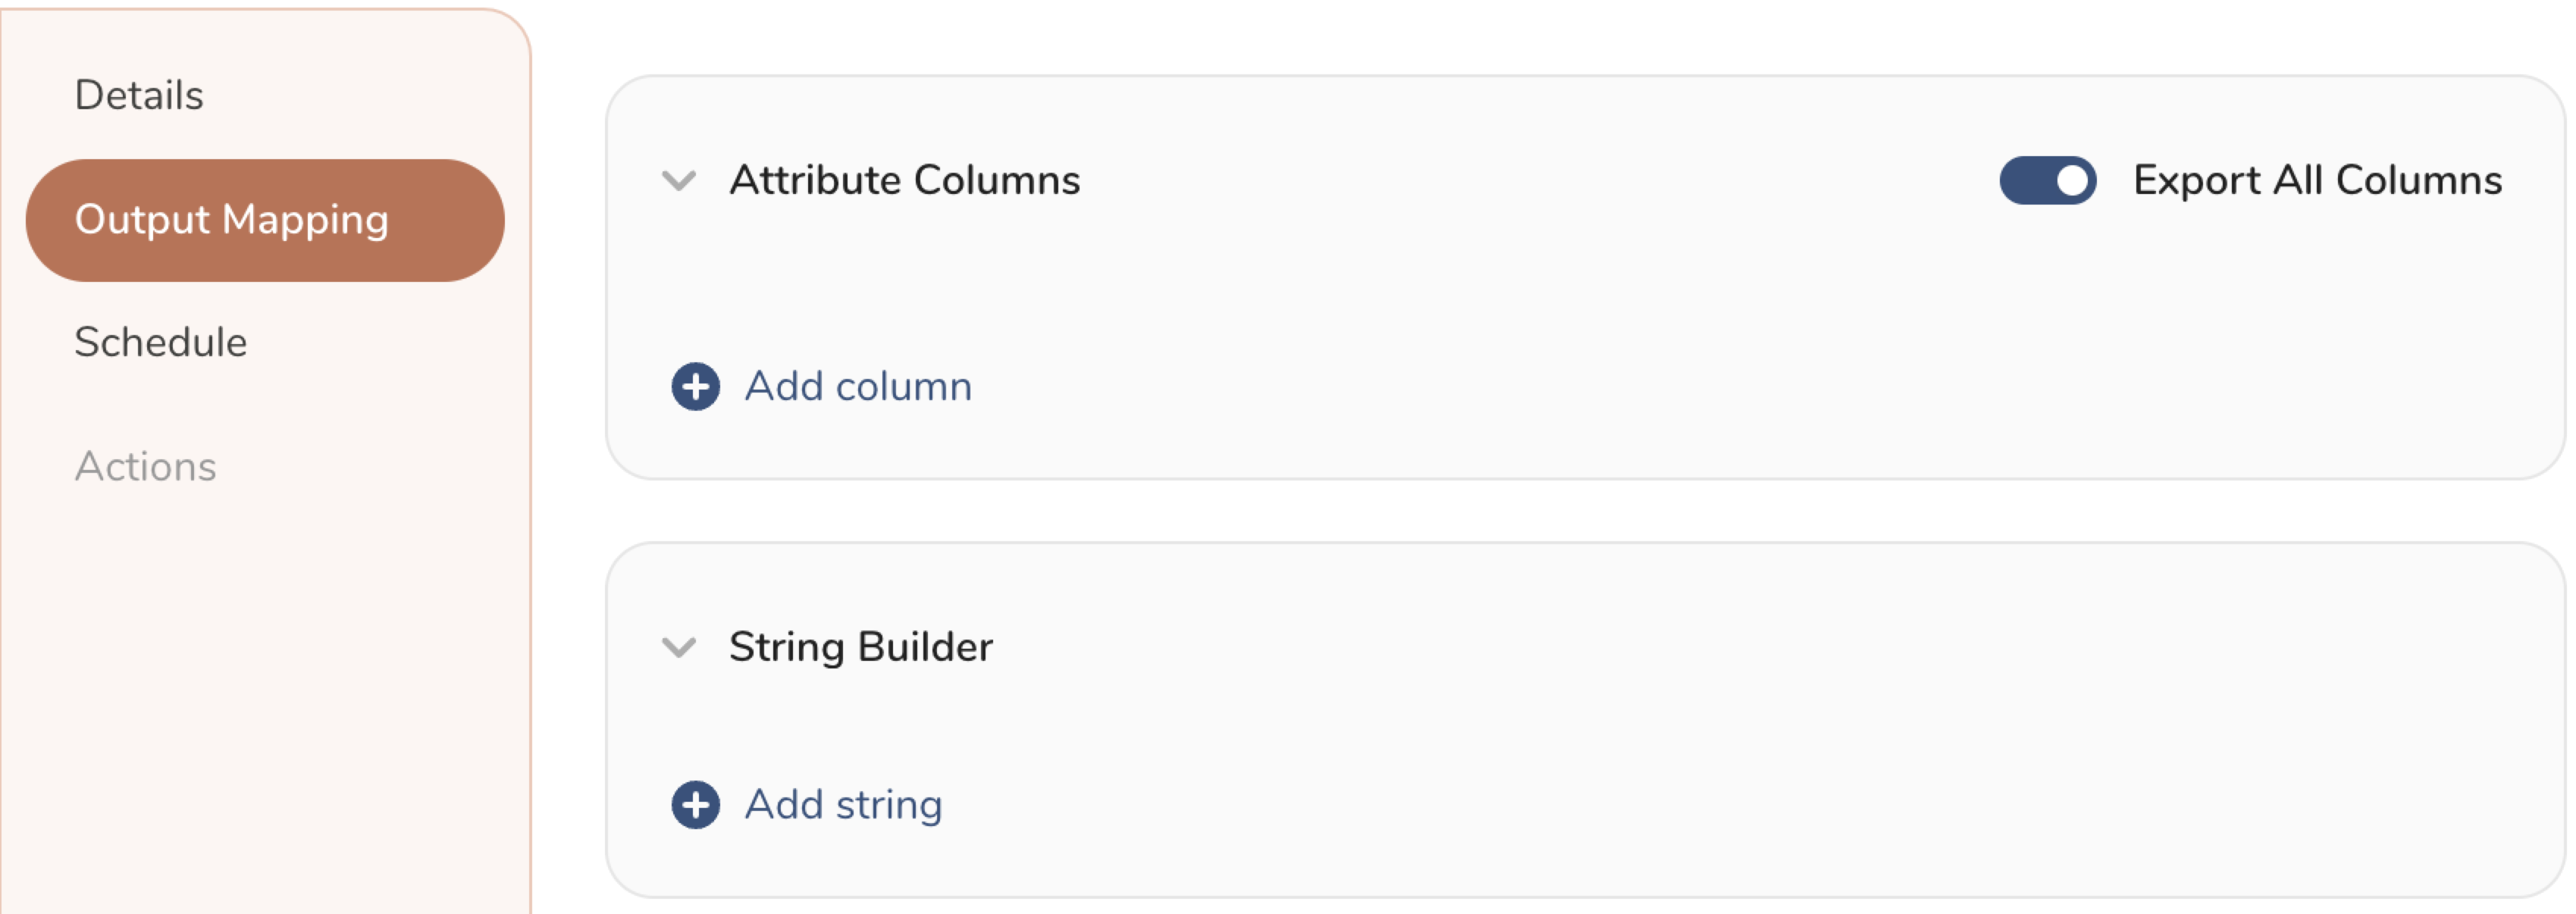
- Attribute Columns
- Select Export All Columns to export all columns without making any changes.
- Select + Add Columns to add specific columns for the export. The Output Column Name pre-populates with the same Source column name. You can update the Output Column Name. Continue to select + Add Columnsto add new columns for your activation output.
- String Builder
- + Add string to create strings for export. Select from the following values:
- String: Choose any value; use text to create a custom value.
- Timestamp: The date and time of the export.
- Segment Id: The segment ID number.
- Segment Name: The segment name.
- Audience Id: The parent segment number.
- + Add string to create strings for export. Select from the following values:
- Set a Schedule.
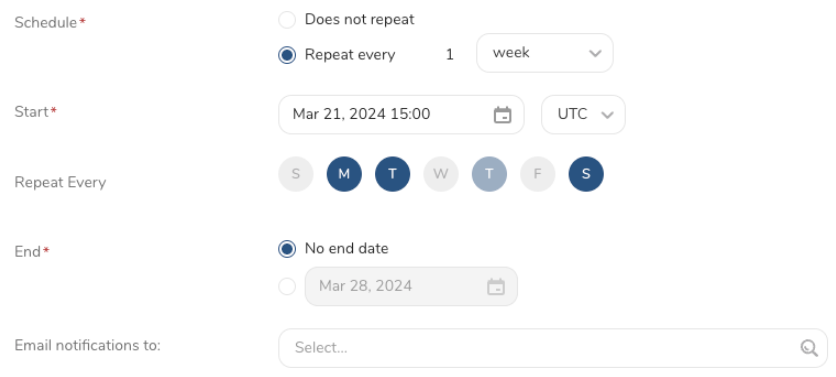
- Select the values to define your schedule and optionally include email notifications.
- Select Create.
If you need to create an activation for a batch journey, review Creating a Batch Journey Activation.
Treasure Workflow内で、このデータコネクタを使用してデータをエクスポートすることを指定できます。
詳細については、Using Workflows to Export Data with the TD Toolbeltをご覧ください。
sendgrifd_marketing_test_mail.dig
_export:
  td:
 database: sendgrid_db

+sendgrid_send_mail_task:
  td>: marketing_test_mail.sql
  database: ${td.database}
  result_connection: meg_sendgrid_auth
  result_settings:
  	type: sendgrid
	  action: send_mail
  	from_email: test@treasure-data.com
    from_name: lee
  	personalized_template: |
      {
        "personalizations": [{
        "to": [{
        "email": "__email__"
        }],
        "subject": "Subject in personalization __email__",
        "substitutions": {
        "--name--": "substitution value"
        }
        }]
      }
  	content: |
	    {"content": [
        {
          "type": "text/plain",
          "value": "Hello --name--"
        }
      ]}
    batch_size: 1000
    unsubscribe_group_id: null
    attachment: null
    mail_settings: null
tracking_settings: null type: sendgrid
action: send_test_marketing_mail
from_email: meg+sendgrid@treasure-data.com
from_name: lee
receiver_column_name: email
template_id_send_testing: d-d86cc2d8bxx4400e903adf052e53d55a
unsubscribe_url: null
suppression_group_id: null