この統合を使用すると、TDクエリジョブを使用して以下のことができます
- Eloquaコンタクトリストにコンタクトを追加
- Eloquaアカウントグループにアカウントを追加
- Eloquaカスタムデータオブジェクト(CDO)にデータを追加
- Eloquaの共有リストにコンタクトを追加し、共有リストをセグメントに追加
- TD Toolbeltを含むTreasure Dataの基本知識
- APIアクセスが有効になっているEloquaアカウント
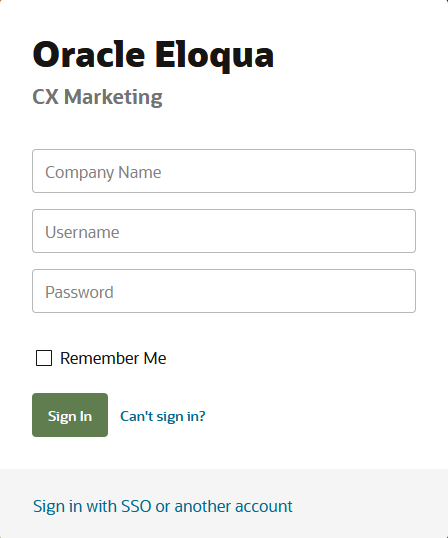
https://login.eloqua.comにアクセスします。
Oracle JDeveloperとOracle Enterprise Manager Fusion Middleware ControlでCSF認証キーを指定する際に使用したのと同じCompany Name、Username、およびPasswordを使用して、Oracle Eloqua Consoleにログインします。
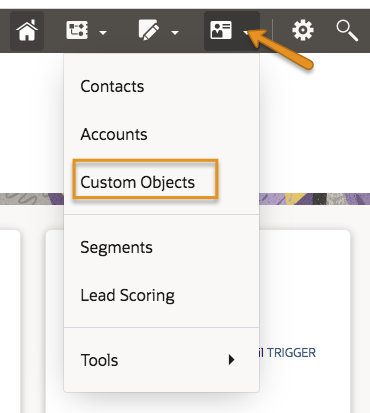
- ログイン後、Audience > Custom Objectsを選択します。
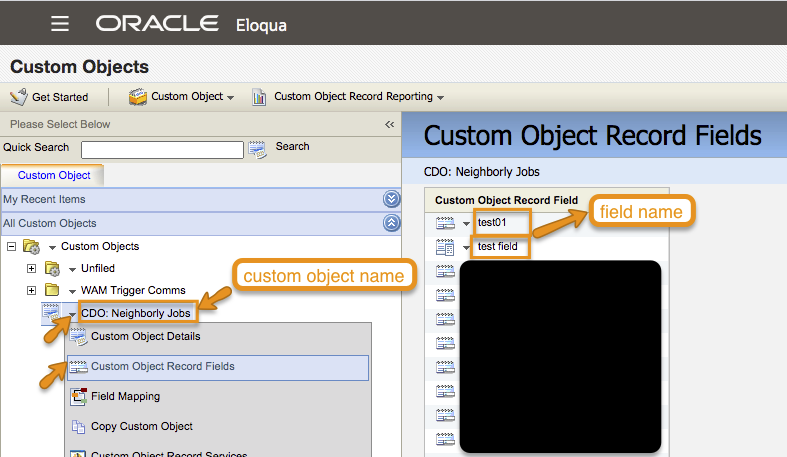
- カスタムオブジェクト名とフィールド名をメモします。
オプションで、Custom Object Record Reportingに移動し、目的のレポートを選択できます:
- Custom Object Data — このレポートを使用して、個々のカスタムオブジェクト内のすべてのカスタムオブジェクトレコードを表示します。レポートを印刷してExcelにエクスポートしたり、カスタムオブジェクトレコードをコピー、削除、または移動したりできます。
- Custom Object and Contact Data — このレポートを使用して、個々のカスタムオブジェクト内のすべてのカスタムオブジェクトレコードを、マッピングされているコンタクト情報とともに表示します。レポートは指定された期間で表示できます。デフォルトは過去1か月ですが、時間範囲(例: Start DateまたはEnd Date)または期間(例: Last weekまたはLast month)を変更できます。レポートを印刷してExcelにエクスポートできます。
クエリを実行する前に、Treasure Dataでデータ接続を作成して設定する必要があります。データ接続の一部として、統合にアクセスするための認証を提供します。
TD Consoleを開きます。
Integrations Hub > Catalogに移動します。
CatalogでEloquaを検索し、アイコンの上にカーソルを置いてCreate Authenticationを選択します。

- 認証するための資格情報を入力します:
| Parameter | Description |
|---|---|
| Authentication Method | Basic(デフォルト) |
| Site Name | Oracle EloquaサイトのURL |
| Username | Oracle Eloquaアカウントのユーザー名 |
| Password | アカウントのパスワード |
Continueを選択します。
認証の名前を入力し、Doneを選択します。
クエリには以下の制約が適用されます:
- クエリでは、各リソースタイプに正確な列名(大文字小文字を区別)とデータ型を持つ特定の列が必要です。
- クエリで列マッピングを定義する必要があります。
- カスタムオブジェクトまたはアカウントフィールドは大文字小文字を区別しません。
- カスタムオブジェクトまたはアカウントフィールドにスペースが含まれている場合は、アンダースコアに置き換える必要があります。
- クエリにカスタムオブジェクトまたはアカウントフィールド名に存在しないフィールド名が含まれている場合、エラーが返され、ジョブは失敗します。
- Creating a Destination Integrationの手順を完了します。
- Data Workbench > Queriesに移動します。
- データをエクスポートするクエリを選択します。
- クエリを実行して結果セットを検証します。
- Export Resultsを選択します。
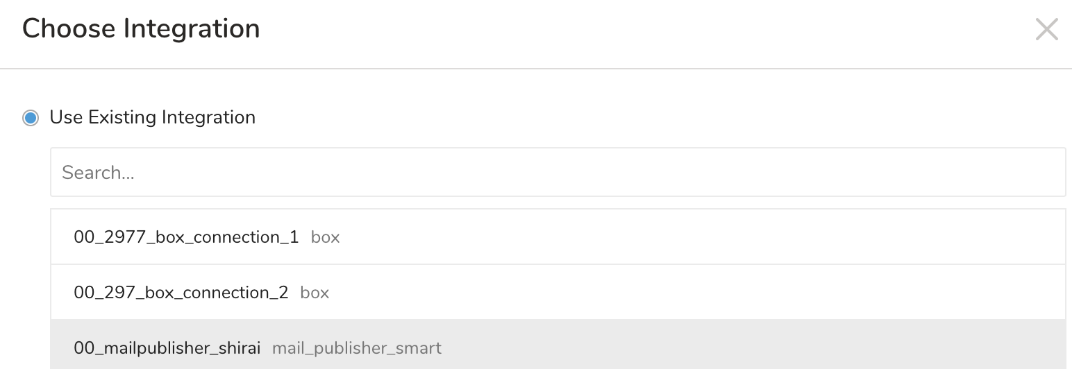
- 既存の統合認証を選択します。
- 追加のExport Resultsの詳細を定義します。エクスポート統合コンテンツで、統合パラメータを確認します。 たとえば、Export Results画面が異なる場合や、入力する追加の詳細がない場合があります:
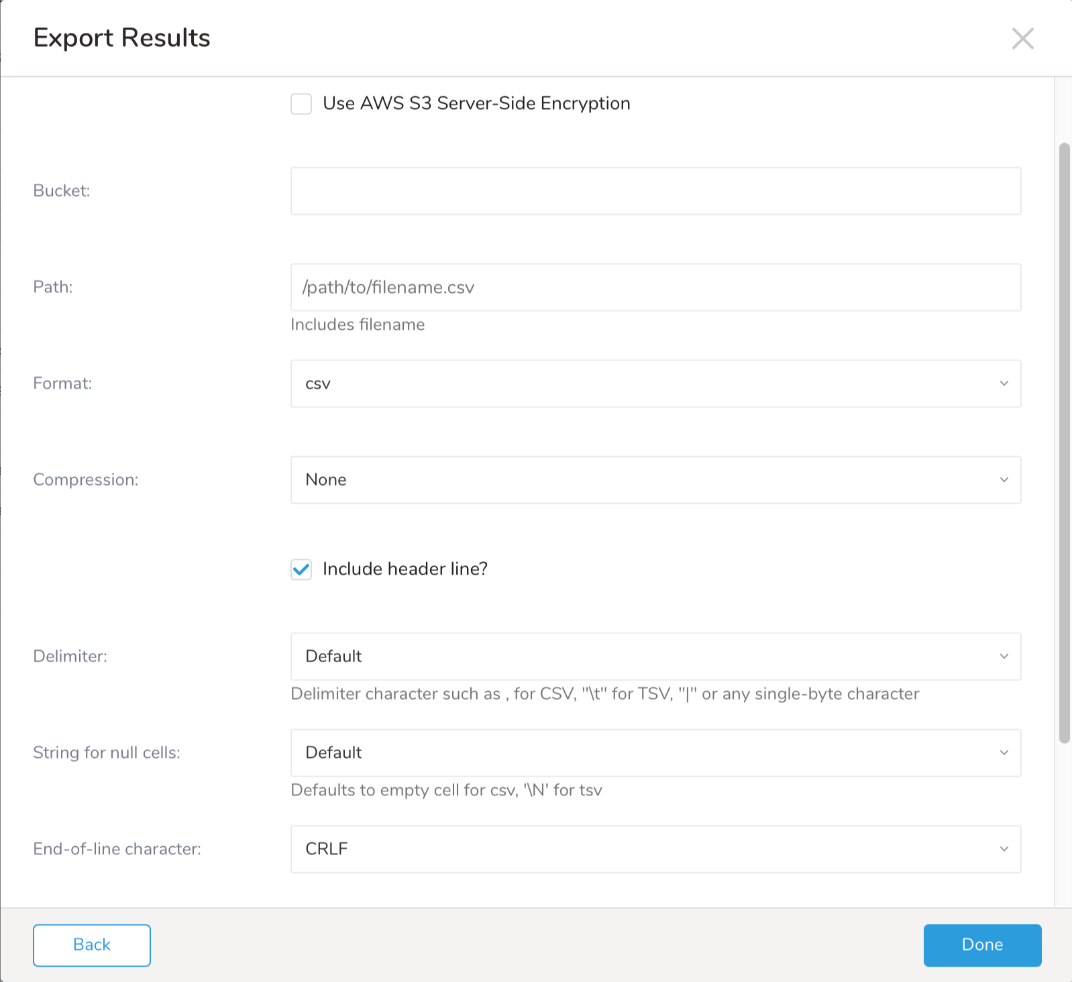
- Doneを選択します。
- クエリを実行します。
- 指定した宛先にデータが移動したことを検証します。
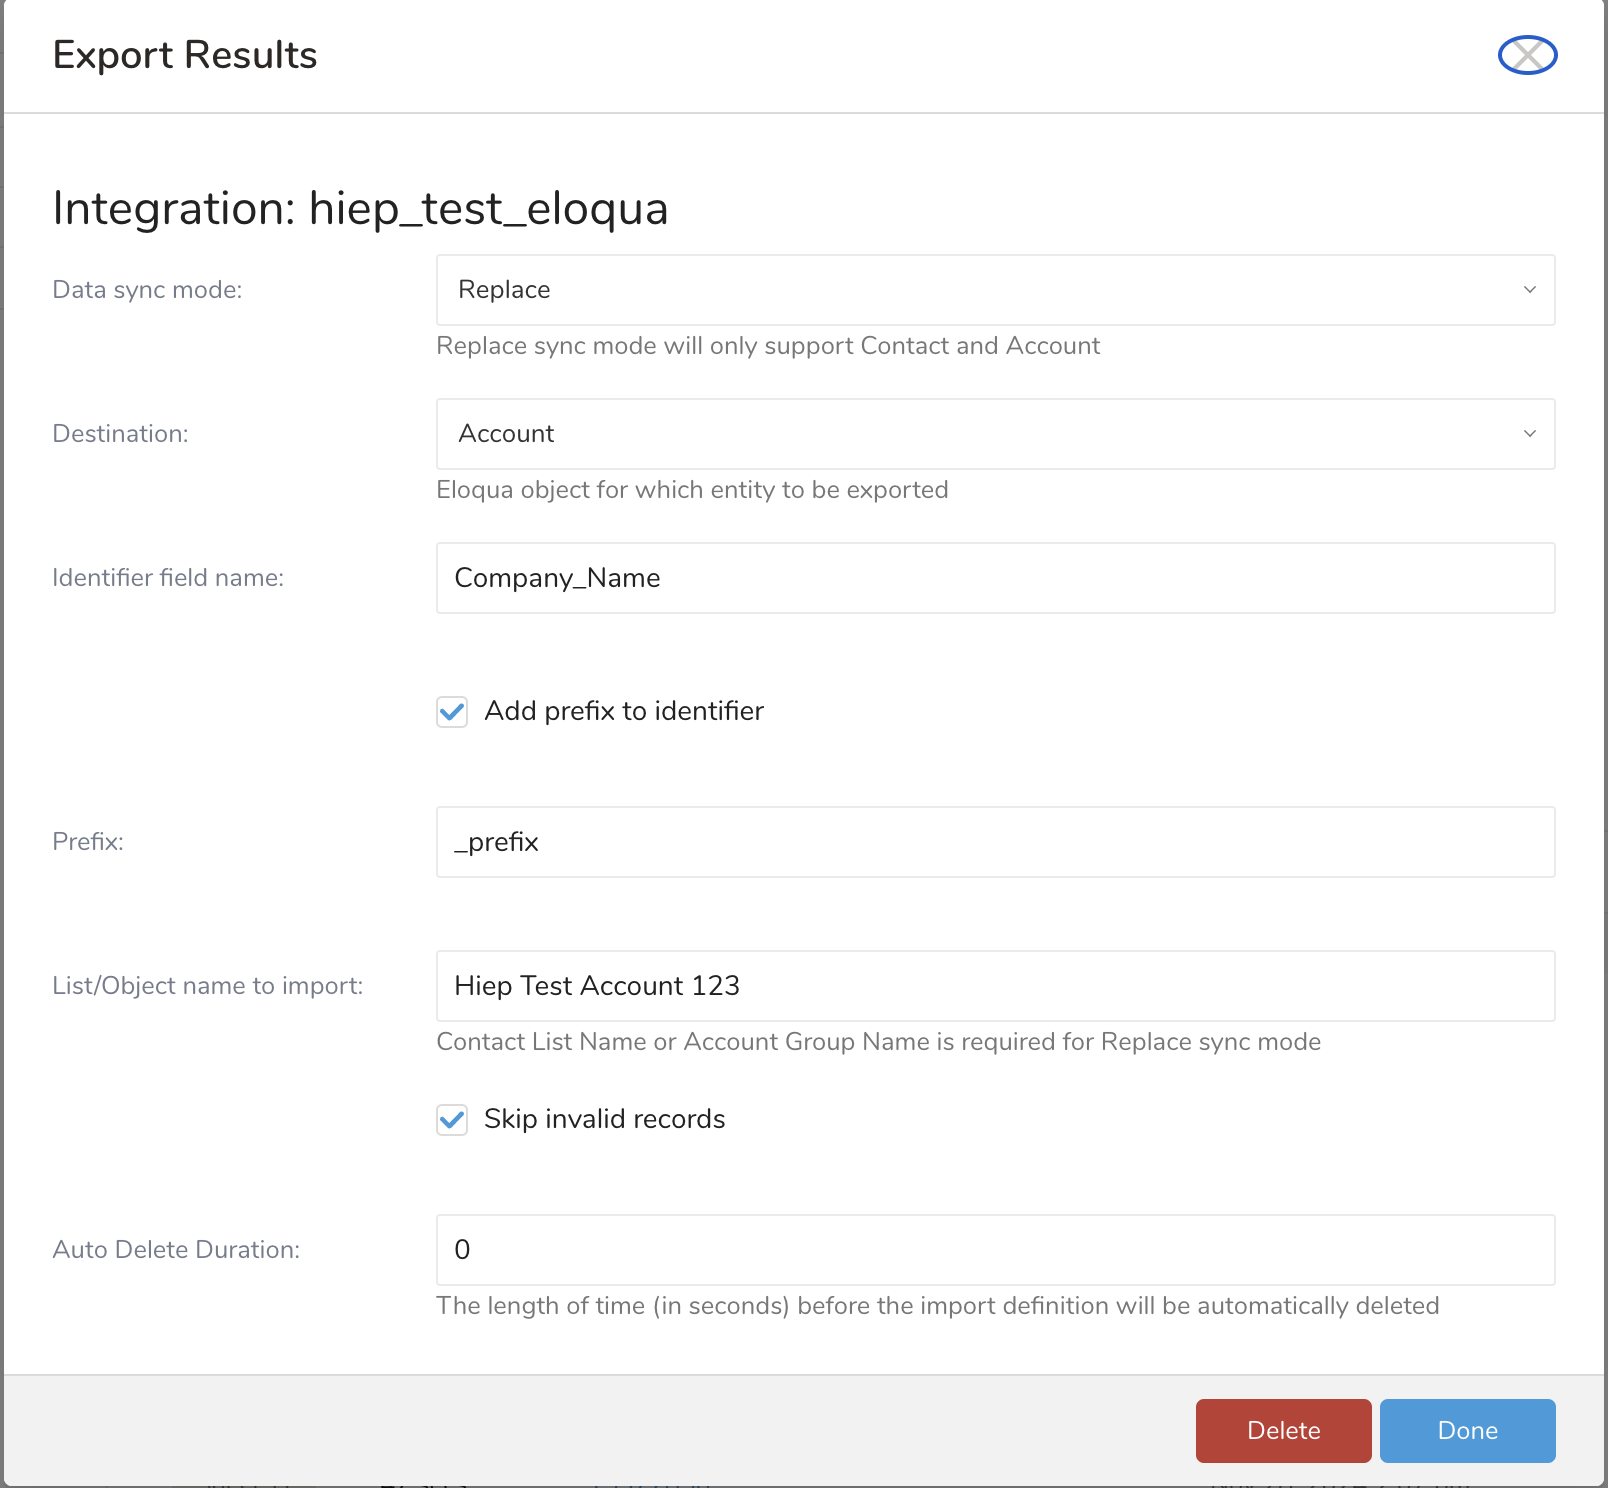
| Parameters | Value | Description |
|---|---|---|
| Data sync mode | AppendまたはReplace | データをエクスポートするEloquaアクション(AppendまたはReplace) |
| Destination | Contact | データをエクスポートするEloquaオブジェクト(コンタクトリストまたはカスタムオブジェクトまたはアカウント) |
| Custom Object Data | データをエクスポートするEloquaオブジェクト(コンタクトリストまたはカスタムオブジェクトまたはアカウント) | |
| Account | データをエクスポートするEloquaオブジェクト(コンタクトリストまたはカスタムオブジェクトまたはアカウント) | |
| Contact Shared List | データをエクスポートするEloquaオブジェクト(コンタクト共有リスト) | |
| Add a prefix to the identifier | 識別子列にプレフィックス値を追加して識別子値を変更する場合にチェックします。このオプションは、文字列型のデータ型を持つ識別子列でサポートされています。 | |
| Prefix | string value | このオプションは、文字列のデータ型を持つ識別子列でサポートされています。プレフィックス値が列値を識別するために追加されます。 |
| List/Object name to import | カスタムオブジェクト名は大文字小文字を区別しません。グループアカウント名は大文字小文字を区別しません(オプション) | エクスポートされたデータのコンタクトリスト名またはオブジェクト名。データをエクスポートするカスタムオブジェクト名。エクスポートされたデータのグループアカウント名。共有リスト名はエクスポートされたデータ用です。コンタクト共有リストでは必須です。 |
| Shared List Identifier Field Name | Shared List Identifier Field Name | フィールド名は、コンタクトエンティティを識別するために使用されます。コンタクトのメールアドレスを選択した場合、クエリにc_emailaddressフィールドと、コンタクトの外部IDとしてc_externalidフィールド、コンタクトのIDとしてc_idフィールドが必要です。 |
| Identifier Field Name | 宛先がContactの場合
| フィールド名は、コンタクトエンティティを識別するために使用されます。コンタクトのメールアドレスを選択した場合、クエリにc_emailaddressフィールドと、コンタクトの外部IDとしてc_externalidフィールド、コンタクトのIDとしてc_idフィールドが必要です。 |
宛先がCustom Object DataまたはAccountの場合 カスタムオブジェクトまたはアカウントデータクエリのフィールド名の1つです。たとえば、クエリが次の場合: SELECT col_a, col_b, col_c FROM your_table;値はcol_aまたはcol_bまたはcol_cである必要があります。 | フィールド名は、カスタムオブジェクトまたはアカウント行を識別するために使用されます。 | |
| Update Rule |
| ルールは、既存のデータを更新する際に使用されます。このパラメータの詳細については、Oracle Eloqua Developer Help Centerを参照してください。 |
| Skip invalid records | チェックした場合、Eloquaはデータ行エラーが発生してもsuccessを返します。それ以外の場合、無効なレコードがあるとジョブは失敗します。 | |
| Map custom object to contact | チェックした場合、ジョブはカスタムオブジェクトをコンタクトにマッピングしようとします。 | |
| Perform case-sensitive search when mapping custom object to contact | カスタムオブジェクトをコンタクトにマッピングする際に、大文字小文字を区別する検索を実行します。 | |
| CDO source field | フィールドの列名 | エクスポートスキーマで使用されるマッピングするフィールドの列名を入力します。Map custom object to contactが有効な場合に必須です。 |
| Contact map field | フィールドの列名 | マッピング用のコンタクトフィールドを入力します。Map custom object to contactが有効な場合に必須です。 |
| Auto Delete Duration | integer | インポート定義が自動的に削除されるまでの時間(秒単位)、0または3600より大きい値 |
クエリでは、各リソースタイプに特定の列と正確な名前(大文字小文字を区別)およびデータ型が必要です。
- col_a、col_b、col_cなどのカスタムオブジェクトまたはアカウントフィールドは、大文字小文字を区別しません。
- Eloquaサーバーのカスタムオブジェクトまたはアカウントフィールド名にスペースが含まれている場合は、クエリでアンダースコアに置き換えます。
- クエリにカスタムオブジェクトまたはアカウントフィールド名に存在しないフィールド名が含まれている場合、エラーが返され、ジョブは失敗します。
カスタムオブジェクトクエリ
SELECT col_a, col_b, col_bFROM your_table;たとえば、コンタクトをエクスポートするには、次のようなクエリを使用できます:
SELECT c_emailaddress, c_firstname, c_lastnameFROM contact;
SELECT identifier_type, identifierFROM table my_tableYou can use Scheduled Jobs with Result Export to periodically write the output result to a target destination that you specify.
Treasure Data's scheduler feature supports periodic query execution to achieve high availability.
When two specifications provide conflicting schedule specifications, the specification requesting to execute more often is followed while the other schedule specification is ignored.
For example, if the cron schedule is '0 0 1 * 1', then the 'day of month' specification and 'day of week' are discordant because the former specification requires it to run every first day of each month at midnight (00:00), while the latter specification requires it to run every Monday at midnight (00:00). The latter specification is followed.
Navigate to Data Workbench > Queries
Create a new query or select an existing query.
Next to Schedule, select None.

In the drop-down, select one of the following schedule options:
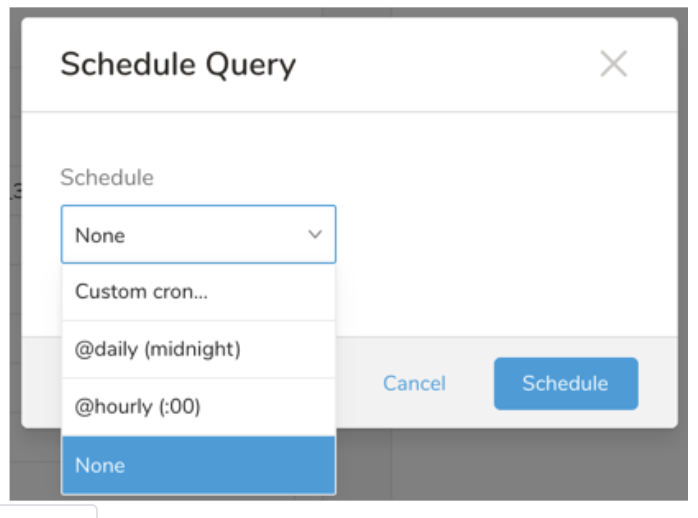
Drop-down Value Description Custom cron... Review Custom cron... details. @daily (midnight) Run once a day at midnight (00:00 am) in the specified time zone. @hourly (:00) Run every hour at 00 minutes. None No schedule.
| Cron Value | Description |
|---|---|
0 * * * * | Run once an hour. |
0 0 * * * | Run once a day at midnight. |
0 0 1 * * | Run once a month at midnight on the morning of the first day of the month. |
| "" | Create a job that has no scheduled run time. |
 *    *    *    *    *
 -    -    -    -    -
 |    |    |    |    |
 |    |    |    |    +----- day of week (0 - 6) (Sunday=0)
 |    |    |    +---------- month (1 - 12)
 |    |    +--------------- day of month (1 - 31)
 |    +-------------------- hour (0 - 23)
 +------------------------- min (0 - 59)
The following named entries can be used:
- Day of Week: sun, mon, tue, wed, thu, fri, sat.
- Month: jan, feb, mar, apr, may, jun, jul, aug, sep, oct, nov, dec.
A single space is required between each field. The values for each field can be composed of:
| Field Value | Example | Example Description |
|---|---|---|
| A single value, within the limits displayed above for each field. | ||
A wildcard '*' to indicate no restriction based on the field. | '0 0 1 * *' | Configures the schedule to run at midnight (00:00) on the first day of each month. |
A range '2-5', indicating the range of accepted values for the field. | '0 0 1-10 * *' | Configures the schedule to run at midnight (00:00) on the first 10 days of each month. |
A list of comma-separated values '2,3,4,5', indicating the list of accepted values for the field. | 0 0 1,11,21 * *' | Configures the schedule to run at midnight (00:00) every 1st, 11th, and 21st day of each month. |
A periodicity indicator '*/5' to express how often based on the field's valid range of values a schedule is allowed to run. | '30 */2 1 * *' | Configures the schedule to run on the 1st of every month, every 2 hours starting at 00:30. '0 0 */5 * *' configures the schedule to run at midnight (00:00) every 5 days starting on the 5th of each month. |
A comma-separated list of any of the above except the '*' wildcard is also supported '2,*/5,8-10'. | '0 0 5,*/10,25 * *' | Configures the schedule to run at midnight (00:00) every 5th, 10th, 20th, and 25th day of each month. |
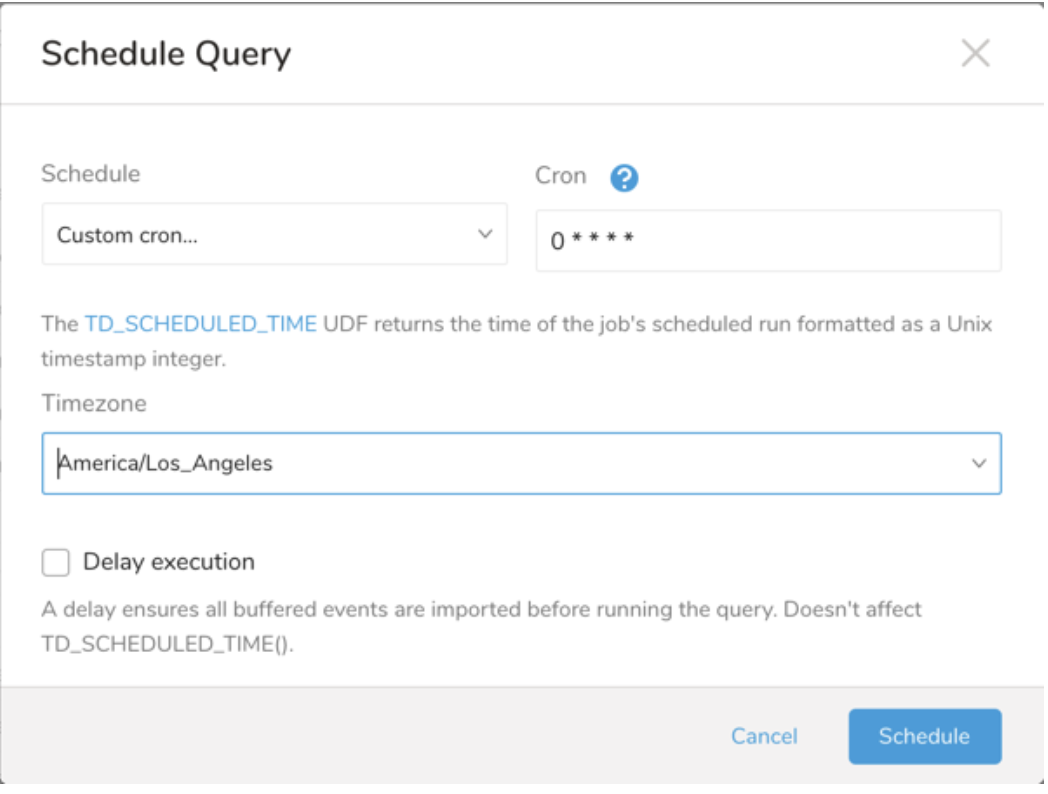
- (Optional) You can delay the start time of a query by enabling the Delay execution.
Save the query with a name and run, or just run the query. Upon successful completion of the query, the query result is automatically exported to the specified destination.
Scheduled jobs that continuously fail due to configuration errors may be disabled on the system side after several notifications.
(Optional) You can delay the start time of a query by enabling the Delay execution.
You can also send segment data to the target platform by creating an activation in the Audience Studio.
- Navigate to Audience Studio.
- Select a parent segment.
- Open the target segment, right-mouse click, and then select Create Activation.
- In the Details panel, enter an Activation name and configure the activation according to the previous section on Configuration Parameters.
- Customize the activation output in the Output Mapping panel.
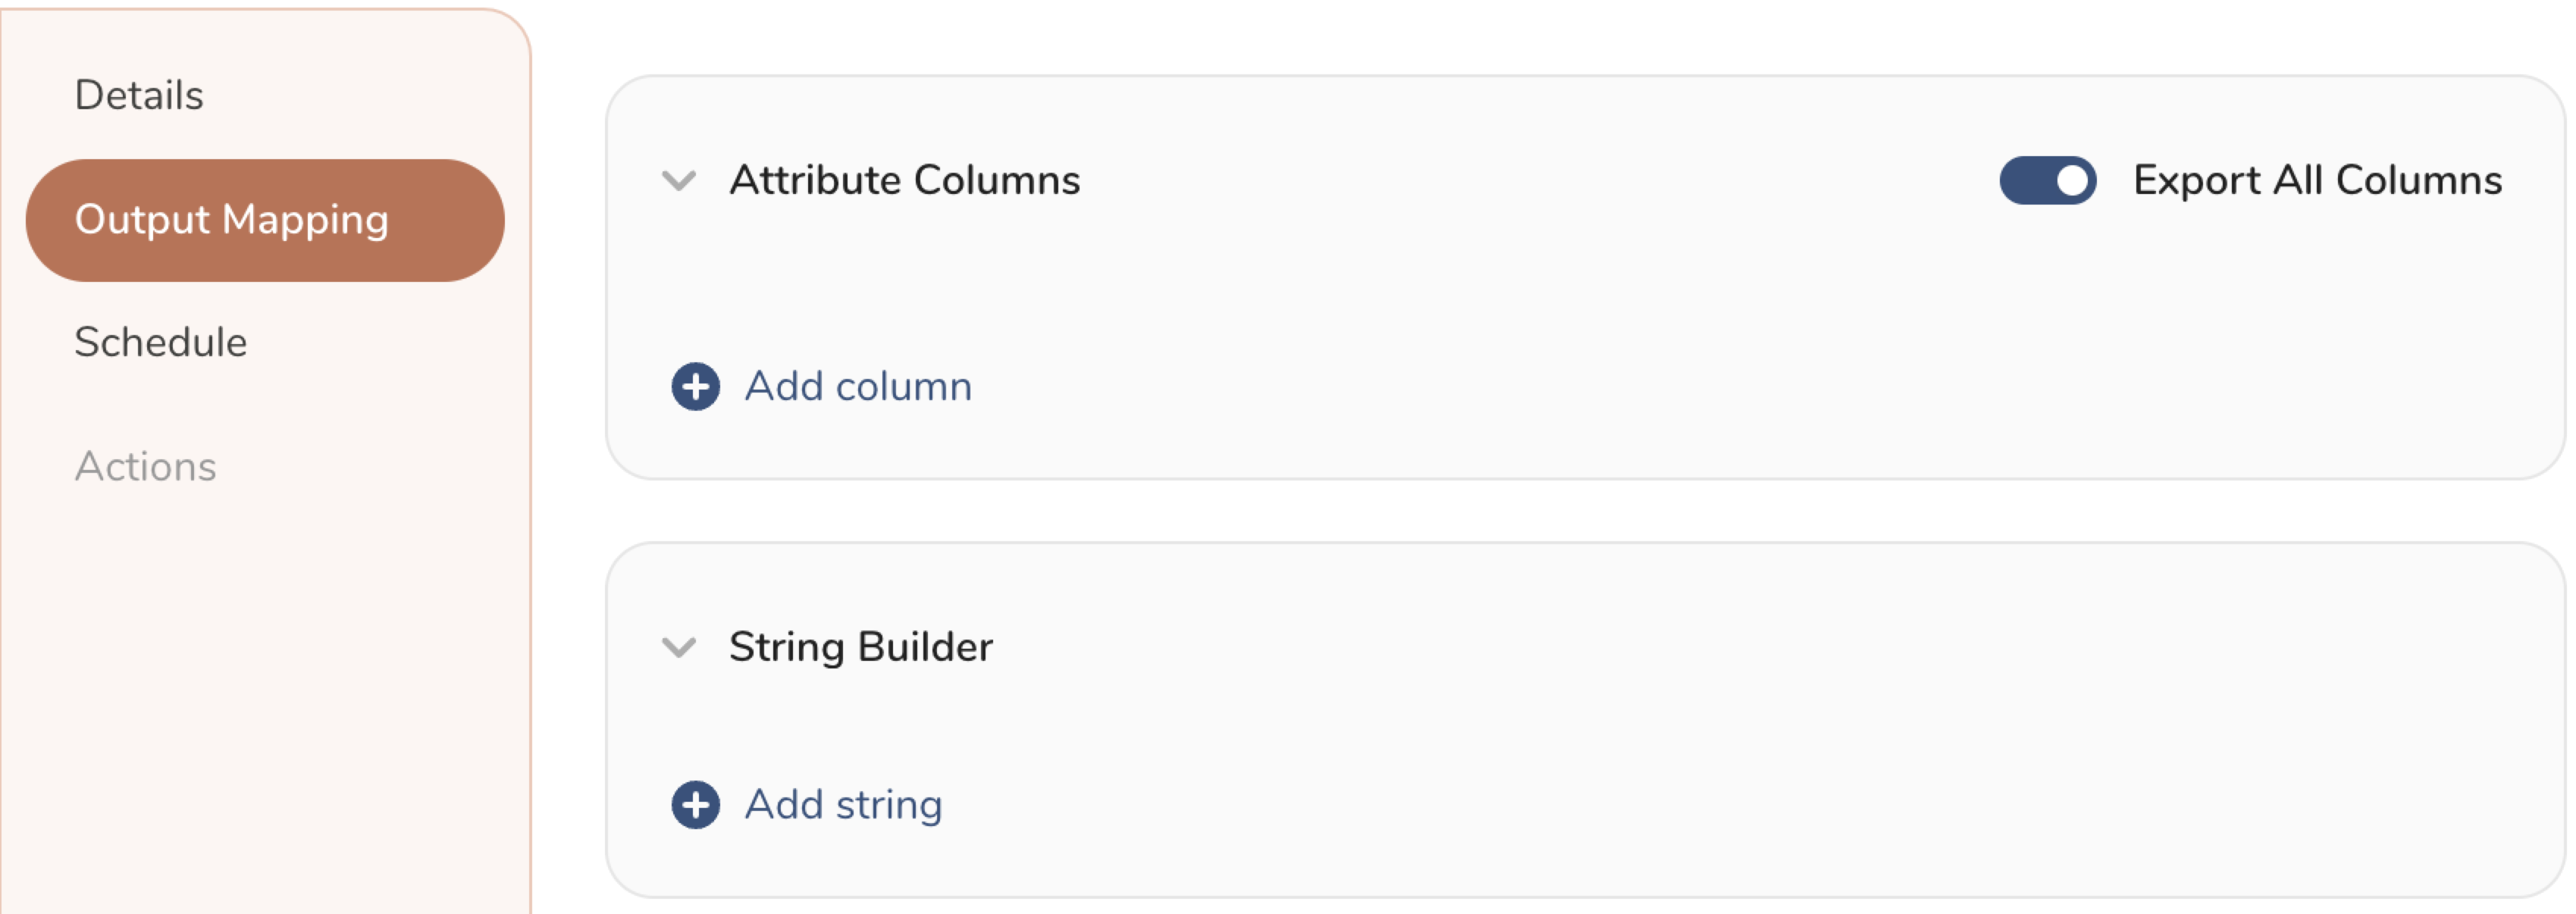
- Attribute Columns
- Select Export All Columns to export all columns without making any changes.
- Select + Add Columns to add specific columns for the export. The Output Column Name pre-populates with the same Source column name. You can update the Output Column Name. Continue to select + Add Columnsto add new columns for your activation output.
- String Builder
- + Add string to create strings for export. Select from the following values:
- String: Choose any value; use text to create a custom value.
- Timestamp: The date and time of the export.
- Segment Id: The segment ID number.
- Segment Name: The segment name.
- Audience Id: The parent segment number.
- + Add string to create strings for export. Select from the following values:
- Set a Schedule.
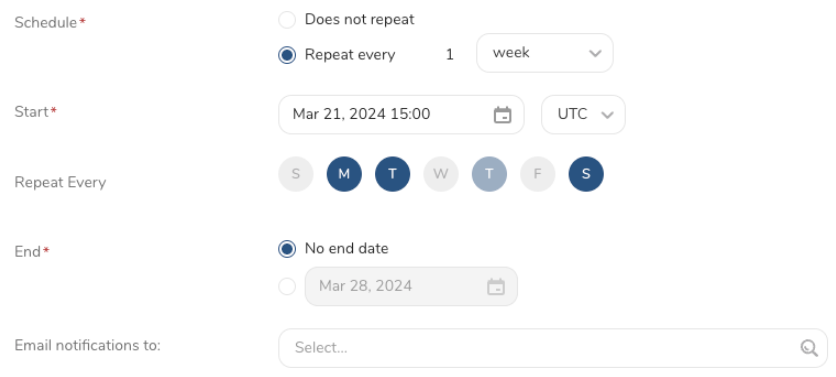
- Select the values to define your schedule and optionally include email notifications.
- Select Create.
If you need to create an activation for a batch journey, review Creating a Batch Journey Activation.
Treasure Workflow内でこのデータコネクターを使用してデータをエクスポートすることを指定できます。
詳細については、Using Workflows to Export Data with the TD Toolbeltを参照してください。
identifier_field_nameは以下の値を受け入れます:
- C_EmailAddress
- C_ExternalID
- C_ID
update_ruleは以下の値を受け入れます:
- always
- ifNewIsNotNull
- ifExistingIsNull
- useFieldRule
_export:
  td:
    database: eloqua_db

+eloqua_custom_object_export_task:
  td>: export_contact.sql
  database: ${td.database}
  result_connection: new_created_eloqua_auth
  result_settings:
    type: eloqua
    data_sync_mode: append # replace mode is only support account or contact list
    target: contact
    identifier_field_name: C_EmailAddress
    list_name: td_shared_list2
    update_rule: always
    skip_invalid_records: true
auto_delete_duration: 3600custom_object_identifier_fieldは、export_custom_object.sqlクエリで指定されたフィールドの1つです。
update_ruleは以下の値を受け入れます:
- always
- ifNewIsNotNull
- ifExistingIsNull
- useFieldRule
custom_object_nameはOracle Eloqua Consoleから取得できます。
_export:
  td:
    database: eloqua_db

+eloqua_custom_object_export_task:
  td>: export_custom_object.sql
  database: ${td.database}
  result_connection: new_created_eloqua_auth
  result_settings:
    type: eloqua
    target: custom_object
    custom_object_identifier_field: {xxxxx}
    list_name: {custom_object_name}
    update_rule: always
    skip_invalid_records: true
    map_custom_object_to_contact: true,
    perform_case_sensitive_search: false,
    cdo_source_field: Email_Address,
    contact_map_field: C_EmailAddress
auto_delete_duration: 0account_identifier_fieldは、export_account.sqlクエリで指定されたフィールドの1つです。
update_ruleは以下の値を受け入れます:
- always
- ifNewIsNotNull
- ifExistingIsNull
- useFieldRule
group_account_nameはOracle Eloqua Consoleから取得できます。
_export:
  td:
    database: eloqua_db

+eloqua_account_export_task:
  td>: export_account.sql
  database: ${td.database}
  result_connection: new_created_eloqua_auth
  result_settings:
    type: eloqua
    data_sync_mode: append/replace
    target: account
    account_identifier_field: {xxxxx}
    list_name: {group_account_name}
    custom_identifier: true
    prefix_identifier: prefix_value
    update_rule: always
    skip_invalid_records: true
auto_delete_duration: 0identifier_field_nameは以下の値を受け入れます:
- C_EmailAddress
- C_ExternalID
- C_ID
update_ruleは以下の値を受け入れます:
- always
- ifNewIsNotNull
- ifExistingIsNull
- useFieldRule
_export:
  td:
    database: eloqua_db

+eloqua_custom_object_export_task:
  td>: export_contact.sql
  database: ${td.database}
  result_connection: new_created_eloqua_auth
  result_settings:
    type: eloqua
    data_sync_mode: append
    target: contact_shared_list
    identifier_field_name: C_EmailAddress
    list_name: td_shared_list2 # Required
    segment_name: td_segment_name #Required
    update_rule: always
    skip_invalid_records: true
auto_delete_duration: 3600CLI(Toolbelt)を使用してEloquaに結果をエクスポートすることもできます
td queryコマンドの--resultオプションとして、サーバーにエクスポートするための情報を指定する必要があります。td queryコマンドについては、この記事を参照してください。
使用例
td query -d your_data_base_here \
-w "SELECT c_emailaddress AS C_EmailAddress, c_firstname AS C_First_Name, c_lastname AS C_Last_Name, c_company  AS Company from eloqua_contact_output" \
-T presto \
--result '{ "type": "eloqua","auth_method": "basic", "site_name": "your site name", "username": "username","password": "password","data_sync_mode": "replace","target": "contact", "list_name": "your list name","identifier_field_name": "C_EmailAddress"}'- API Overview: https://docs.oracle.com/en/cloud/saas/marketing/eloqua-rest-api/APIRequests.html
- Bulk 2.0: https://docs.oracle.com/en/cloud/saas/marketing/eloqua-rest-api/Getting_Started_Bulk.html