OneDrive Import Integrationの詳細を見る。
ジョブ結果を直接OneDriveアカウントに送信できます。
以下のトピックに進んでください:
- TD Toolbeltを含むTreasure Dataの基本知識
- OneDriveまたはSharePointアカウント
- 認可されたTreasure Dataアカウントアクセス
データ接続を設定する際、統合にアクセスするための認証を提供します。Treasure Dataでは、認証を設定してからソース情報を指定します。
Integrations Hub -> Catalogに移動し、OneDriveを検索して選択します。
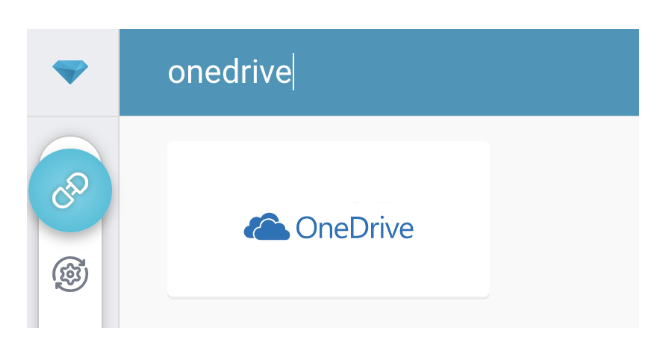
以下のダイアログが開きます。
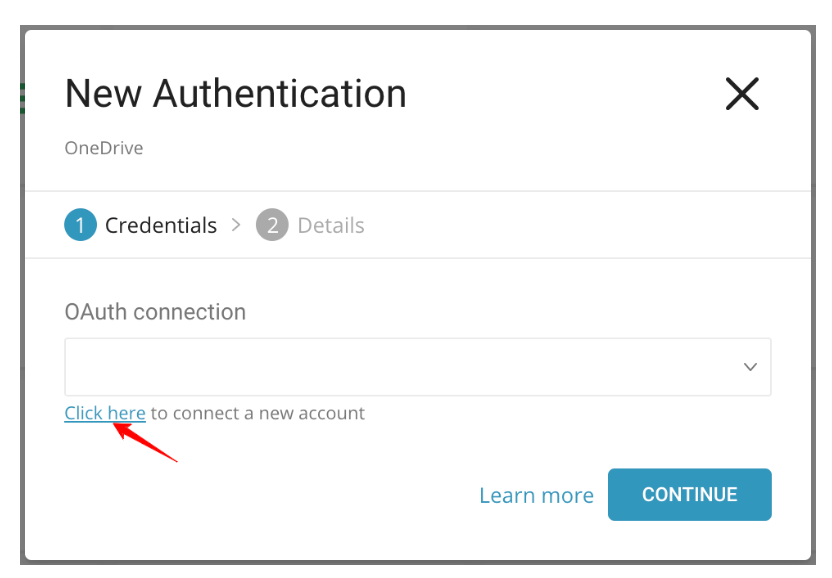
Treasure Data OneDriveへのアクセスには、OAuth2認証が必要です。この認証では、ユーザーが手動でTreasure DataアカウントをそれぞれのOneDriveアカウントに接続する必要があります。
MicrosoftテナントのAdmin ユーザーまたは通常のユーザーがコネクターに認証する方法に影響する2つの認証設定があります:
- 直接ユーザー認証: ユーザーのMicrosoftテナントは、管理者による事前承認を必要としません。組織内のすべてのユーザーは、管理者による事前承認なしで、OAuth認証フローを通じて直接コネクターを認証できます。
- 管理者による事前承認が必要: ユーザーのMicrosoftテナントは、通常のユーザーが認証する前に、管理者がデータコネクターを事前承認する必要があるように設定されています。この設定は、より厳格なセキュリティ管理を持つ組織でよく見られ、管理者が組織全体に代わってアプリケーションに権限を付与する必要があります。コネクターが事前承認されると、通常のユーザーはOAuth認証フローを進めて、自分のアカウントをMicrosoft OneDriveに接続できます。
直接ユーザー認証の場合: 認証するには、以下の手順を完了してください:
- Click here to connect to a new accountを選択します。
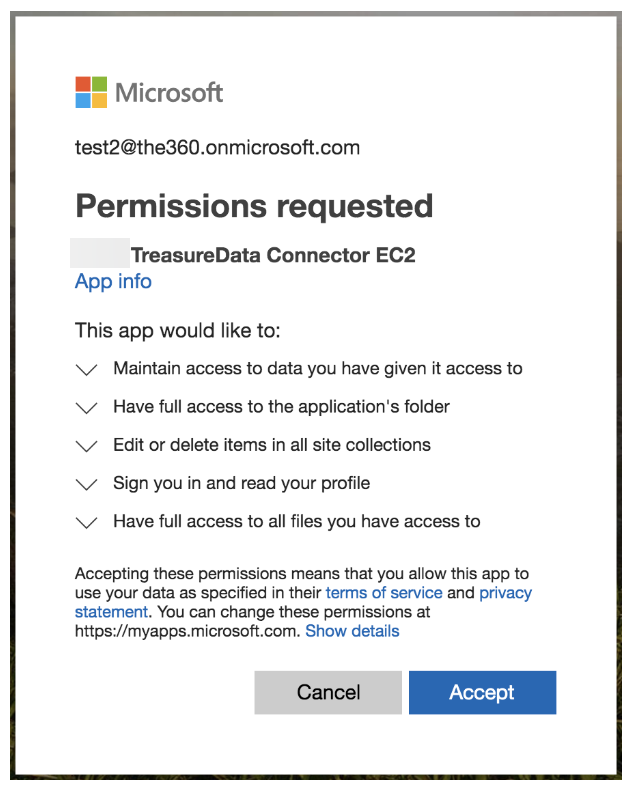
- ポップアップウィンドウでOneDriveアカウントにログインし、Treasure Dataアプリへのアクセスを許可します。
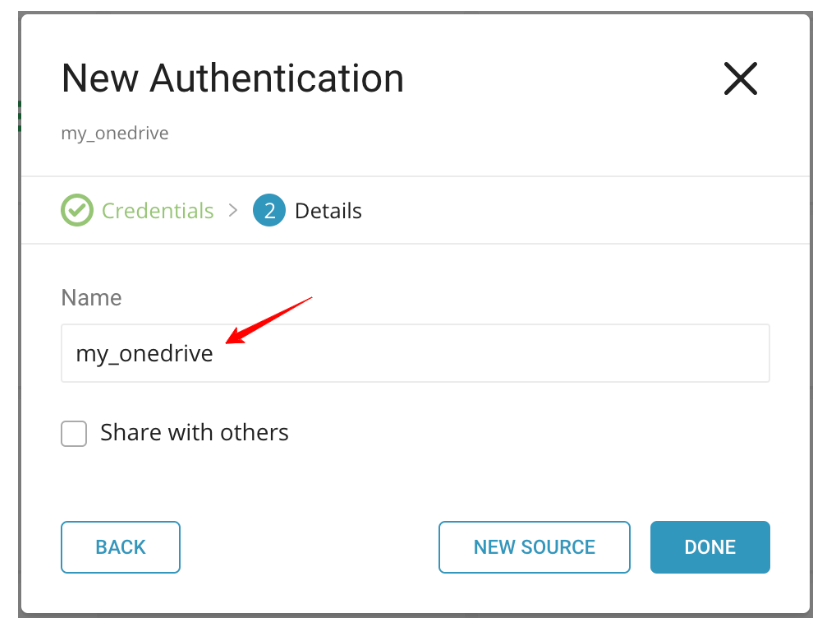
- TD Consoleにリダイレクトされます。最初のステップ(新しい接続を作成)を繰り返し、新しいOAuth接続を選択します。
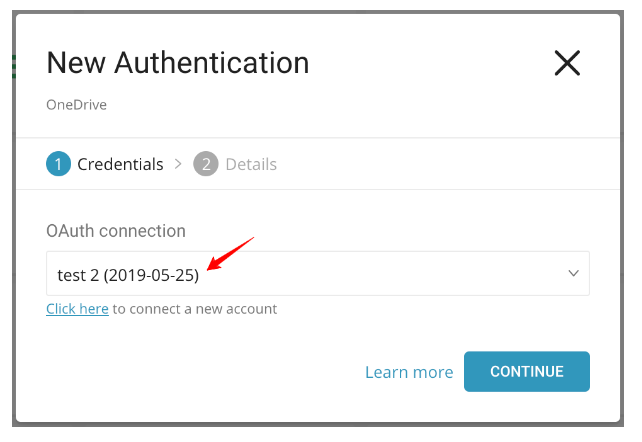
- 新しいOneDrive接続に名前を付けます。Doneを選択します。
- 管理者による事前承認が必要の場合、認証フローは似ていますが、管理者ユーザーが組織全体のコネクターを事前承認する最初のステップを実行する必要があります:
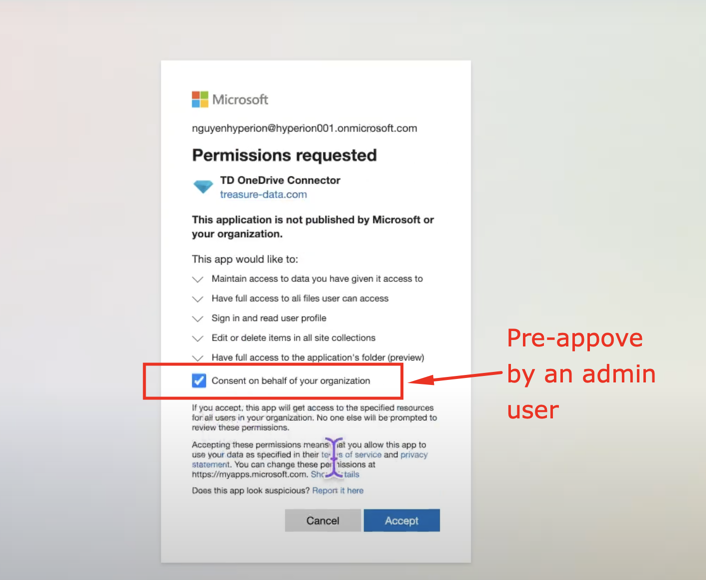
このステップが完了すると、同じMicrosoftテナント内のすべての通常のユーザーは、同意付与画面を再度通過することなくコネクターを認証できます。
このステップでは、クエリを作成または再利用します。クエリで、データ接続を設定します。
- TD Consoleクエリエディターページに移動します。
- データをエクスポートするために使用する予定のクエリにアクセスします。
- 必要に応じて、クエリをコンパイルします。
- Export Resultsを選択します。
- 検索ボックスに接続名を入力して、OneDrive接続をフィルタリングして選択します。
- すべての情報を編集します。

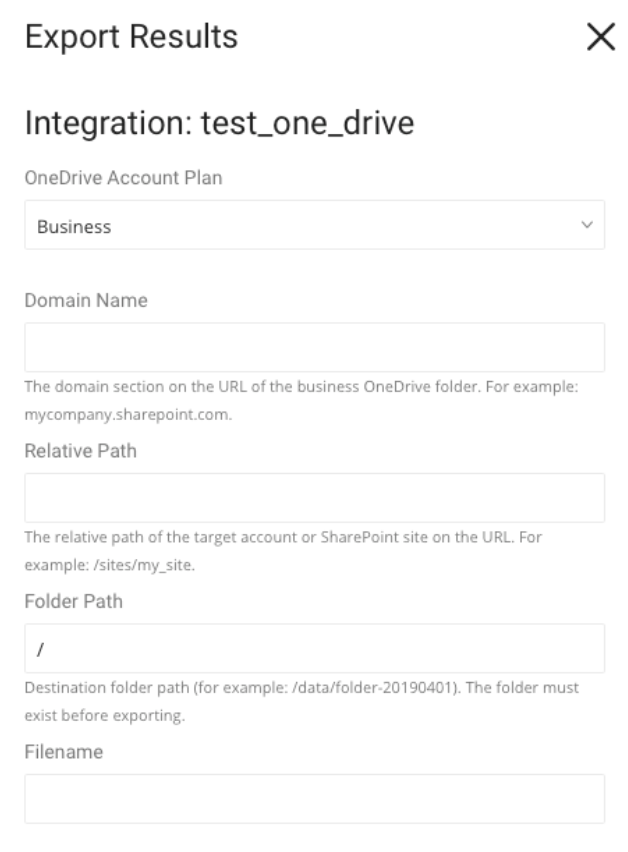

OneDrive Account Plan: 2つのアカウントプランがあります:
- Business: ドメイン、相対パス、およびフォルダパスを指定する必要があります。
- Personal: フォルダパスと、それが共有フォルダであるかどうかを指定する必要があります。
Domain Name: フォルダのドメイン。
Relative Path: OneDriveまたはSharePointサイト内のユーザーフォルダの相対パス。
Folder Path: OneDriveまたはSharePoint内のフォルダのディレクトリ。
File Name: 宛先ファイル名。マルチバイト文字は使用できません。
This is a shared folder: 誰かによって共有されているフォルダの場合に選択します
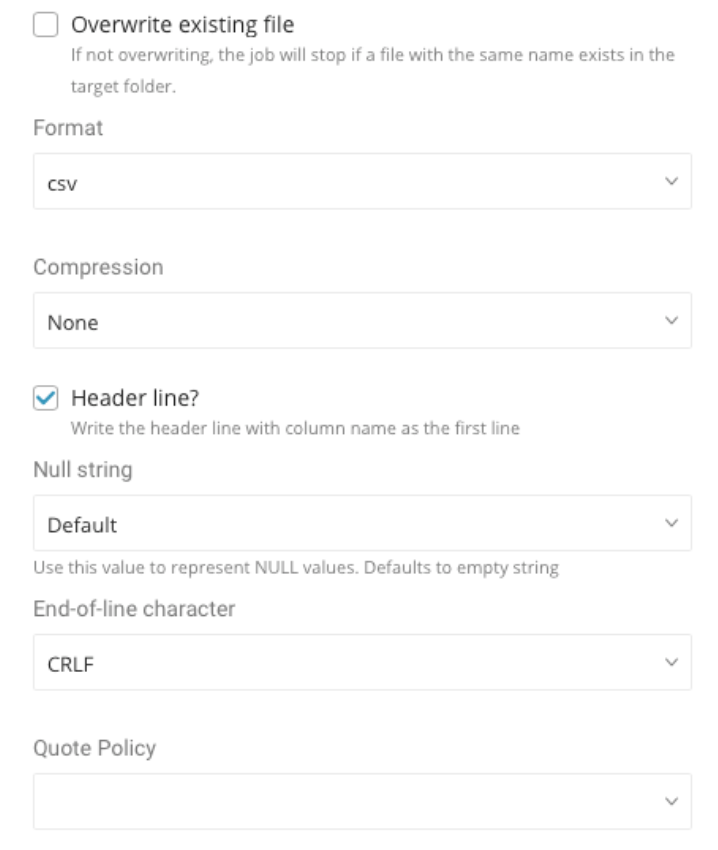
Format: ファイル拡張子。
Encoders 結果を圧縮するかどうかを示します。利用可能なオプション: None、gz、およびbzip2、暗号化PGP
Public Key 公開鍵は、アップロードする前にファイルを暗号化するために使用されます
Key Identifier ファイルを保護するために使用される暗号化サブキーのKey IDを指定します。マスターキーは暗号化プロセスから除外されます。
Amor ASCII armorを使用するかどうか
Compression Type
- Boxサーバーにアップロードするために暗号化する前に圧縮されるファイルを圧縮するために使用される圧縮アルゴリズムを定義します。
- 注意: 暗号化してアップロードする前に、ファイルを圧縮してください。復号化すると、ファイルは.gzや.bz2などの圧縮形式に戻ります。
Header line: エクスポートされたデータに列名をヘッダー行として含める場合に選択します。
Null String: NULL値を表すためにこの値を使用します。利用可能なオプション:
- Default. ファイル形式CSVの場合、空の文字列('')がNull値を表すために使用され、TSV形式の場合、\Nが使用される場合に選択します。
- Empty string
- \N NULL
- null
End-of-line character: 行末の文字。利用可能なオプションは、CRLF、LF、およびCRです
Quote Policy: 利用可能なオプション:
- ALL. すべての値が二重引用符("")で囲まれる場合に選択します。
- MINIMAL. 埋め込まれた引用符(")を含む値が、連続する引用符のペア("")で表示される場合に選択します。MINIMALクォートポリシーはCSVに適用されます。
- NONE. 埋め込まれた引用符のエスケープが適用されない場合に選択します。デフォルトでは、NONEはTSVファイル形式に適用されます。
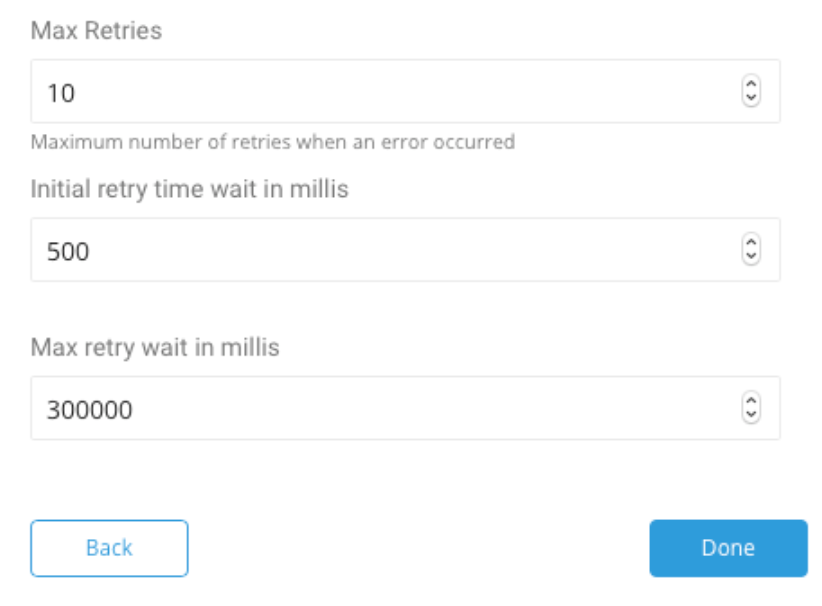
Max Retries: OneDriveサーバーエラーまたはネットワークエラーによりエラーが発生した場合、アップロードを中止する前に試行される再試行の回数。
Initial Retry Time Wait In Millies: エラーが発生した場合、再試行の初期待機時間。各再試行後に待機時間を2倍にします。
Max Retry Wait In Millies: 再試行の上限待機時間。
You can use Scheduled Jobs with Result Export to periodically write the output result to a target destination that you specify.
Treasure Data's scheduler feature supports periodic query execution to achieve high availability.
When two specifications provide conflicting schedule specifications, the specification requesting to execute more often is followed while the other schedule specification is ignored.
For example, if the cron schedule is '0 0 1 * 1', then the 'day of month' specification and 'day of week' are discordant because the former specification requires it to run every first day of each month at midnight (00:00), while the latter specification requires it to run every Monday at midnight (00:00). The latter specification is followed.
Navigate to Data Workbench > Queries
Create a new query or select an existing query.
Next to Schedule, select None.

In the drop-down, select one of the following schedule options:
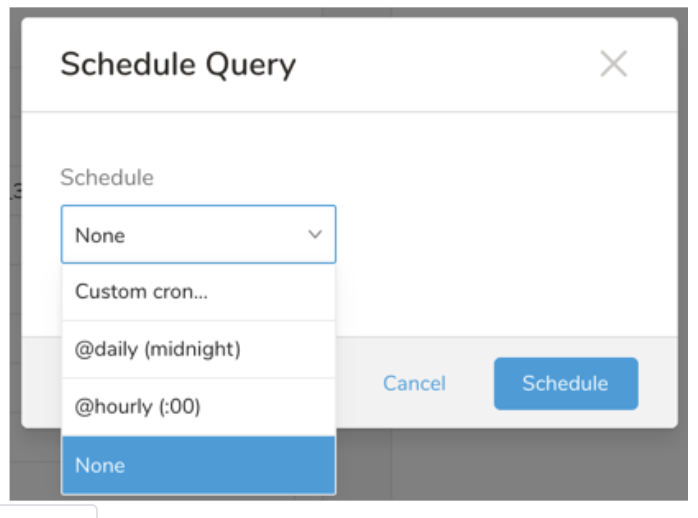
Drop-down Value Description Custom cron... Review Custom cron... details. @daily (midnight) Run once a day at midnight (00:00 am) in the specified time zone. @hourly (:00) Run every hour at 00 minutes. None No schedule.
| Cron Value | Description |
|---|---|
0 * * * * | Run once an hour. |
0 0 * * * | Run once a day at midnight. |
0 0 1 * * | Run once a month at midnight on the morning of the first day of the month. |
| "" | Create a job that has no scheduled run time. |
 *    *    *    *    *
 -    -    -    -    -
 |    |    |    |    |
 |    |    |    |    +----- day of week (0 - 6) (Sunday=0)
 |    |    |    +---------- month (1 - 12)
 |    |    +--------------- day of month (1 - 31)
 |    +-------------------- hour (0 - 23)
 +------------------------- min (0 - 59)
The following named entries can be used:
- Day of Week: sun, mon, tue, wed, thu, fri, sat.
- Month: jan, feb, mar, apr, may, jun, jul, aug, sep, oct, nov, dec.
A single space is required between each field. The values for each field can be composed of:
| Field Value | Example | Example Description |
|---|---|---|
| A single value, within the limits displayed above for each field. | ||
A wildcard '*' to indicate no restriction based on the field. | '0 0 1 * *' | Configures the schedule to run at midnight (00:00) on the first day of each month. |
A range '2-5', indicating the range of accepted values for the field. | '0 0 1-10 * *' | Configures the schedule to run at midnight (00:00) on the first 10 days of each month. |
A list of comma-separated values '2,3,4,5', indicating the list of accepted values for the field. | 0 0 1,11,21 * *' | Configures the schedule to run at midnight (00:00) every 1st, 11th, and 21st day of each month. |
A periodicity indicator '*/5' to express how often based on the field's valid range of values a schedule is allowed to run. | '30 */2 1 * *' | Configures the schedule to run on the 1st of every month, every 2 hours starting at 00:30. '0 0 */5 * *' configures the schedule to run at midnight (00:00) every 5 days starting on the 5th of each month. |
A comma-separated list of any of the above except the '*' wildcard is also supported '2,*/5,8-10'. | '0 0 5,*/10,25 * *' | Configures the schedule to run at midnight (00:00) every 5th, 10th, 20th, and 25th day of each month. |
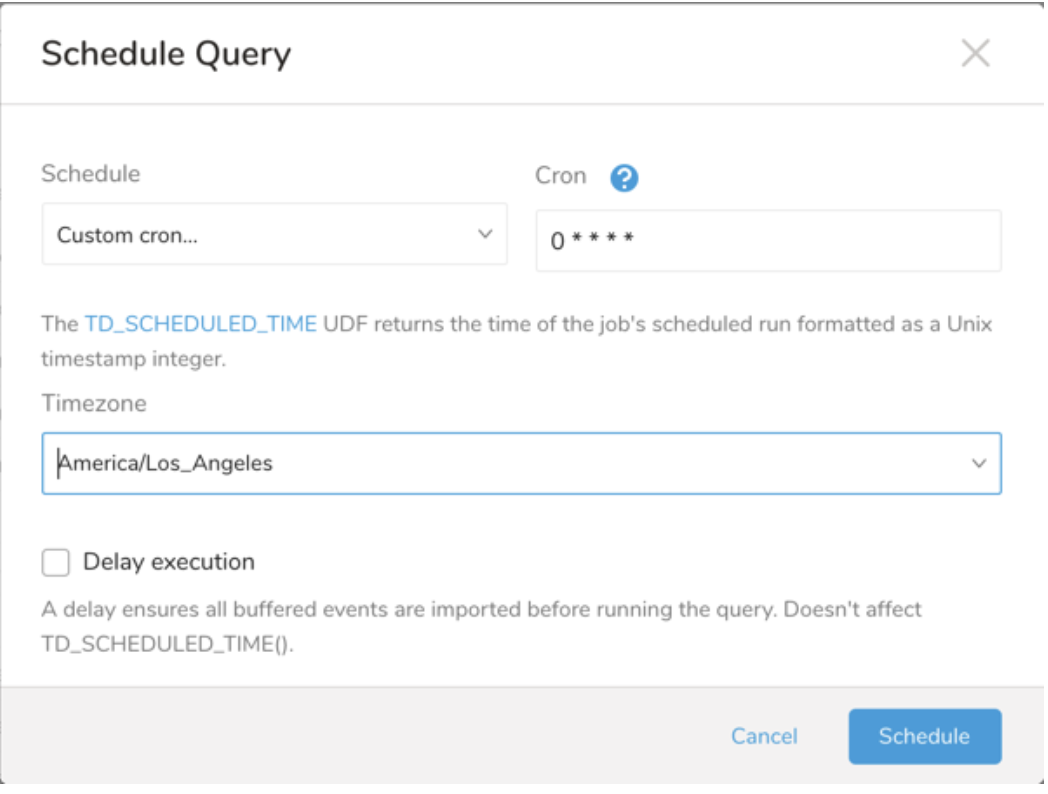
- (Optional) You can delay the start time of a query by enabling the Delay execution.
Save the query with a name and run, or just run the query. Upon successful completion of the query, the query result is automatically exported to the specified destination.
Scheduled jobs that continuously fail due to configuration errors may be disabled on the system side after several notifications.
(Optional) You can delay the start time of a query by enabling the Delay execution.
SELECT email, first_name, last_name, region, age, gender, website FROM ( VALUES ('kate1@gmail.com', 'Kate', 'Tiny', 'Asia', '41 and above', 'female', 'google.com'), ('ronan@gmail.com', 'R', 'P', 'Americas', '21-30', 'male', 'google.com'), ('michelle@gmail.com', 'M', 'C', 'EMEA', '31-40', 'male', 'facebook.com')) tbl (email, first_name, last_name, region, age, gender, website);You can also send segment data to the target platform by creating an activation in the Audience Studio.
- Navigate to Audience Studio.
- Select a parent segment.
- Open the target segment, right-mouse click, and then select Create Activation.
- In the Details panel, enter an Activation name and configure the activation according to the previous section on Configuration Parameters.
- Customize the activation output in the Output Mapping panel.
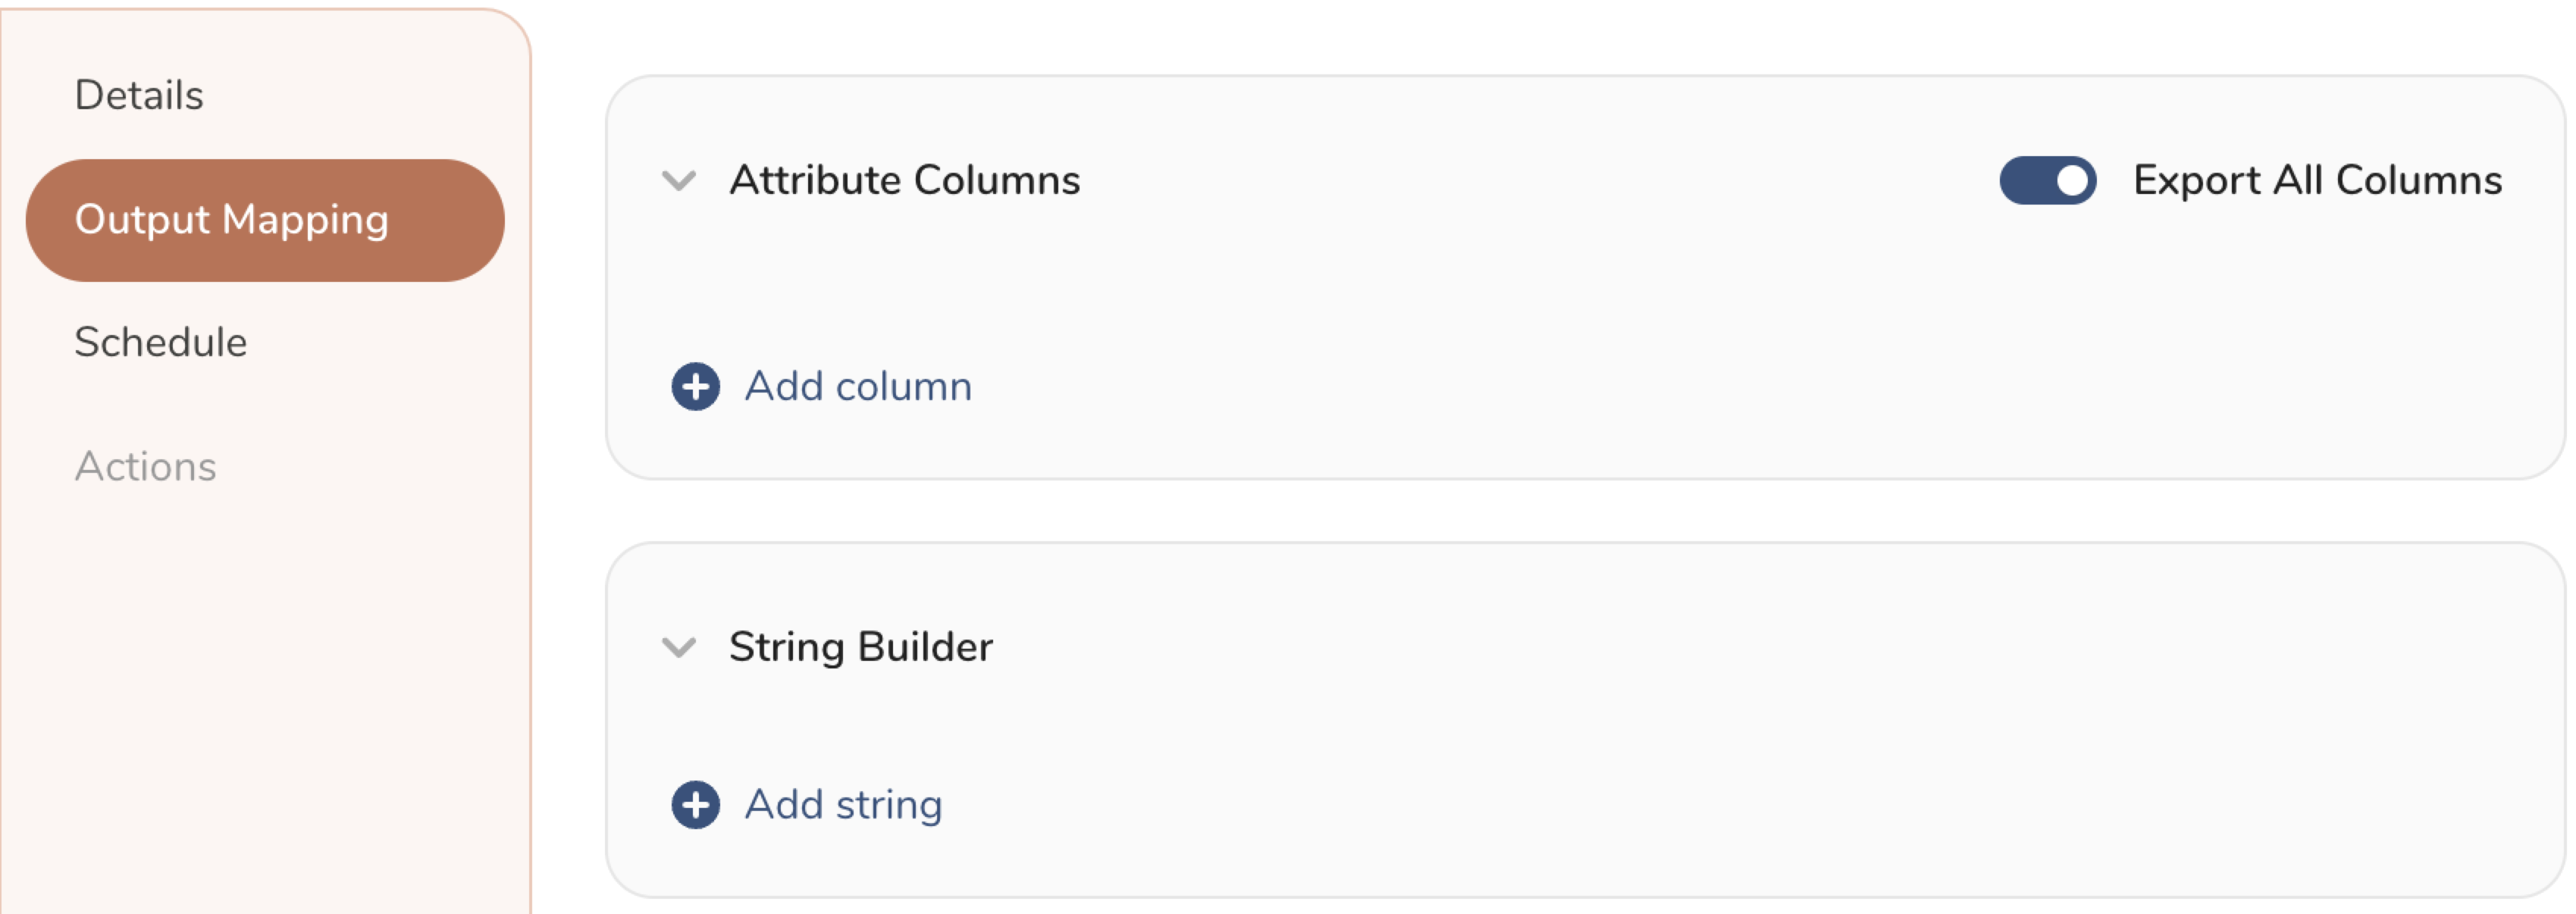
- Attribute Columns
- Select Export All Columns to export all columns without making any changes.
- Select + Add Columns to add specific columns for the export. The Output Column Name pre-populates with the same Source column name. You can update the Output Column Name. Continue to select + Add Columnsto add new columns for your activation output.
- String Builder
- + Add string to create strings for export. Select from the following values:
- String: Choose any value; use text to create a custom value.
- Timestamp: The date and time of the export.
- Segment Id: The segment ID number.
- Segment Name: The segment name.
- Audience Id: The parent segment number.
- + Add string to create strings for export. Select from the following values:
- Set a Schedule.
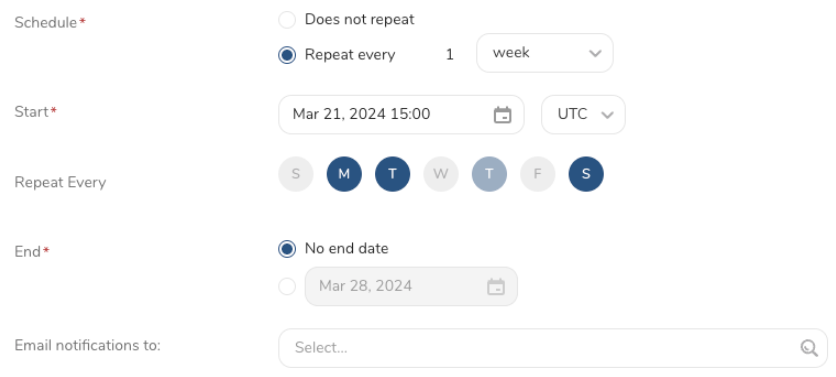
- Select the values to define your schedule and optionally include email notifications.
- Select Create.
If you need to create an activation for a batch journey, review Creating a Batch Journey Activation.
timezone: UTC

_export:
  td:
    database: sample_datasets

+td-result-into-one-drive:
  td>: queries/sample.sql
  result_connection: your_connection_name
  result_settings:
    account_type:
    replace_existing:
    file_name:
    folder_path:
    domain_name:
    server_relative_path:
    is_shared_folder:
    replace_existing:
    format:
    compression:
    header_line:
    null_string:
    newline:
quote_policy:TD Toolbeltをインストールします。
td queryコマンドの-r / --resultオプションを使用して、OneDrive結果出力先を追加します:
td query -d test_db -w \
'SELECT id, via FROM table1' \
--type presto -r \
'{"type":"one_drive", "refresh_token":"***","account_type":"personal","domain_name":null,"server_relative_path":null,"folder_path":"/abc","is_shared_folder":false,"file_name":"test_file","replace_existing":null,"format":"csv","compression":"","header_line":true,"null_string":"default","newline":"CRLF","quote_policy":null,"retry_count":"5","retry_initial_wait_millis":"1000","max_retry_wait_millis":"300000"}'td sched:createコマンドの-r / --resultオプションを使用して、OneDrive結果出力先を追加します:
td sched:create every_6_mins "*/6 * * * *" \
-d test_db -w 'SELECT id, via FROM table1' \
--type presto \
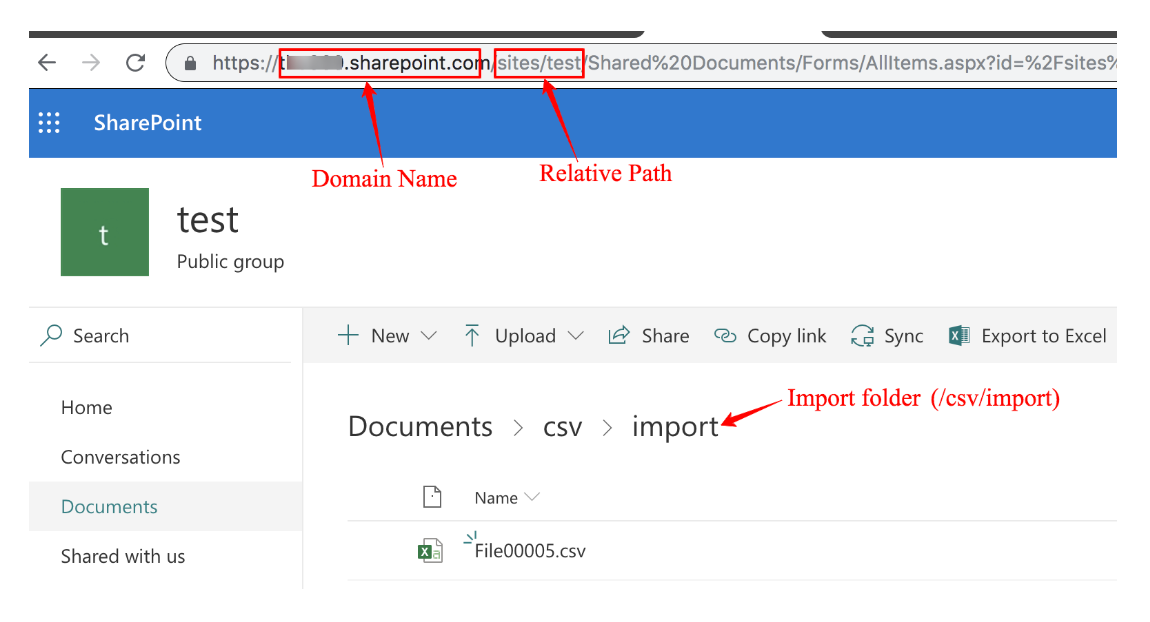
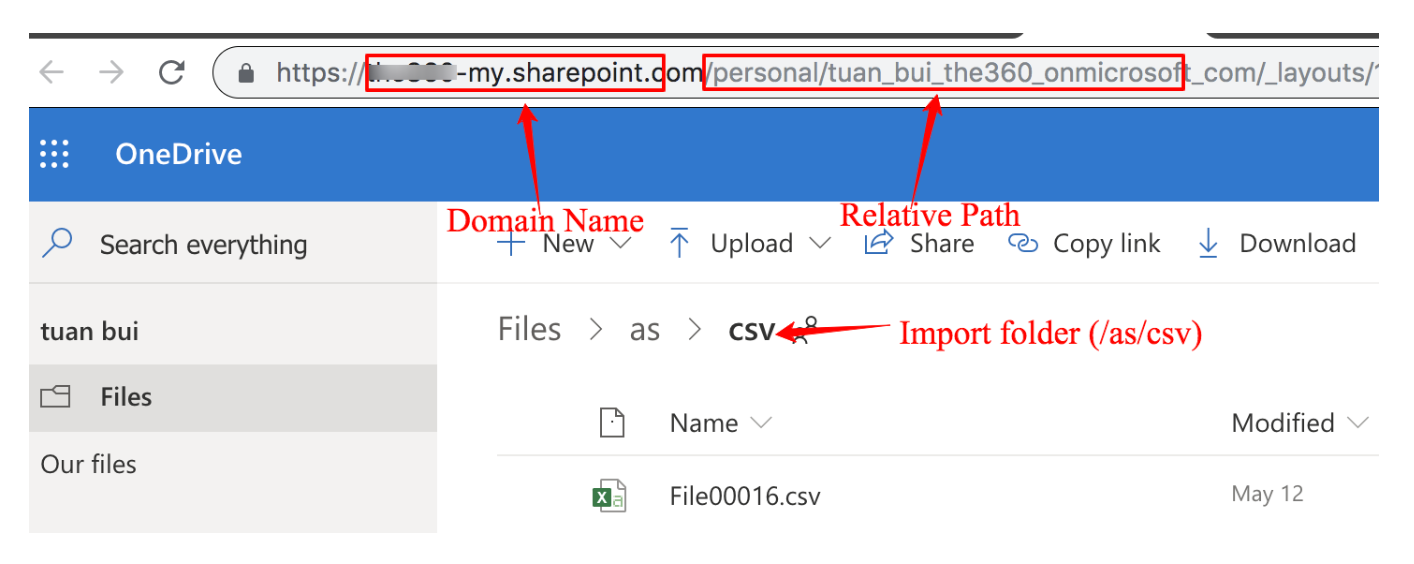
-r '{{"type":"one_drive", "refresh_token":"***","account_type":"personal","domain_name":null,"server_relative_path":null,"folder_path":"/abc","is_shared_folder":false,"file_name":"test_file","replace_existing":null,"format":"csv","compression":"","header_line":true,"null_string":"default","newline":"CRLF","quote_policy":null,"retry_count":"5","retry_initial_wait_millis":"1000","max_retry_wait_millis":"300000"}'- Business Account Plan:
ドメイン名、サーバー相対パス、およびフォルダパスが必要です。ブラウザで「Shared With Me」タブに移動します:
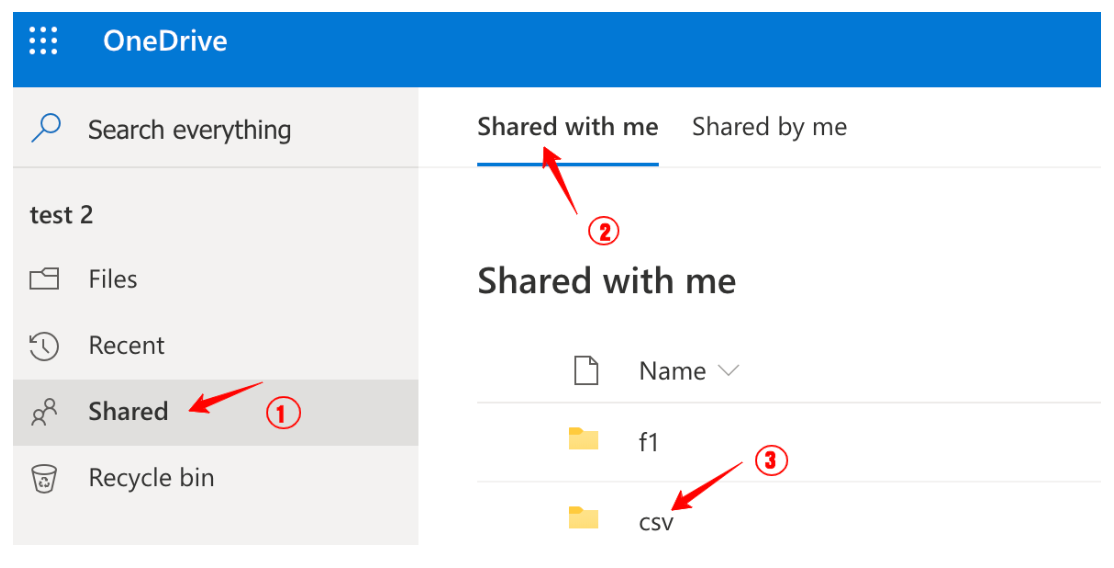

共有フォルダを開いて選択し、「Domain Name and Relative Path」で説明されているように、ドメイン名、相対パス、およびフォルダパスをメモします。
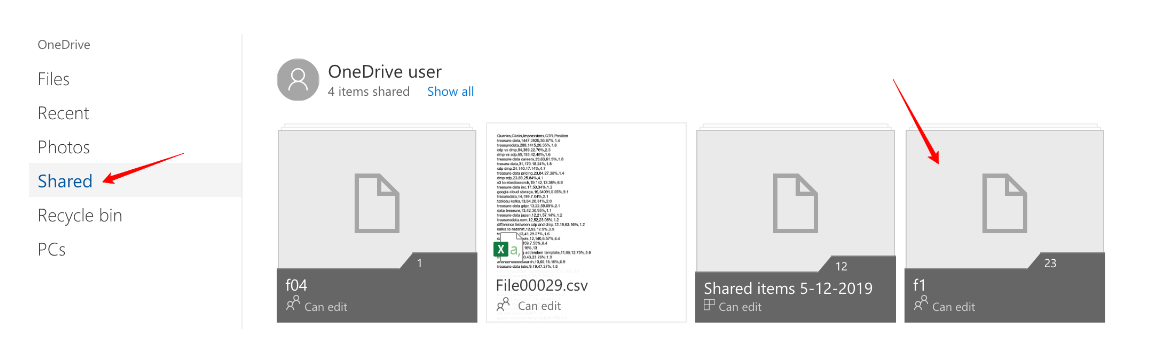
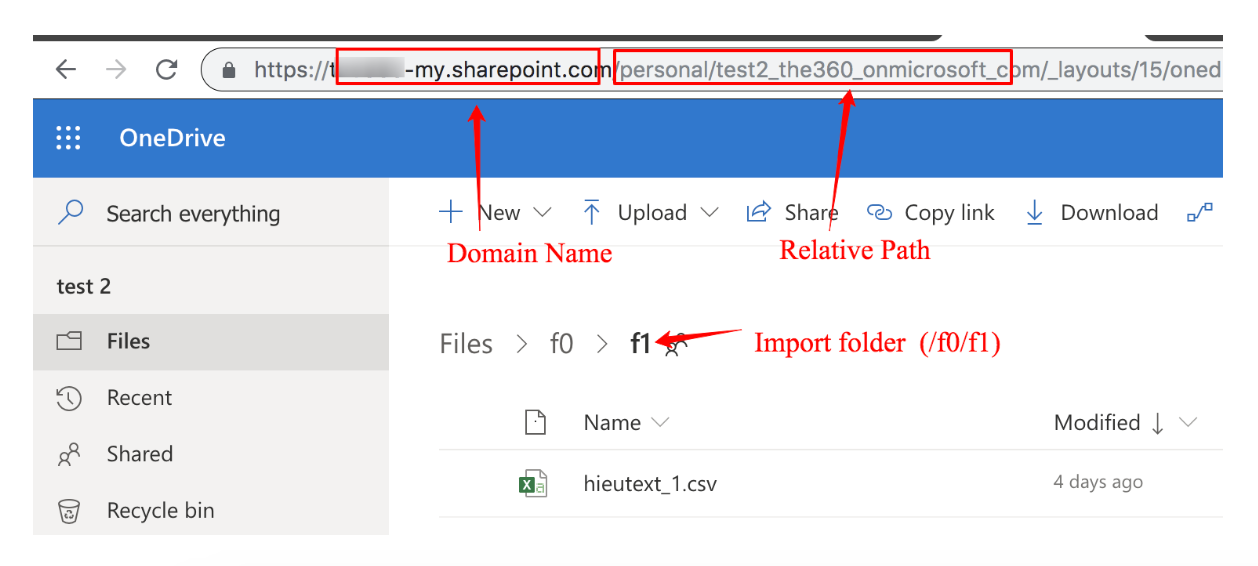
- Personal Account Plan
フィールド: This is a shared folder(is_shared_folder)をtrueに設定し、画像に示されているように共有フォルダにドリルダウンする必要があります。

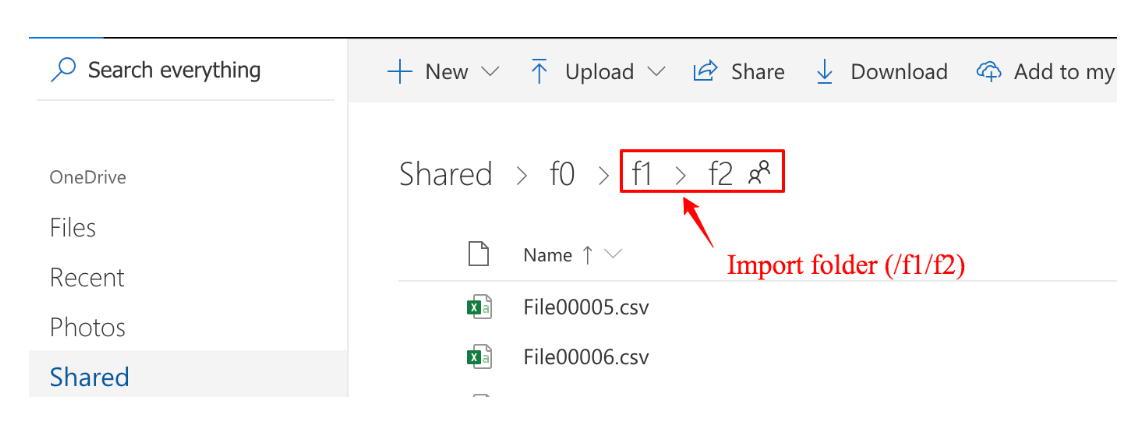
共有フォルダf1を選択し、インポートするf2ターゲットフォルダに移動します。


次のようにフォルダパスパラメータを入力します: folder_path: /f1/f2(注意: フォルダf0はあなたと共有されていません)

エクスポートパスとして'/sites'と'/teams'('/personal'を含む)をサポートできます。他のパスはサポートされていません。
Domain NameとURL Relative Pathは、個人フォルダ、SharePointサイトコレクション、および共有されているフォルダを含む、OneDrive businessアカウントプランにアクセスするために必要です。
ブラウザでインポートするフォルダを開きます。次に、次のようにDomain NameとRelative Pathを取得します:
Personal folder

SharePoint collection

Folder shared with me

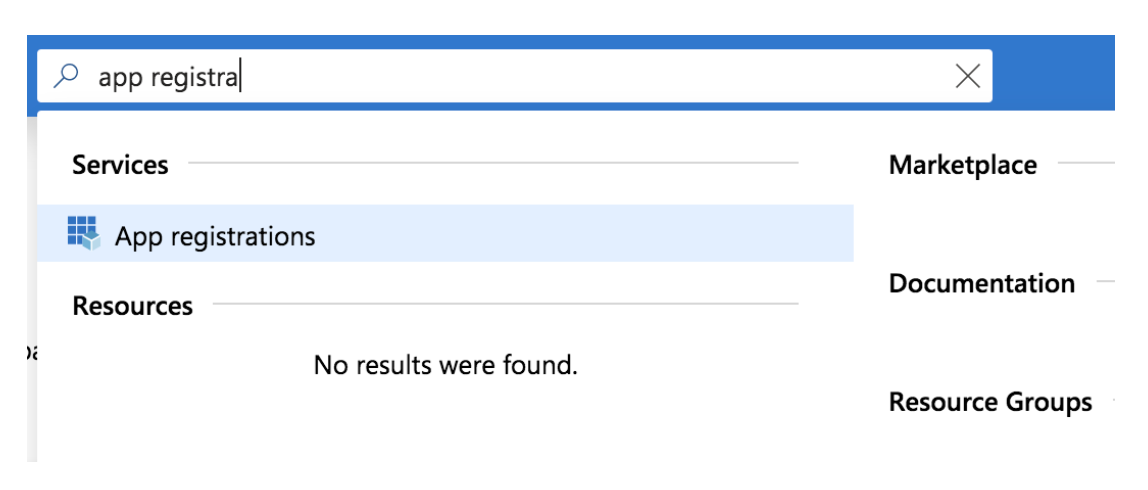
CLIからジョブを発行するには、client_id、client_secret、およびrefresh_tokenが必要です。
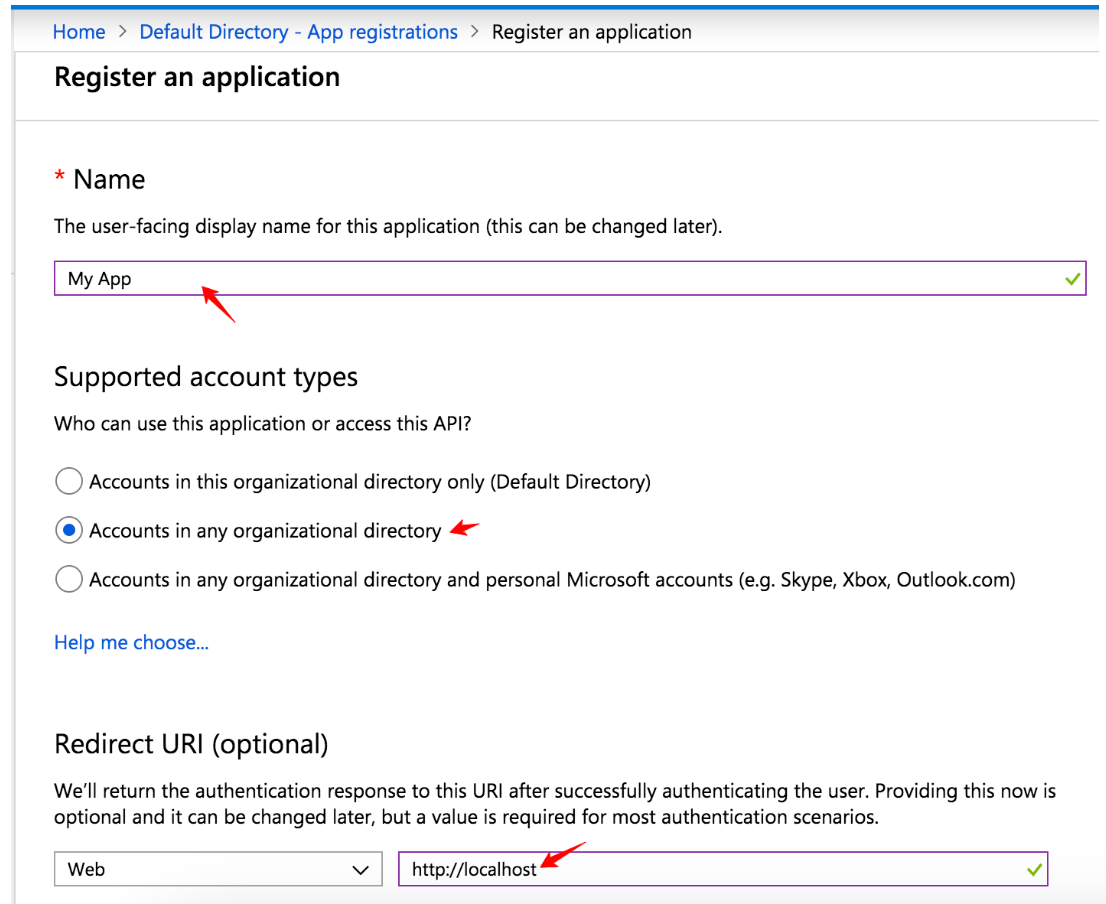
開発者アカウントを登録し、Azure App Registration Portal https://portal.azure.com/#homeに移動します。検索ボックスで、App Registrationを検索します。

New Registrationを選択します。


App Nameを入力し、Account Typeを選択し、Redirect URIを入力します。Registerを選択します。

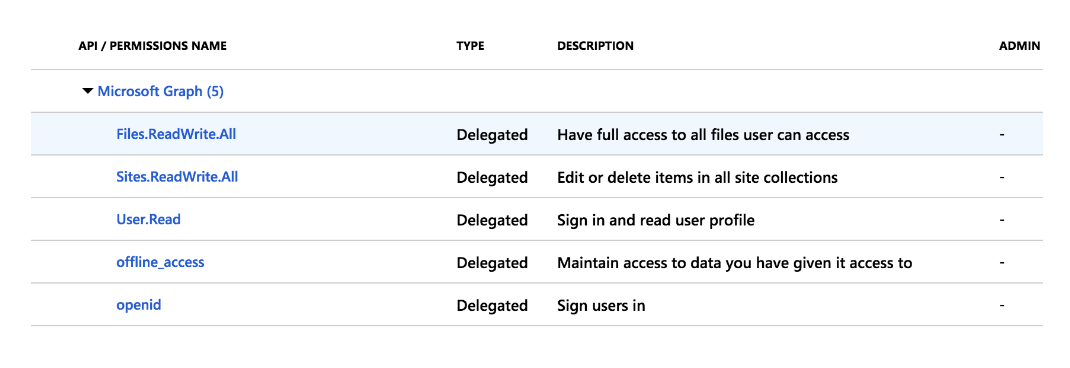
App Permissionsタブから、Add a Permissionを選択します。
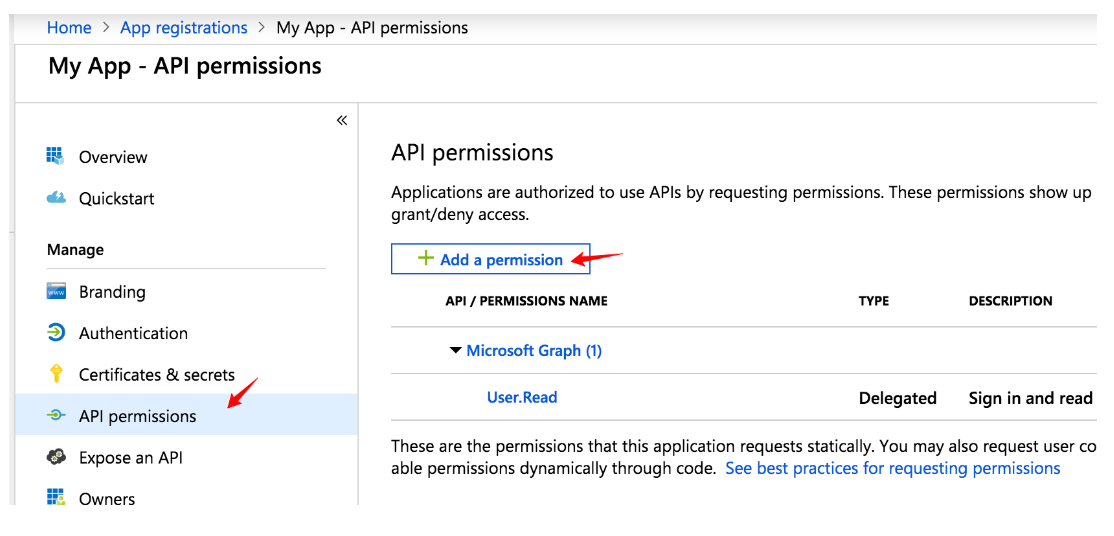

Request API permissionsウィンドウから、Microsoft Graph > Delegated permissionsを選択し、次のように権限を追加します:

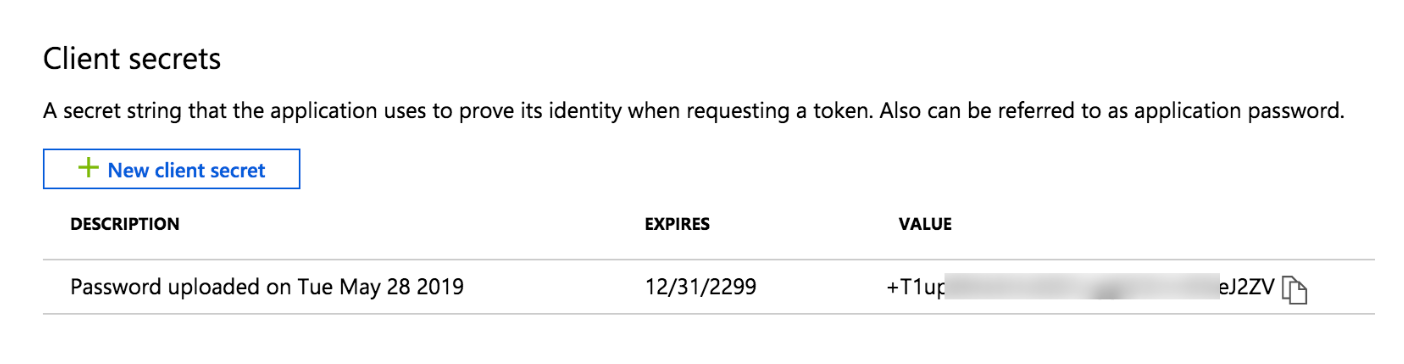
Certificates & secretsタブから、New client secretを選択し、Neverを選択してAddします。
新しいクライアントシークレットキーが次のように作成されます:

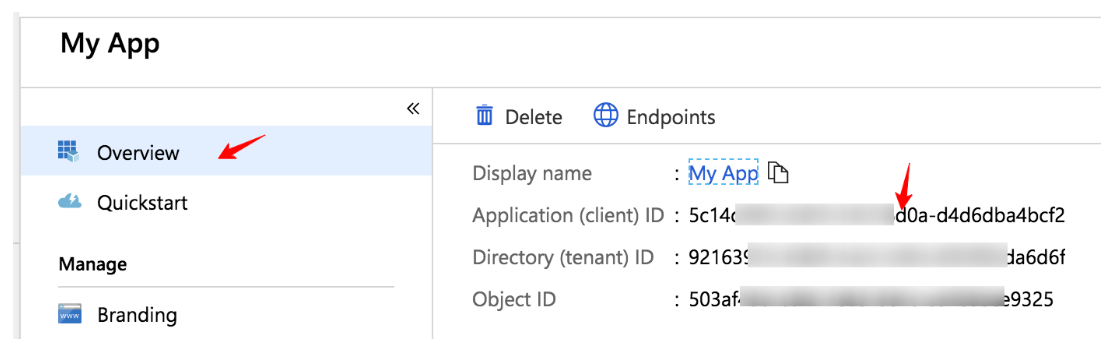
Overviewタブから、次のようにクライアントIDを確認できます:

このURLのclient_idを置き換えて、ブラウザで開きます。
https://login.microsoftonline.com/common/oauth2/v2.0/authorize?client_id=xxxxxx&response_type=code&redirect_uri=http://localhost&response_mode=query&scope=offline_access files.readwrite.all openid sites.readwrite.all&state=1234Permission Requestウィンドウを受け入れます。

アドレスバーからコードをコピーします:


code、client_id、client_secretを置き換えて、curlコマンドを実行し、access_tokenとrefresh_tokenを取得します。
curl -X POST \ https://login.microsoftonline.com/common/oauth2/v2.0/token \ -H 'Content-Type: application/x-www-form-urlencoded' \ -d 'client_id={xxxxxx}&client_secret={xxxxx}&grant_type=authorization_code&scope=offline_access%20files.readwrite.all%20openid%20sites.readwrite.all&code={xxxxxx}&redirect_uri=http://localhost'個人アカウントを使用している場合、OneDrive Connectorは以下の権限を要求します:
| Permission | Description | Note |
|---|---|---|
| User.Read | ユーザーがアプリにサインインできるようにし、アプリがサインインしているユーザーのプロファイルを読み取れるようにします。また、サインインしているユーザーの基本的な会社情報をアプリが読み取れるようにします。 | |
| Files.ReadWrite.AppFolder | アプリケーションのフォルダ内のファイルの読み取り、作成、更新、および削除をアプリに許可します。 | Application's folderは、「TreasureData OneDrive Connector」アプリ専用の特別なフォルダです。What is an App Folderを参照してください |
| Files.ReadWrite.All | サインインしているユーザーがアクセスできるすべてのファイルの読み取り、作成、更新、および削除をアプリに許可します。 | インポートおよびエクスポートConnectorは同じクライアントアプリケーションを共有し、読み取り、作成、更新のみを実行しますが、ファイルは削除しません。 |
| offline_access | 現在アプリを使用していない場合でも、アプリがユーザーデータを読み取って更新できるようにします。 | スケジュールインポート/エクスポートに使用 |
Business/workアカウントは追加の権限を要求します
| Permission | Description | Note |
|---|---|---|
| Sites.ReadWrite.All | すべてのグループの読み取りと書き込み、すべてのサイトコレクション内のアイテムの編集または削除 | 読み取り、作成、更新のみを実行しますが、ファイルは削除しません。 |
削除権限はSites. ReadWrite. All権限の一部としてデフォルトで付与されますが、データコネクタはMicrosoft OneDrive上のファイルを削除しません。