Rokt is an e-commerce engagement and monetization platform that specializes in presenting personalized offers or ads during the transaction moment (for example, immediately after a purchase)
This document describes how to integrate Treasure Data CDP with Rokt using Secure FTP (SFTP) to upload custom audience lists and conversion data. By leveraging file-based integration, businesses can automate the synchronization of key marketing data without relying on real-time API connectivity.
Goal: Improve offer targeting by leveraging audience segments built in the CDP.
Use Cases:
- Suppress offers for products/services the customer already owns (e.g., exclude existing credit card holders).
- Prioritize high-value offers for VIP or loyal customers.
Goal: Leverage CDP-enriched attributes (e.g., inferred interests, loyalty scores) to personalize the Rokt experience.
Use Cases:
- Use CDP-generated attributes like age brackets, product affinities, or churn risk to influence Rokt’s offer selection.
Goal: Export conversion events (e.g., purchases, sign-ups, cancellations) from the CDP and send them to Rokt via file upload.
Use Cases:
- Enhance campaign optimization.
- Improve accuracy of attribution.
- Contact your Rokt account manager to obtain SFTP credentials.
- Ensure your parent segment in CDP includes either plaintext email or SHA-256 hashed email.
If your security policy requires IP whitelisting, you must add Treasure Data's IP addresses to your allowlist to ensure a successful connection.
Please find the complete list of static IP addresses, organized by region, at the following document
Rokt supports importing the following via SFTP:
- Custom Audience Lists: For inclusion or exclusion targeting in campaigns.
- Conversion Data: For campaign measurement, optimization, and attribution.
For more details, see:
- Import custom audiences | Rokt documentation
- Import conversions via file transfer | Rokt documentation
You must create and configure the data connection on TD Console before running your query. As part of the data connection, you provide authentication to access the integration using the following steps:
Open the TD Console.
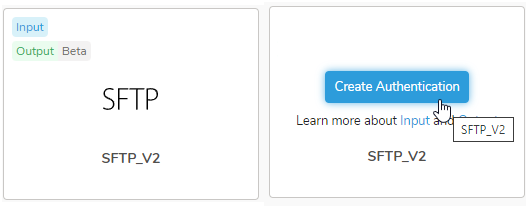
Navigate to Integrations Hub > Catalog.
Search for SFTP_V2 and then select Create Authentication.
Provide the connection credentials.
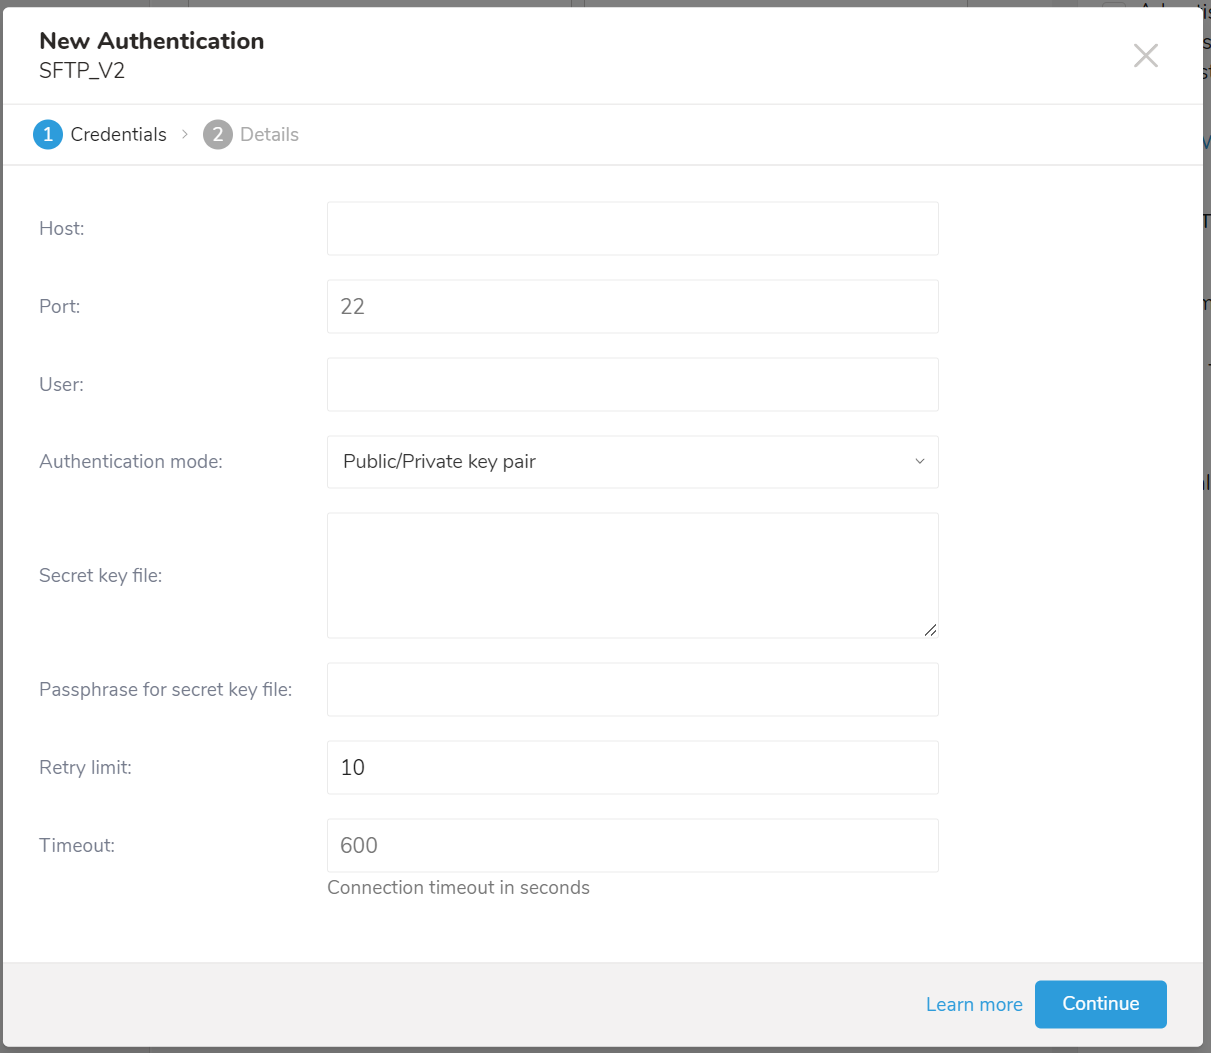
Authentication Fields
| Parameter | Data Type | Description |
|---|---|---|
| Host Required | string | ftp.rokt.com |
| Port Required | string | 22 |
| User Required | string | The user name used to connect to the remote FTP instance |
| Authentication mode Required | string | Choose Public / Private key pair. |
| Secret key file Optional | string | Reach out to your Rokt Account Manager to request access to the Rokt SFTP. Once you've been granted access, you should receive an email from Rokt with the subject "You've been granted access to Rokt's SFTP server." |
| Passphrase for secret key file Optional | string | The passphrase of the provided secret file, for some algorithms that require |
| Retry limit Required | int | Number of times to retry a failed connection (default 10) |
| Timeout Required | int | Connection timeout in seconds (default 600) |
- Select Continue, enter a name for the Authentication.
- Select Done.
The TD Console supports multiple ways to export data. Complete the following steps to export data from the Data Workbench.
Navigate to Data Workbench > Queries.
Select New Query and define your query.
Select Export Results and provide the data export configuration.
Use an existing integration or create a new one.
Configure the export parameters and select Done.
Export Configuration Parameters
| Parameter | Data Type | Description |
|---|---|---|
Is user directory Root? Required | boolean | Choose "No" |
Path prefix Required | string | Upload files to the following directories on the Rokt SFTP server:
|
Rename file after upload finish Required | string | If selected, the file is uploaded to the SFTP with a suffix |
Format Required | string |
|
Encoders Required | string |
|
Header line? Required | string |
|
Delimiter Required | string | The delimiter character:
|
Quote policy Optional | string | The policy for a quote:
|
Null string Required | string | How null value of the result of the query displays:
|
End-of-line character Required | string | The EOL (end-of-line) character:
|
Temp filesize threshold Required | long | If the export data is bigger than this threshold, the upload is executed in batches with the batch size is the threshold itself. If the error |
You can use Scheduled Jobs with Result Export to periodically write the output result to a target destination that you specify.
Treasure Data's scheduler feature supports periodic query execution to achieve high availability.
When two specifications provide conflicting schedule specifications, the specification requesting to execute more often is followed while the other schedule specification is ignored.
For example, if the cron schedule is '0 0 1 * 1', then the 'day of month' specification and 'day of week' are discordant because the former specification requires it to run every first day of each month at midnight (00:00), while the latter specification requires it to run every Monday at midnight (00:00). The latter specification is followed.
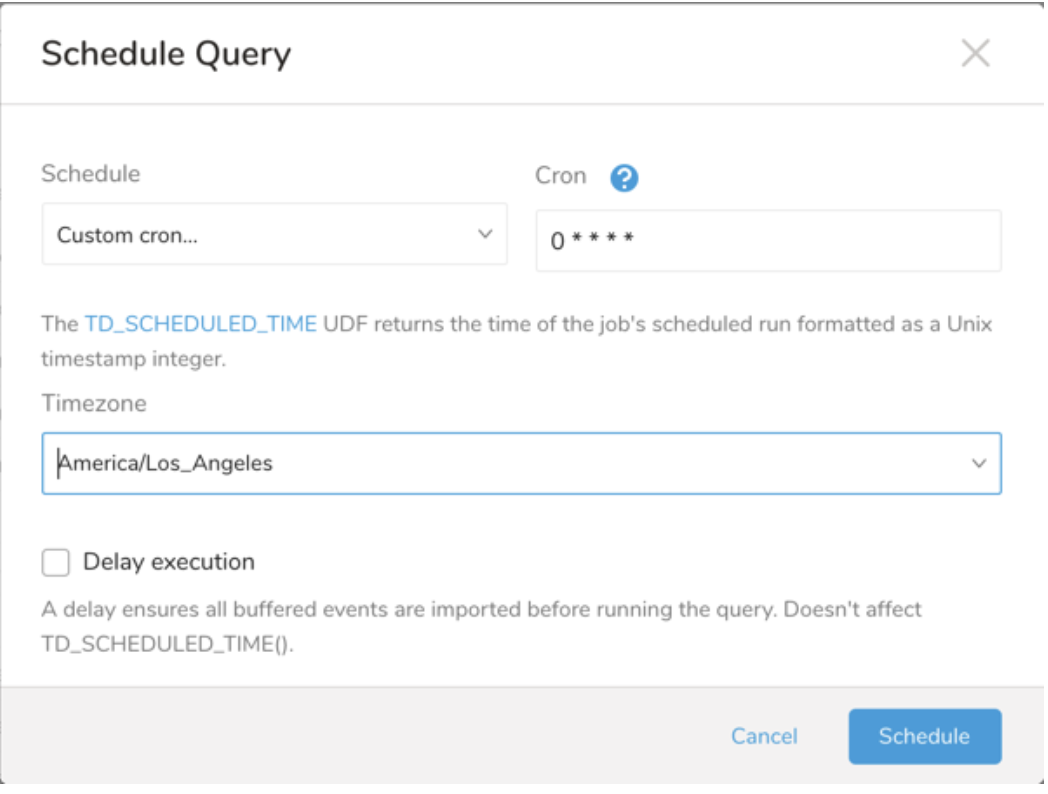
Navigate to Data Workbench > Queries
Create a new query or select an existing query.
Next to Schedule, select None.

In the drop-down, select one of the following schedule options:
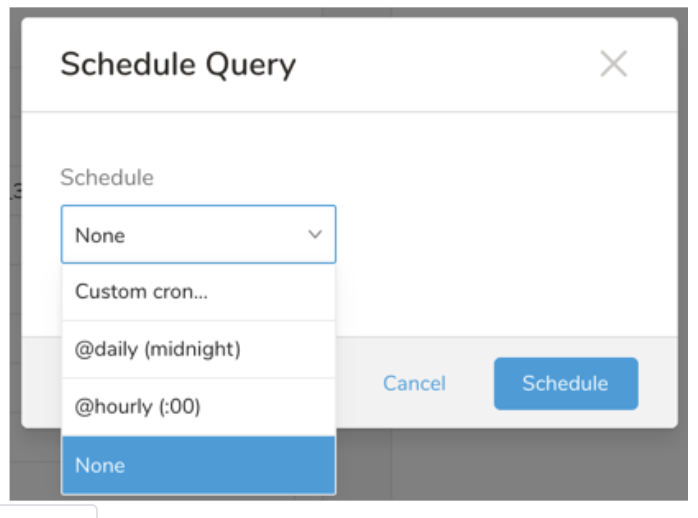
Drop-down Value Description Custom cron... Review Custom cron... details. @daily (midnight) Run once a day at midnight (00:00 am) in the specified time zone. @hourly (:00) Run every hour at 00 minutes. None No schedule.
| Cron Value | Description |
|---|---|
0 * * * * | Run once an hour. |
0 0 * * * | Run once a day at midnight. |
0 0 1 * * | Run once a month at midnight on the morning of the first day of the month. |
| "" | Create a job that has no scheduled run time. |
 *    *    *    *    *
 -    -    -    -    -
 |    |    |    |    |
 |    |    |    |    +----- day of week (0 - 6) (Sunday=0)
 |    |    |    +---------- month (1 - 12)
 |    |    +--------------- day of month (1 - 31)
 |    +-------------------- hour (0 - 23)
 +------------------------- min (0 - 59)
The following named entries can be used:
- Day of Week: sun, mon, tue, wed, thu, fri, sat.
- Month: jan, feb, mar, apr, may, jun, jul, aug, sep, oct, nov, dec.
A single space is required between each field. The values for each field can be composed of:
| Field Value | Example | Example Description |
|---|---|---|
| A single value, within the limits displayed above for each field. | ||
A wildcard '*' to indicate no restriction based on the field. | '0 0 1 * *' | Configures the schedule to run at midnight (00:00) on the first day of each month. |
A range '2-5', indicating the range of accepted values for the field. | '0 0 1-10 * *' | Configures the schedule to run at midnight (00:00) on the first 10 days of each month. |
A list of comma-separated values '2,3,4,5', indicating the list of accepted values for the field. | 0 0 1,11,21 * *' | Configures the schedule to run at midnight (00:00) every 1st, 11th, and 21st day of each month. |
A periodicity indicator '*/5' to express how often based on the field's valid range of values a schedule is allowed to run. | '30 */2 1 * *' | Configures the schedule to run on the 1st of every month, every 2 hours starting at 00:30. '0 0 */5 * *' configures the schedule to run at midnight (00:00) every 5 days starting on the 5th of each month. |
A comma-separated list of any of the above except the '*' wildcard is also supported '2,*/5,8-10'. | '0 0 5,*/10,25 * *' | Configures the schedule to run at midnight (00:00) every 5th, 10th, 20th, and 25th day of each month. |
- (Optional) You can delay the start time of a query by enabling the Delay execution.
Save the query with a name and run, or just run the query. Upon successful completion of the query, the query result is automatically exported to the specified destination.
Scheduled jobs that continuously fail due to configuration errors may be disabled on the system side after several notifications.
(Optional) You can delay the start time of a query by enabling the Delay execution.
You can also send segment data to the target platform by creating an activation in the Audience Studio.
- Navigate to Audience Studio.
- Select a parent segment.
- Open the target segment, right-mouse click, and then select Create Activation.
- In the Details panel, enter an Activation name and configure the activation according to the previous section on Configuration Parameters.
- Customize the activation output in the Output Mapping panel.
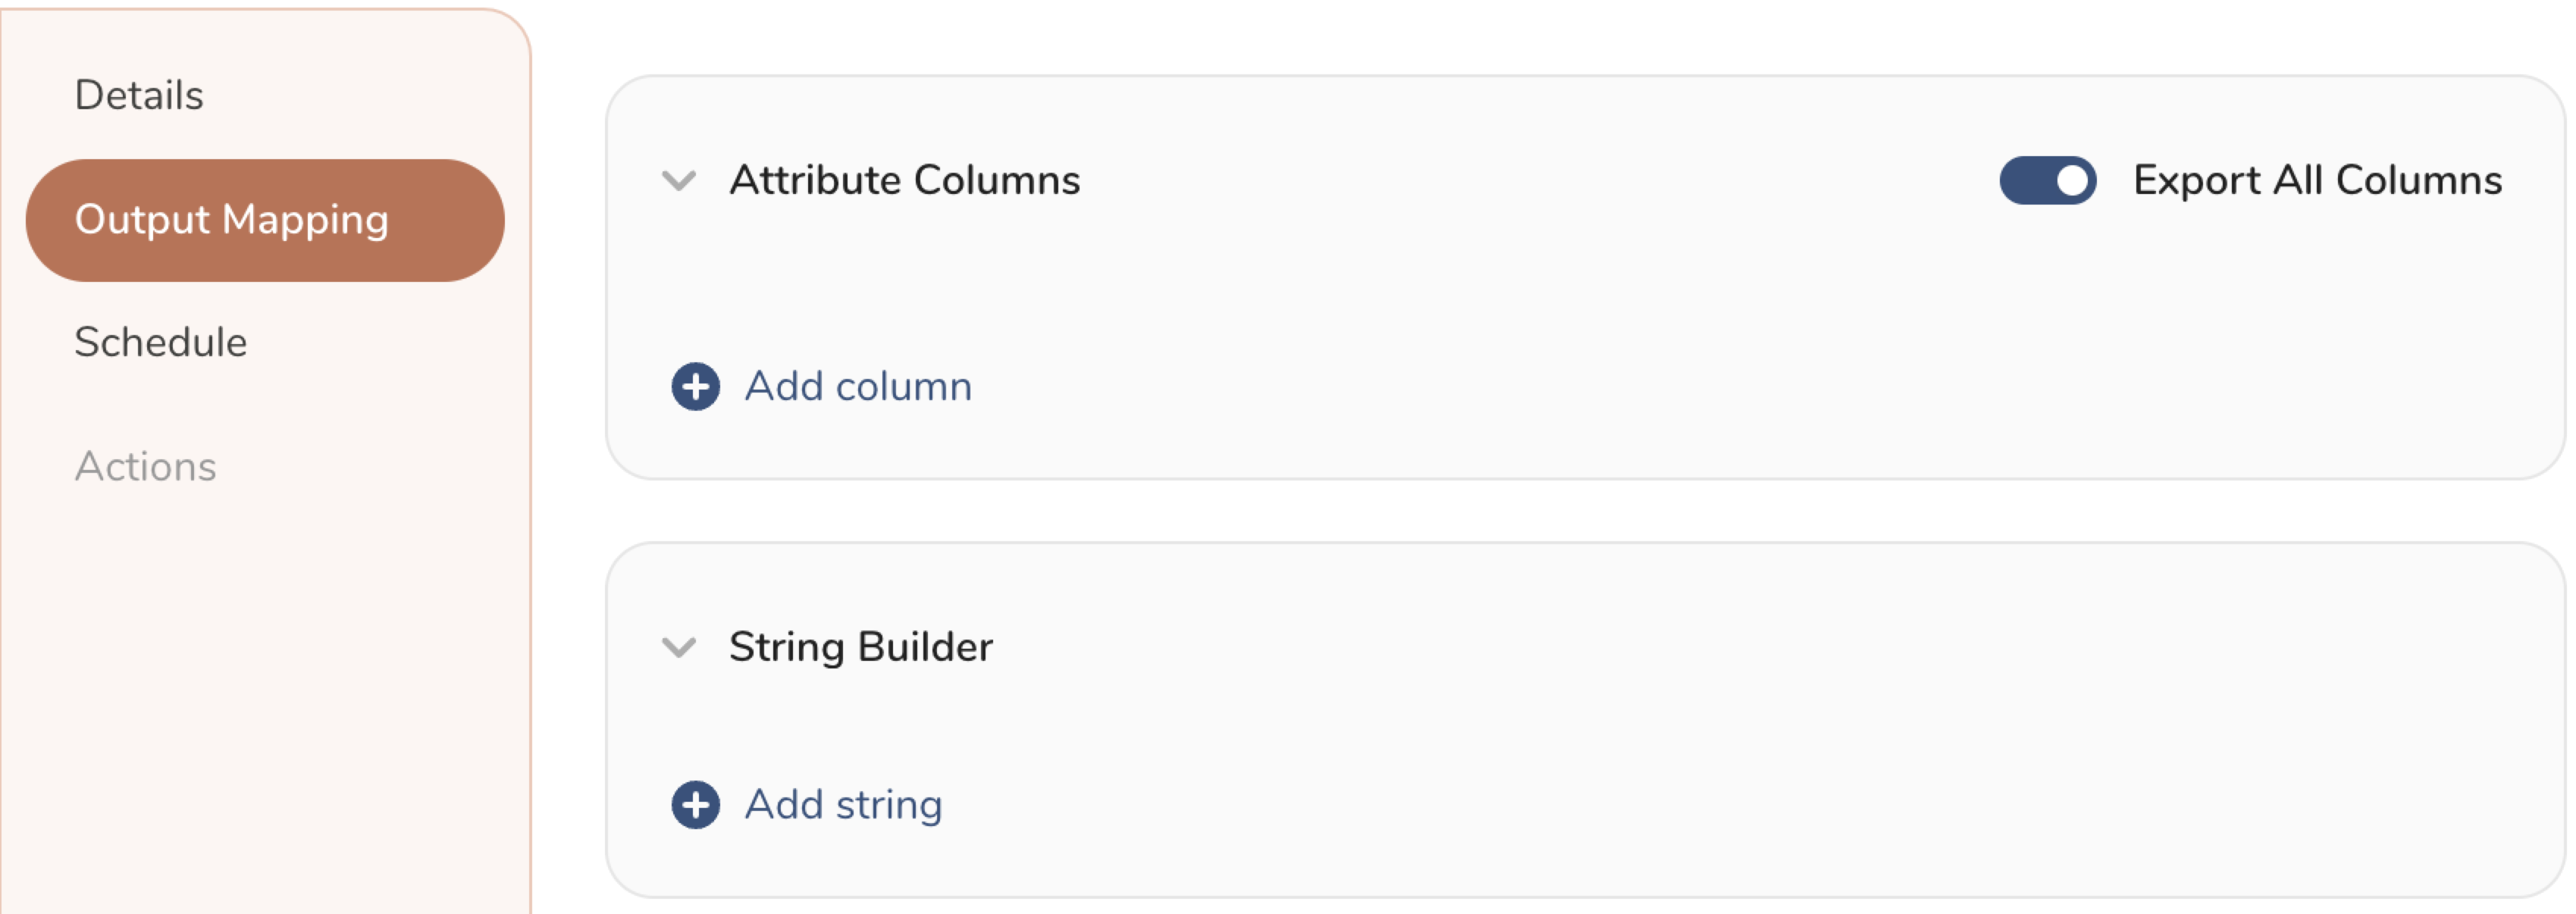
- Attribute Columns
- Select Export All Columns to export all columns without making any changes.
- Select + Add Columns to add specific columns for the export. The Output Column Name pre-populates with the same Source column name. You can update the Output Column Name. Continue to select + Add Columnsto add new columns for your activation output.
- String Builder
- + Add string to create strings for export. Select from the following values:
- String: Choose any value; use text to create a custom value.
- Timestamp: The date and time of the export.
- Segment Id: The segment ID number.
- Segment Name: The segment name.
- Audience Id: The parent segment number.
- + Add string to create strings for export. Select from the following values:
- Set a Schedule.
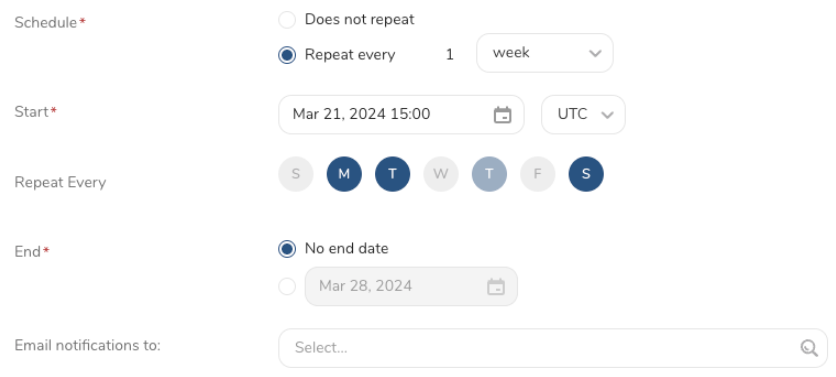
- Select the values to define your schedule and optionally include email notifications.
- Select Create.
If you need to create an activation for a batch journey, review Creating a Batch Journey Activation.
The TD Toolbelt can trigger exporting the Query Result to SFTP from the CLI. You need to specify the parameters for the export job using the --result option of the td query command. For more information, refer to Querying and Importing Data to Treasure Data from the Command Line.
The format of the option is JSON and the general structure is as follows:
Authentication using user & password
{
  "type": "sftp_v2",
  "host": "IP or host of SFTP server",
  "port": 22,
  "path_prefix": "/upload/2024Aug29/TC01.csv",
  "temp_file_threshold": 1024,
  "timeout": 600,
  "user_directory_is_root": false,
  "rename_file_after_upload": true,
  "auth_method": "password",
  "username": "login user",
  "password": "password of user when auth_method is password"
}
Authentication using public/private key-pair
{
  "type": "sftp_v2",
  "host": "IP or host of SFTP server",
  "port": 22,
  "path_prefix": "/upload/2024Aug29/TC01.csv",
  "temp_file_threshold": 1024,
  "timeout": 600,
  "user_directory_is_root": false,
  "rename_file_after_upload": true,
  "auth_method": "key_pair",
  "secret_key_file": "Content of private key file",
  "secret_key_passphrase": "td@123"
}| Name | Description | Value | Default Value | Required |
|---|---|---|---|---|
| type | Type must be sftp_v2 | String | NULL | YES |
| host | The address of the SFTP server specified as an IP address or domain name
| String | NULL | YES |
| port | The port for the connection with the SFTP Server | Number | 22 | NO |
| user_directory_is_root | On some servers, users will have a home directory which is their root directory. For example, a user named john could have root directory name /home/john. If that user wanted to upload a file to a directory named /home/john/day1/my_data.csv, they would have two options:
| String | False | NO |
| path_prefix | The path where you want to upload the file on the SFTP server. The value of path_prefix depends on whether user_directory_is_root is true or false. | String | NULL | YES |
| rename_file_after_upload | Determines whether the file is renamed after the upload completes | Boolean | False | NO |
| temp_file_threshold | The size of the temporary file to be used during export. When the temporary file size is reached, the integration reads and writes the data from that file to the remote file and the deletes the temporary file. | Number | 5,368,709,120 (5 Gb) | NO |
| auth_method | Determines which authentication type will be used to authenticate with SFTP server:
| Supported values:
| key_pair | YES |
| username | The username that is used to authenticate | String | NULL | YES |
| password | The password that is use to authenticate | String | NULL | YES, when auth_method is password |
secret_key_file | The private key file that is used to authenticate. The content of the file should be formatted as one line. Example td ... --result '{"type":"sftp_v2", "secret_key_file": "-----BEGIN OPENSSH PRIVATE KEY-----\nline1\nline2\nline3\n-----END OPENSSH PRIVATE KEY-----\n\n"}'Content of private key file before formatting: -----BEGIN OPENSSH PRIVATE KEY-----
line1
line2
line3
-----END OPENSSH PRIVATE KEY-----After formatting -----BEGIN OPENSSH PRIVATE KEY-----line1line2line3-----END OPENSSH PRIVATE KEY----- | String | NULL | YES, when auth_method is key_pair |
| secret_key_passphrase | If the private key was generated with a password, input that password here. | String | NULL | NO |
| sequence_format | The suffix name of file being uploaded. For example, "%03d.%02d" | String | Blank | NO |
| format | The output format of file being uploaded file | Supported values:
| csv | NO |
| encoders | Specifies the encoder's type of the output | Supported values:
| "" | NO |
| public_key | The public key to use for encryption | String | ||
| key_identifier | Specifies the Key ID of the encryption subkey used to secure the file. The master key is excluded from the encryption process. (string, required) | String | ||
| amor | Use ASCII armor for the encrypted output (boolean) | Boolean | ||
compression_type | The compression type determines whether to compress the data before encrypting it. | Supported values
Note: Please ensure that you compress your file before encrypting and uploading. When you decrypt it, the file will return to a compressed format such as .gz or .bz2. | ||
| delimiter | Column delimiter | Supported values:
| "," | NO |
quote_policy | The policy for handing quotes | Supported values:
Example Code Policy ALL Config: quote_policy: ALL,
quote: "'",Output 'id'|'column01'|'column02'|'column03'|'column04'|'column05'
'1'|'data01'|'data02'|'data03'|'data04'|'data05'Example Code Policy MINIMAL Config: quote_policy: MINIMAL,
quote: "'",Output id|column01|column02|column03|column04|column05
1|data01|data02|data03|data04|data05 | ||
quote | Determines whether quoting will use single or double quotes. | Single Quote Config quote_policy: ALL,
quote: "'",Output 'id'|'column01'|'column02'
'1'|'data01'|'data02'Double Quote Config quote_policy: ALL,
quote: "\"",Output "id"|"column01"|"column02"
"1"|"data01"|"data02" | ||
| null_string | Determines the default value for null column. | Supported values:
| "" | |
| newline | Determines how new lines are started in CSV files. | Supported values:
| CRLF |
Using password authentication
td --database your_db --wait "SELECT email FROM (VALUES ('test01@test.com')) tbl(email)" \
--type presto \
--result '{"type":"sftp_v2","host":"your_ip","port": 22,"auth_method":"password","username":"user_name","password":"your_pass", "user_directory_is_root": true, "rename_file_after_upload": true,"path_prefix":"/sftp/2024aug/test.csv"}'
Using password authentication and data compression
td --database your_db --wait "SELECT email FROM (VALUES ('test01@test.com')) tbl(email)" \
--type presto \
--result '{"type":"sftp_v2","host":"your_ip","port": 22,"auth_method":"password","username":"user_name","password":"password","user_directory_is_root":true,"path_prefix":"/sftp/2024aug/test.csv","rename_file_after_upload":true,"format": "csv", "compression": "gz","header_line":true,"quote_policy":"ALL","delimiter":"\t","null_string":"","newline":"CRLF","temp_file_threshold":0,"sequence_format":".%01d%01d"}'
Using Public/Private key authentication with password phrase
Private key file content (password phrase is
123):-----BEGIN OPENSSH PRIVATE KEY----- line1 line2 line3 -----END OPENSSH PRIVATE KEY-----Format for CLI:
-----BEGIN OPENSSH PRIVATE KEY-----\nline1\nline2\nline3\n-----END OPENSSH PRIVATE KEY-----\n\nThe CLI command:
td --database your_db --wait "SELECT email FROM (VALUES ('test01@test.com')) tbl(email)" \
--type presto \
--result '{"type":"sftp_v2","host":"your_ip","port": 22,"auth_method":"key_pair","username":"user_name", "path_prefix": "/sftp/2024aug/test.csv","sequence_format":"","max_connection_retry":5,"secret_key_passphrase":"123","timeout":600,"secret_key_file":"-----BEGIN OPENSSH PRIVATE KEY-----\nline1\nline2\nline3\n-----END OPENSSH PRIVATE KEY-----\n\n"}'
Create the new customer
td --database luan_db --wait "SELECT customer_list_id,first_name,last_name,birthday,company_name,email,fax,gender,job_title,phone_business,phone_home,phone_mobile,second_name,credentials FROM (VALUES ('site_1','fname_201','lname_1','1990-05-12','Test Company',Using the encryption encoder
td query -d luan_db -w "select * from luan_db.sfcc_500k" -T presto --result '{
  "type": "sftp_v2",
  "host": "your host server",
  "auth_method": "password",
  "username": "your user name",
  "password": "your password",
  "path_prefix": "cli/test_27_3_500K.csv.bz2.gpg",
  "file_ext": ".gpg",
  "rename_file_after_upload": false,
  "formatter": {
    "type": "csv",
    "quote_policy": "MINIMAL",
    "delimiter": ",",
    "null_string": "null",
    "newline": "\n"
  },
  "compression": "encrypt_pgp",
  "public_key": "your public key",
  "key_identifier": "your key identifier",
  "armor": true/false,
  "compression_type": "bzip2/gzip/none"
}'
Within Treasure Workflow, you can specify the use of this integration to export data. For sample workflows, view Treasure Boxes.
- The Result Export can be scheduled to upload data to a target destination periodically
- Most import and export integrations can be added to a TD Workflow to be involved in a more advanced data pipeline. Refer here for more detailed information.
Q: I cannot connect to my SFTP server. What can I do?
A: Here are some things to check:
- Verify that your protocol is valid. If you intended to use SFTP, you can use this integration. If you intended to use FTP/FTPS, try to connect with the FTP Server Import Integration.
- If you are using a firewall, check your accepted IP range and port. Server administrators sometimes change the default port number from TCP 22 for security reasons.
- Be sure that your private key has an OpenSSH format. Treasure Data does not support other formats like “PuTTY”.
- Treasure Data does not support the default format of the private key since OpenSSH 7.8. Re-generate the key using '-m PEM' option.
Q: I cannot find my uploaded file on the SFTP server. What happened?
A: If your SFTP server does not support Append mode, the integration may not be able to update the file with the error "SFTP Exception: no such file." For stability reasons, the integration uploads the file content in batches. Consequently, you will need to enable the Append mode on your SFTP server. If Append mode cannot be enabled on your SFTP server, you will need to set temp_file_threshold to 0 to bypass this feature.
Note: Please ensure that you compress your file before encrypting and uploading.
When you decrypt using non-built-in encryption, the file will return to a compressed format such as .gz or .bz2.
When you decrypt using built-in encryption, the file will return to raw data.