Magento helps you create customized shopping experiences for your customers. Magento is an open-source e-commerce platform written in PHP.
You can write query job results from Treasure Data directly to Magento (v2).
- Basic knowledge of Treasure Data
- Basic knowledge of Magento 2 (Treasure Data supports v. 2.4.6)
- Basic knowledge of Bulk API Magento 2
- Understanding of JSON formatted queries and POST API formats
This integration supports APIs with the following specifications:
- POST API
- Bulk API For example, support asynchronous loading - https://devdocs.magento.com/guides/v2.4/rest/bulk-endpoints.html.
- Consumes an array of objects. For example:
[{"column1":"v1_1", "column2":"v2_1"},{"column1":"v1_2", "column2":"v2_2"},...]By default, an admin token is valid for 4 hours. You can change these values from the Admin page if running the job takes a long time.
On self-hosted Magento instances, performance benchmarks were run on the following example environment:
- EC2 instance : T2.medium
- RAM : 4GB
- Storage: 50 GB EBS and installed components
- https://github.com/clean-docker/Magento2/blob/master/docker-compose.yml + rabbitMQ
The following performance benchmark results occurred using the default configuration:
- 1000 records, 2 columns, 26 KB → 1 min
- 1500 records, 2 columns, 43 KB → 1 min
- 10000 records, 2 columns, 279 KB → 12 min
- 1000000 records, 2 columns, 29.3 MB → 12 hours, 16 mins
JSON fields in the POST API request should be specified as JSON or String in a TD query result.
Magento reference document for POST API endpoints:
The following are some examples of queries for different endpoints:
POST API Endpoint : /async/bulk/V1/products
SELECT
'{
	"id": 45638,
	"sku": "39887-speaker-XL",
	"name": "39887-speaker-XL",
	"attribute_set_id": 9,
	"price": 450,
	"status": 1,
	"visibility": 1,
	"type_id": "virtual",
	"created_at": "2016-04-05 23:04:09",
	"updated_at": "2016-04-05 23:04:09",
	"product_links": [],
	"options": [],
	"tier_prices": [],
	"custom_attributes": [{
			"attribute_code": "description",
			"value": "pPrecise Long-Sleeve Shirt in Black, Denim, or White.</p>"
		},
		{
			"attribute_code": "meta_title",
			"value": "Precise Long-Sleeve Shirt"
		},
		{
			"attribute_code": "meta_keyword",
			"value": "Precise Long-Sleeve Shirt"
		},
		{
			"attribute_code": "meta_description",
			"value": "Precise Long-Sleeve Shirt pPrecise Long-Sleeve Shirt in Black, Denim, or White.</p>"
		},
		{
			"attribute_code": "color",
			"value": "11"
		},
		{
			"attribute_code": "options_container",
			"value": "container2"
		},
		{
			"attribute_code": "required_options",
			"value": "0"
		},
		{
			"attribute_code": "has_options",
			"value": "0"
		},
		{
			"attribute_code": "url_key",
			"value": "10090-white-xl"
		},
		{
			"attribute_code": "msrp_display_actual_price_type",
			"value": "0"
		},
		{
			"attribute_code": "tax_class_id",
			"value": "2"
		},
		{
			"attribute_code": "size",
			"value": "8"
		}
	]
}' AS product,
TRUE AS saveOptions
POST API Endpoint: /async/bulk/V1/customers
SELECT '{
  "email":"dummyuser@example.com",
  "firstname":"test",
  "lastname":"user",
  "addresses":[
     {
        "region":{
           "region_code":"MI",
           "region":"Michigan",
           "region_id":33
        },
        "region_id":33,
        "country_id":"US",
        "street":[
           "6146 Honey Bluff Parkway"
        ],
        "telephone":"(555) 229-3326",
        "postcode":"49628-7978",
        "city":"Calder",
        "firstname":"Veronica",
        "lastname":"Costello",
        "default_shipping":true,
        "default_billing":true
     }
  ]
}' as customer,
'dummy!@@#A_pass' as password;
From Treasure Data, run the following query with export results into a connection for Magento:
SELECT
  '{"email":"demo@example.com","firstname":"demo Shaw","lastname":"Doe","addresses":[{"region":{"region_code":"MI","region":"Michigan","region_id":33},"region_id":33,"country_id":"US","street":["6146 Honey Bluff Parkway"],"telephone":"(555) 229-3326","postcode":"49628-7978","city":"Calder","firstname":"Veronica","lastname":"Costello","default_shipping":true,"default_billing":true}]}' AS customer,
  'Strong-Password' AS password
Sample parameter configuration:
When you configure a data connection, you provide authentication to access the integration. In Treasure Data, you configure the authentication and then specify the source information.
Open the TD Console
Navigate to Integrations Hub > Catalog.
Search for Magento.
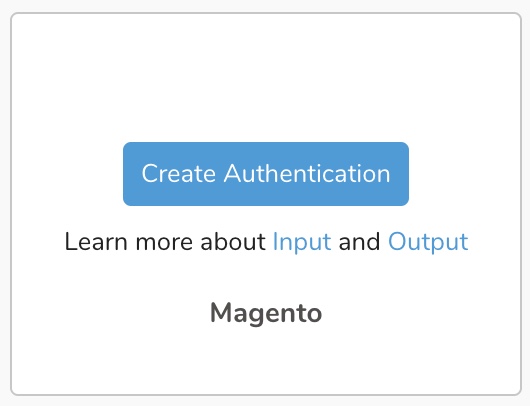
Select Create Authentication.
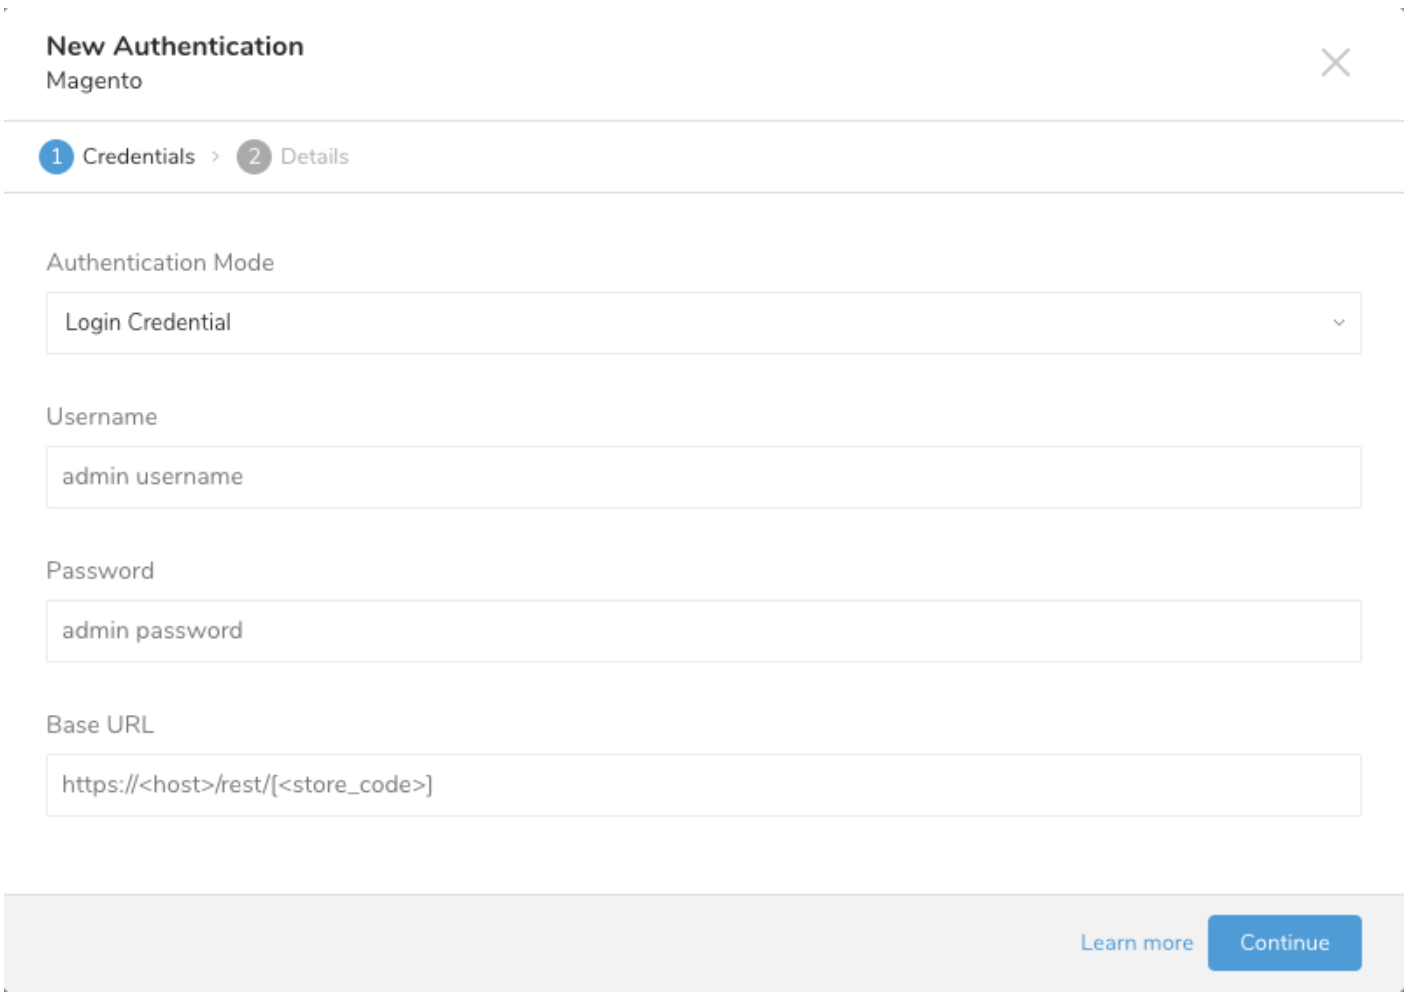
The following dialog opens. Choose one of the Authentication Modes. Edit the required credentials.
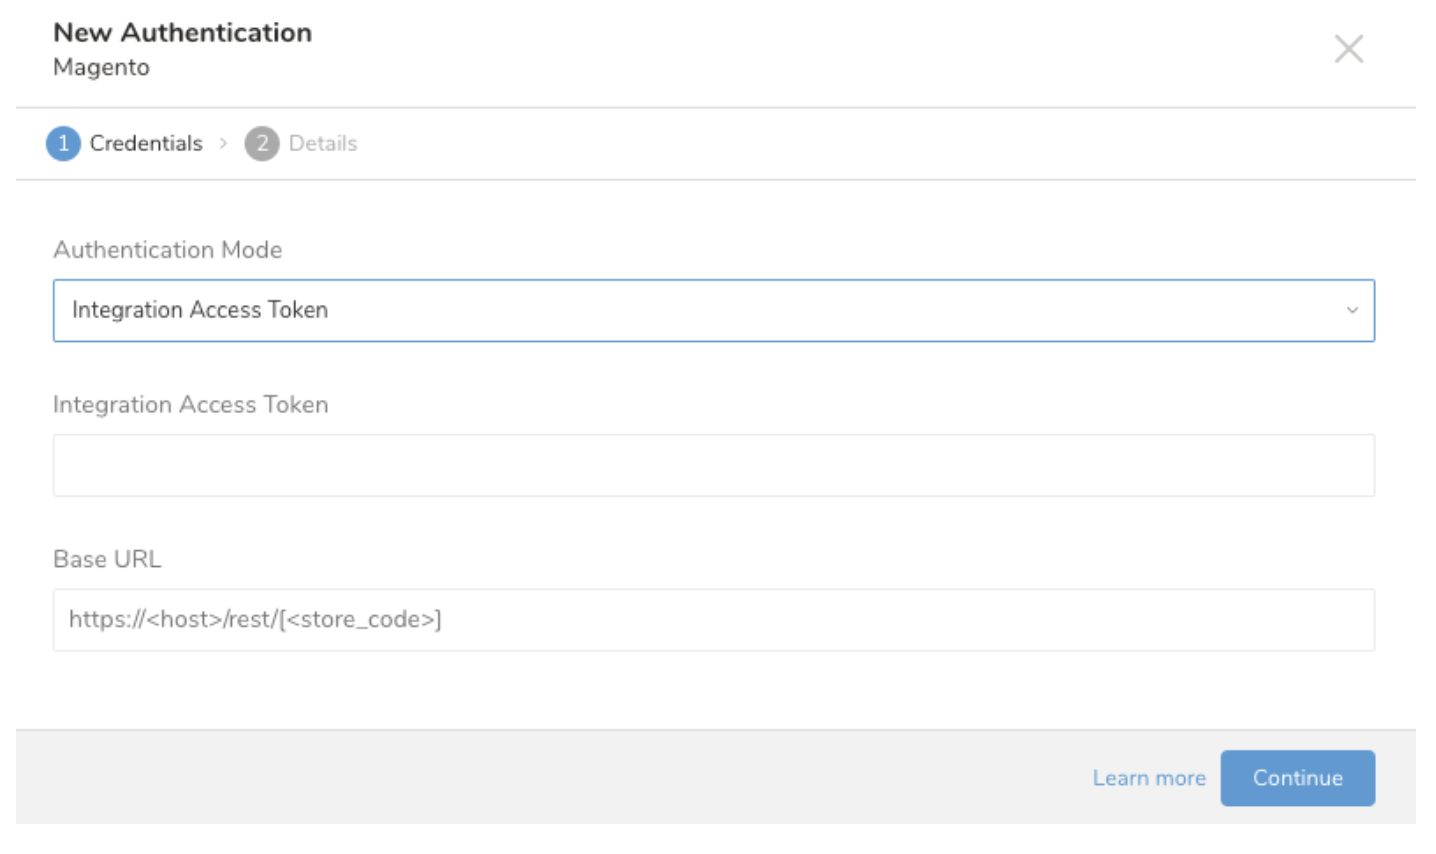
Select Continue.
- Select Login Credential and enter your Admin-level user name and password.
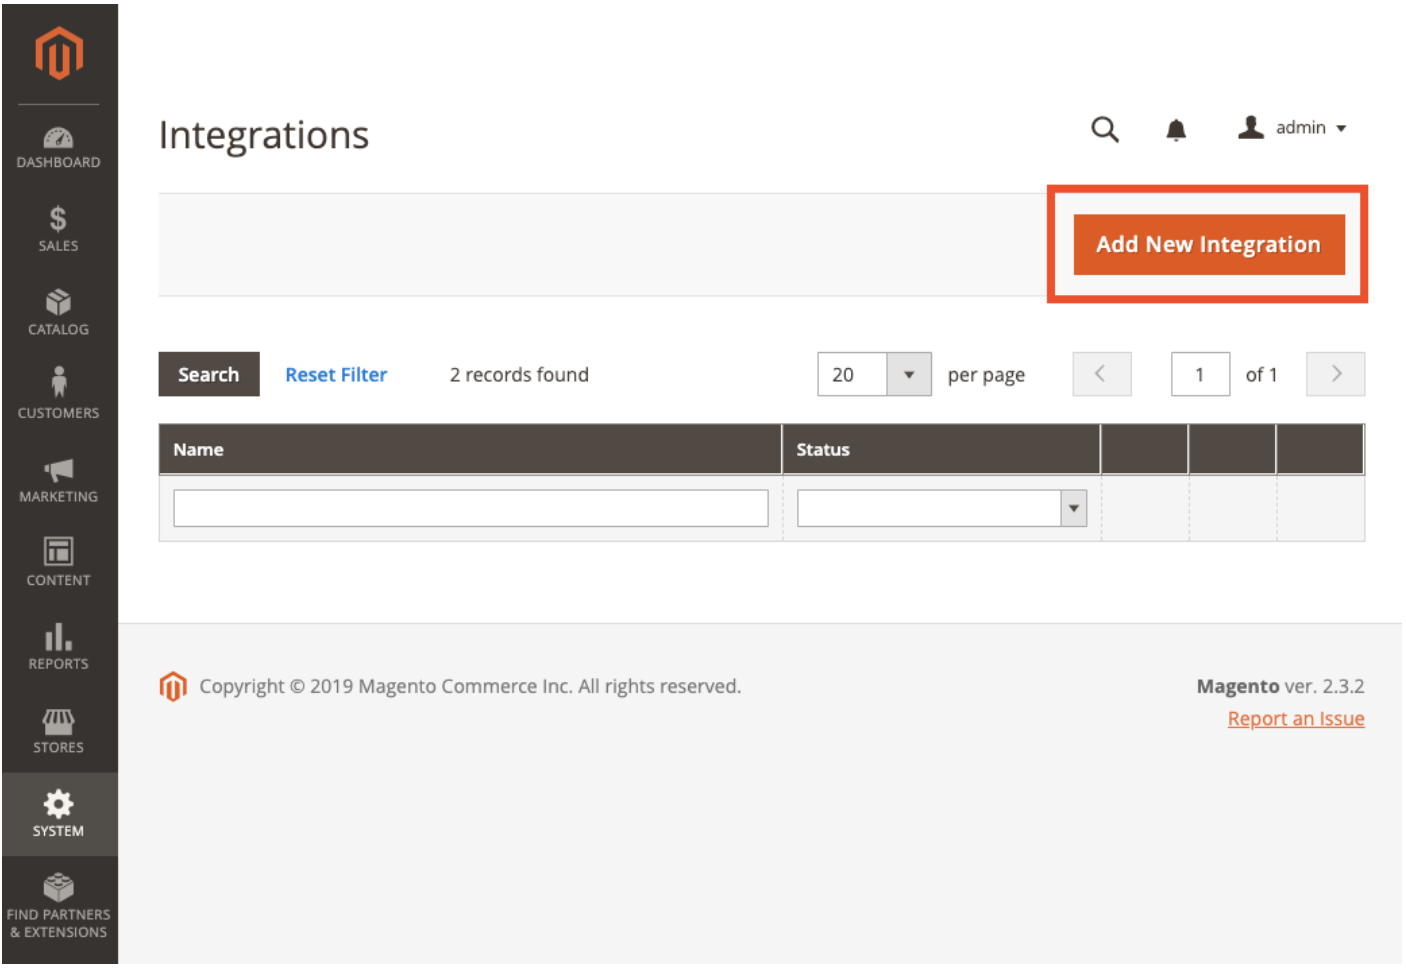
To get the access token, in your Magento Admin view, go to System > Integrations > Add New Integration (or open an existing one).
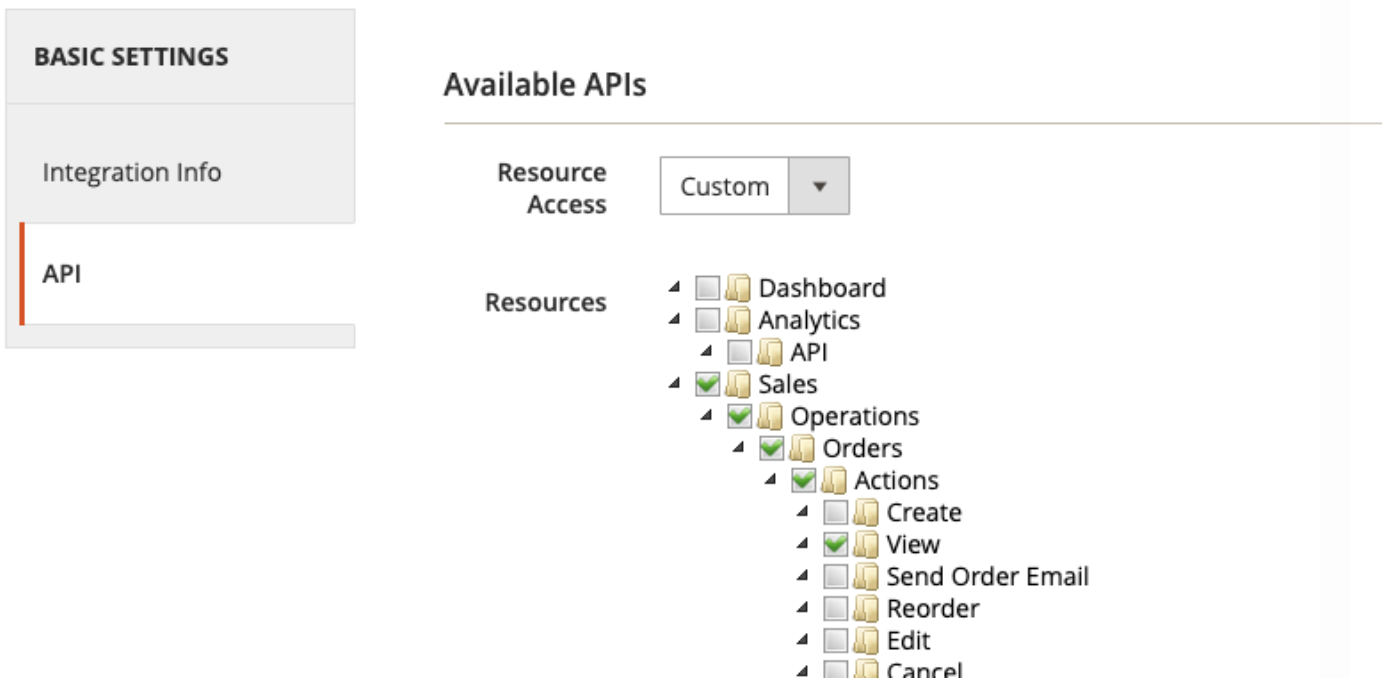
Select the appropriate permissions for your target resources.
Activate the integration.
Copy the Access Token.
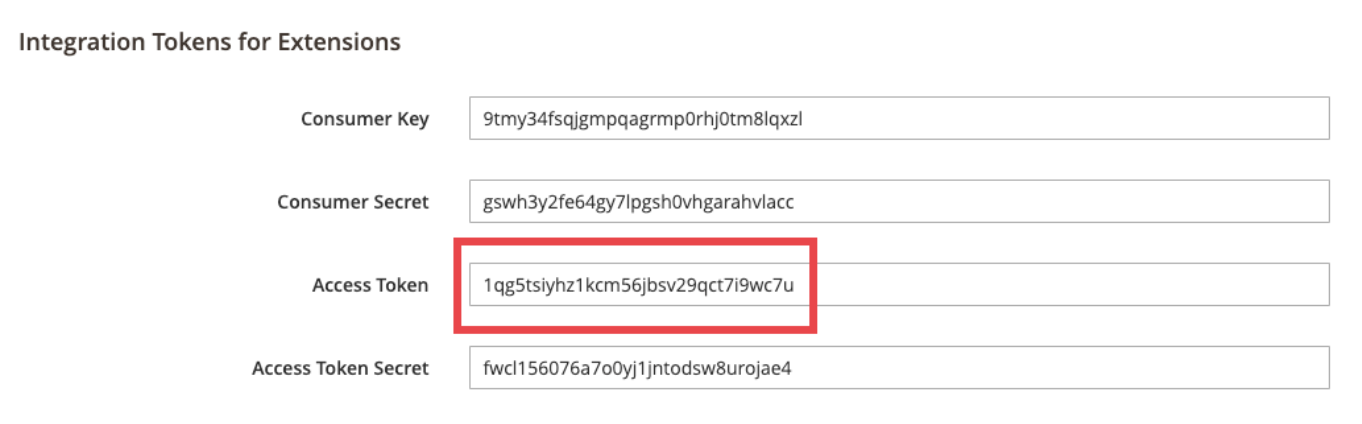
In Treasure Data, paste the name of the access token. For Base URL, set the value to your Magento 2 REST API endpoint. For example,
http://my-magento-server/rest/.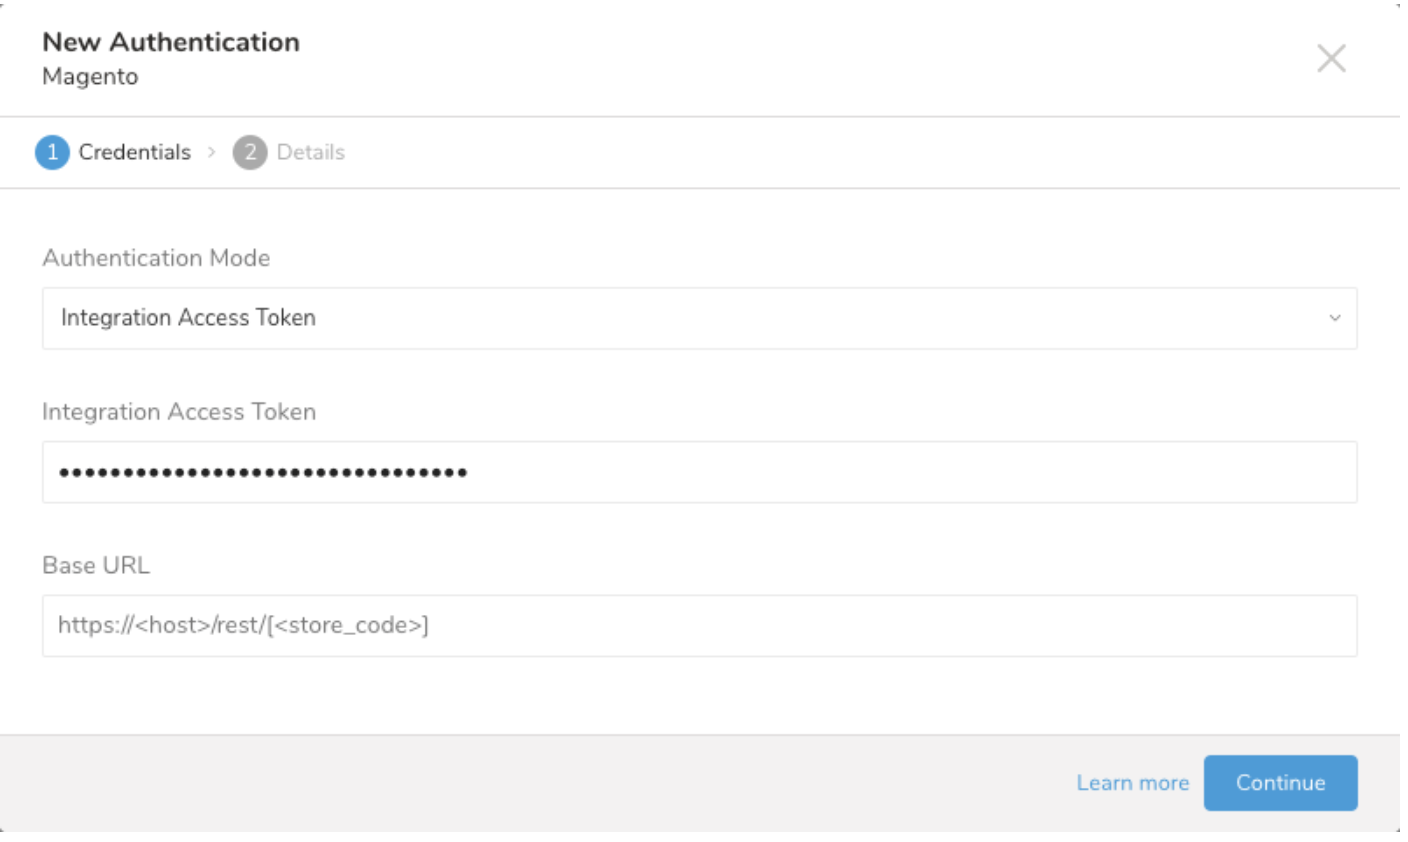
Select Continue.
Name your Authentication.
Select Done.
In this step, you create or reuse a query. In the query, you configure the data connection.
- Open TD Console.
- Navigate to Data Workbench > Queries.
- Select the query that you plan to use to export data. For example:
SELECT
   '{"email":"demo@example.com","firstname":"demo Shaw","lastname":"Doe","addresses":[{"region":{"region_code":"MI","region":"Michigan","region_id":33},"region_id":33,"country_id":"US","street":["6146 Honey Bluff Parkway"],"telephone":"(555) 229-3326","postcode":"49628-7978","city":"Calder","firstname":"Veronica","lastname":"Costello","default_shipping":true,"default_billing":true}]}' as customer,
   'Strong-Password' as password;
Select Export Results located at top of your query editor. The Choose Integration dialog opens.
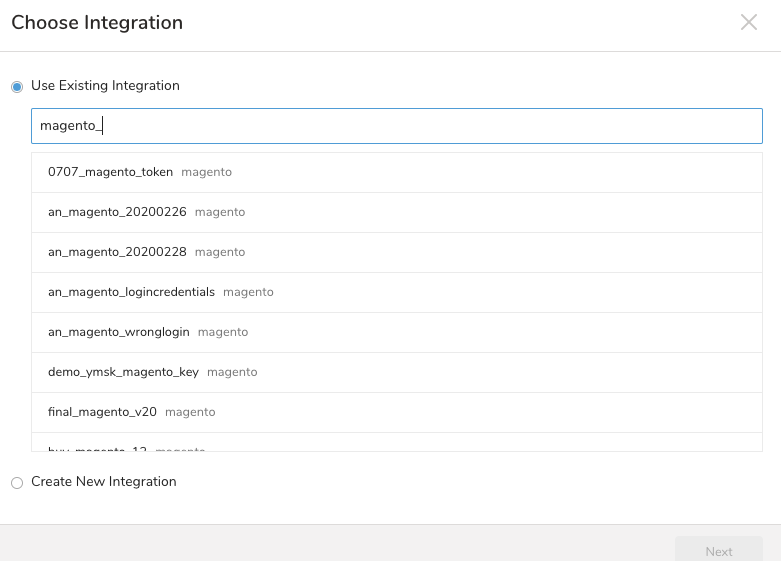
Select one of the following:
- Use an Existing Connection
- Select Use Existing Integration.
- Type the connection name in the search box to filter.
- Select your connection.
- Create a New Integration
- Select Create New Integration.
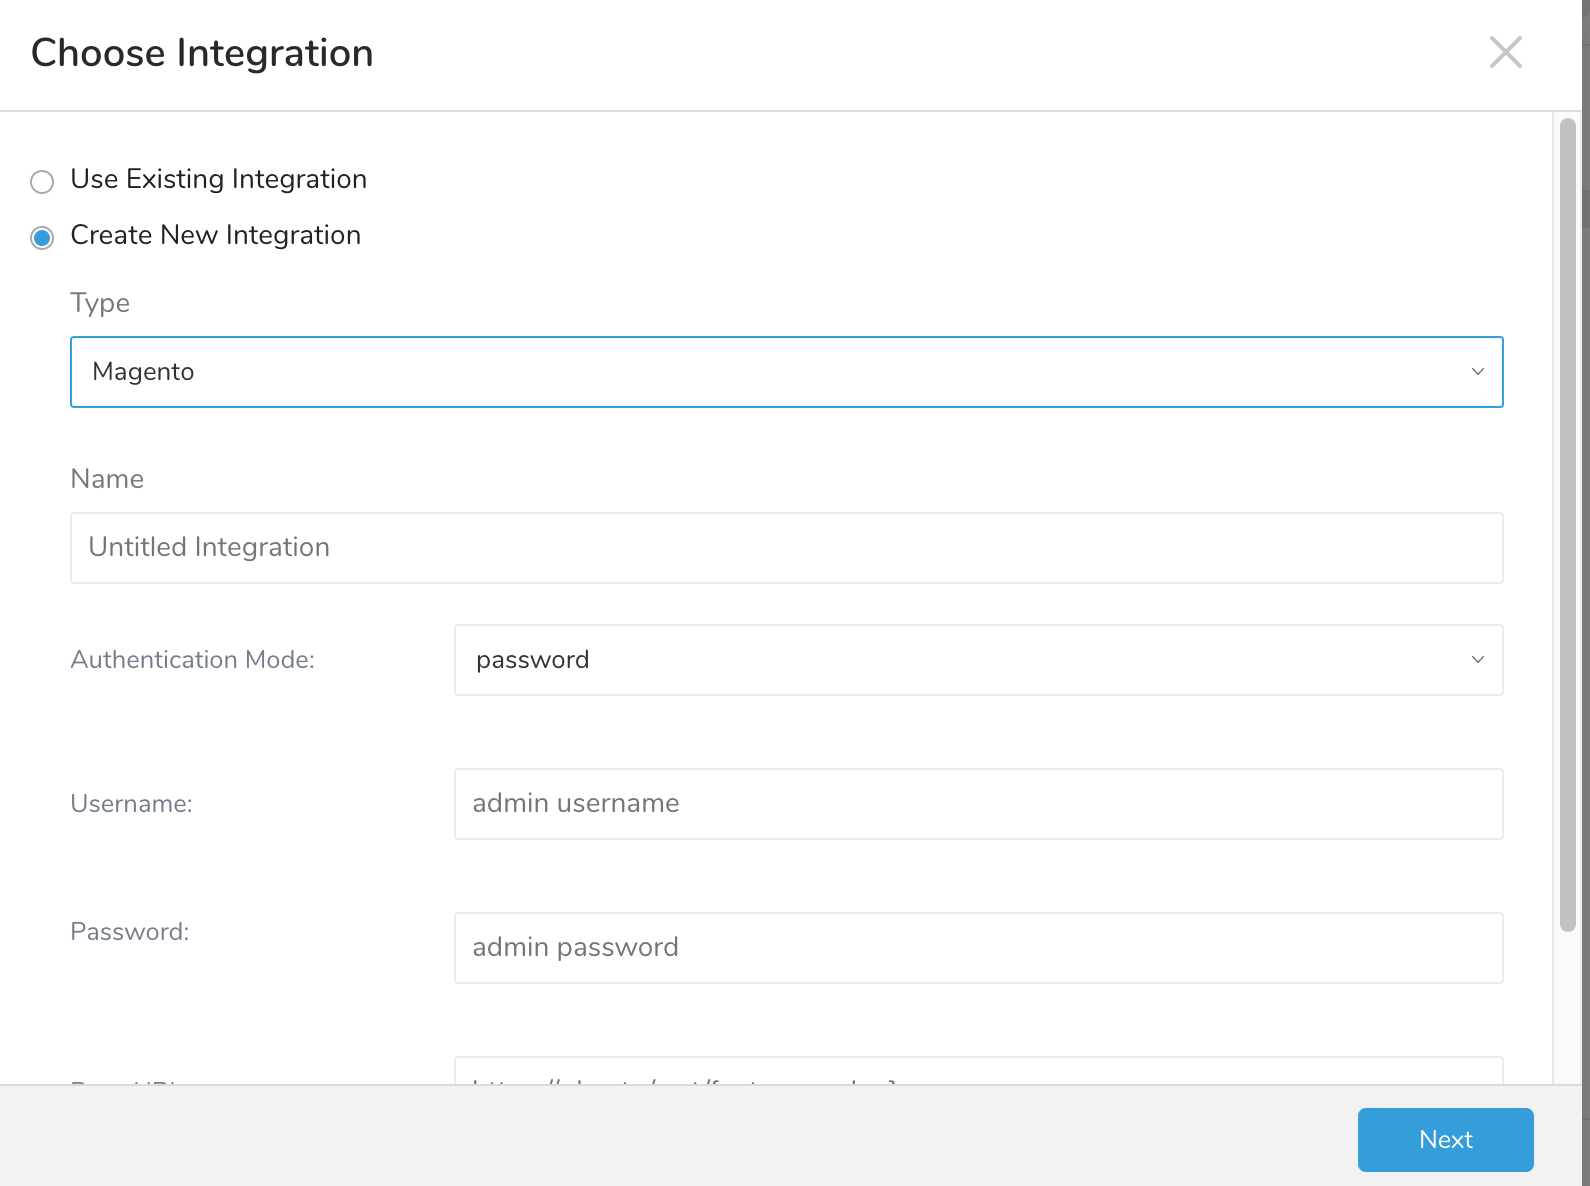 2. Follow steps 5-7 in Use the TD Console to Connect. 3. Follow all the steps in Using an Integration Access Token to Authenticate.
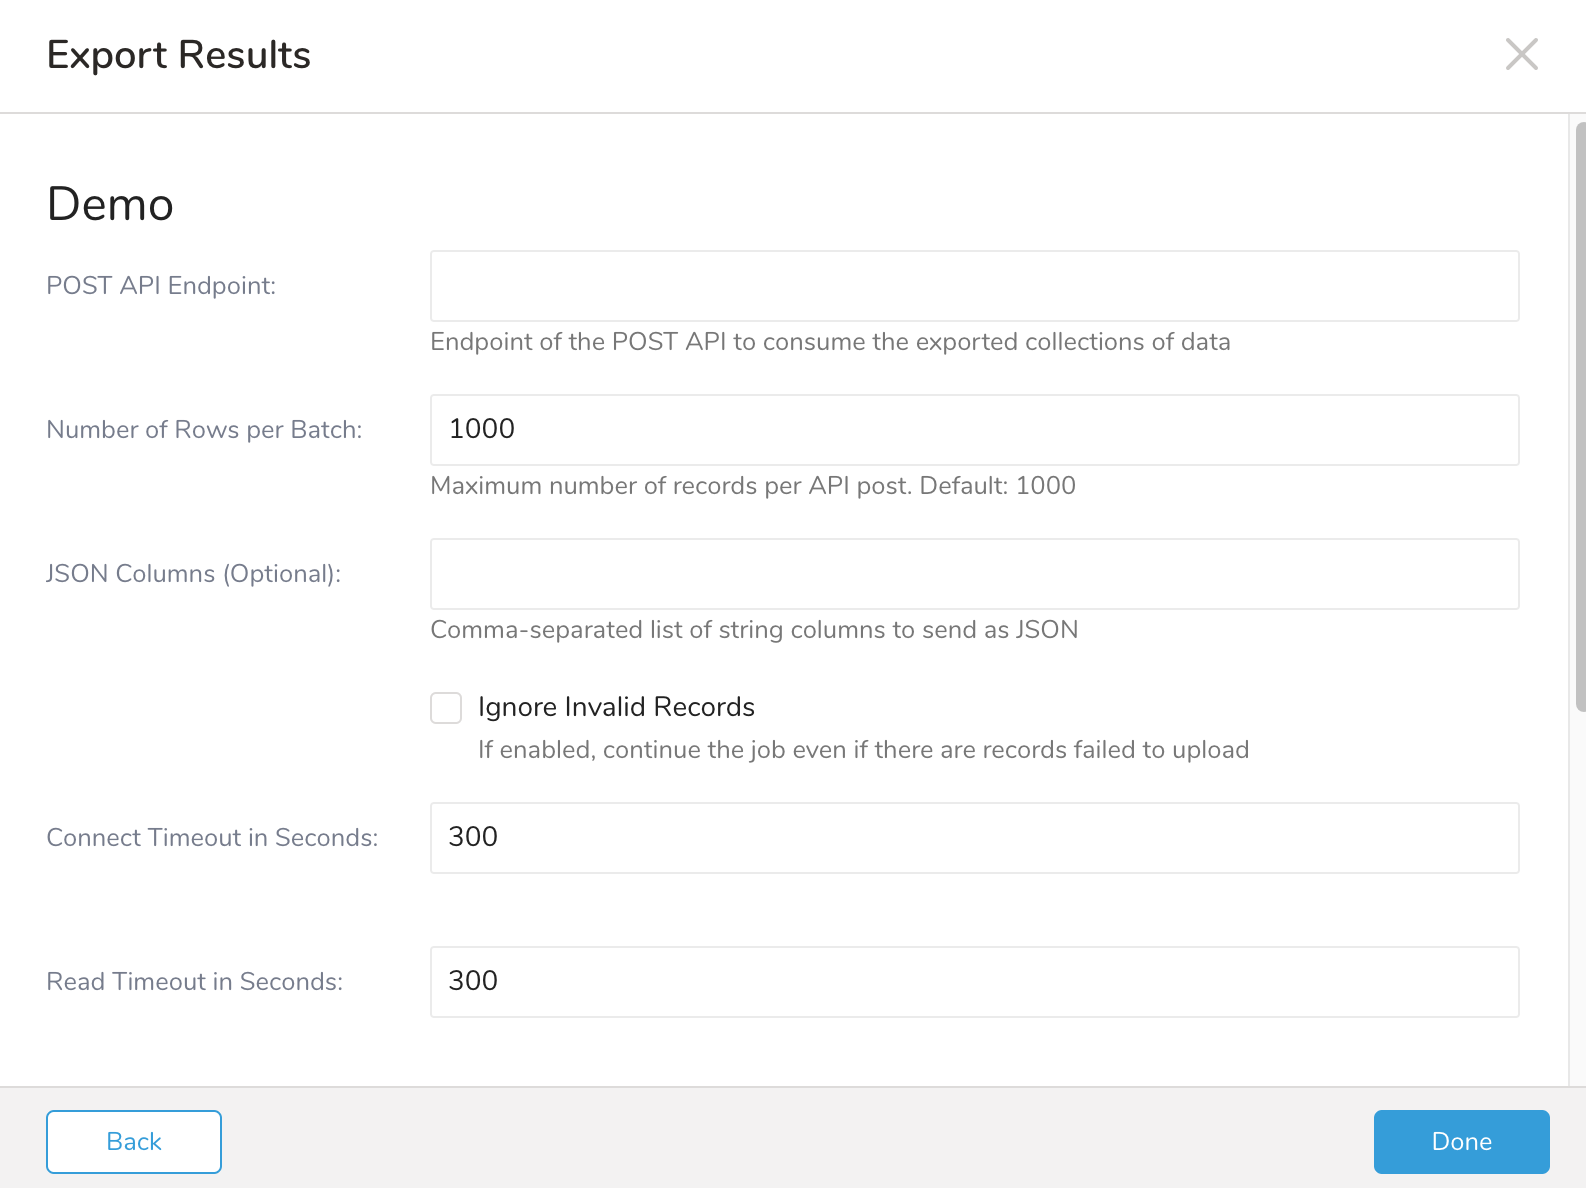
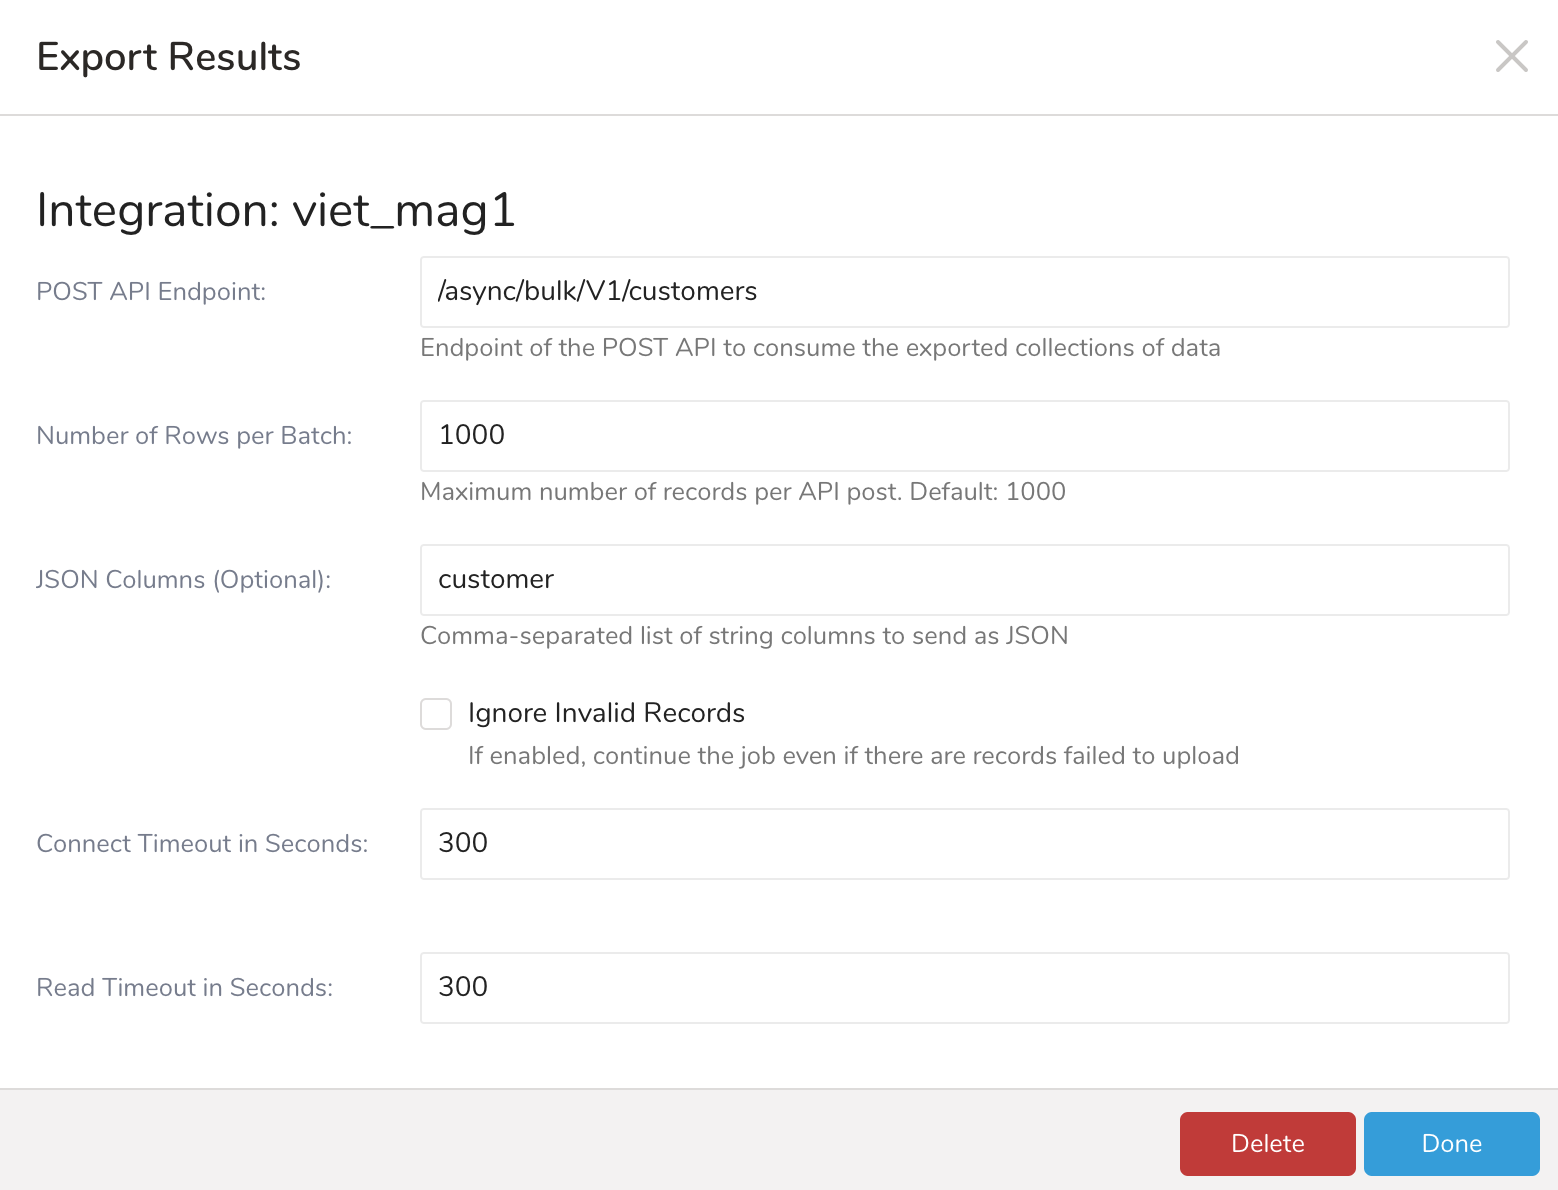
- Define the parameters for your export including:
| Field | Required Optional | Description |
|---|---|---|
| Post API Endpoint | Required | Endpoint of the bulk POST API to consume the exported collections of data |
| Number of Rows per Batch | Optional | Maximum number of records per API post. Default: 1000 |
| JSON Columns | Optional | Comma-separated list of string columns to send as JSON |
| Ignore Invalid Records | Optional | If enabled, continue the job even if there are records failed to upload because of invalid json format |
| Connect Timeout in Seconds | Optional | The time, in seconds, to wait until aborting a connection operation. Default: 300, which is equivalent to 5 minutes. Max: 1800 |
| Read Timeout in Seconds | Optional | The time, in seconds, to wait until aborting a read operation. Default: 300, which is equivalent to 5 minutes. Max: 1800 |
| Write Timeout in Seconds | Optional | The time, in seconds, to wait until aborting a write operation. Default: 300, which is equivalent to 5 minutes. Max: 1800 |
| Retry Limit | Optional | Number of retries before the system gives up. Default: 7. Max: 10 |
| Initial retry time wait in milliseconds | Optional | The time, in milliseconds, between the first and second attempt. Default: 500, which is equivalent to 0.5 seconds. Max: 900000 |
| Max retry wait in milliseconds | Optional | The time, in milliseconds, between the second and all subsequent attempts. Default: 300000, which is equivalent to 5 minutes. Max: 900000 |
You can use Scheduled Jobs with Result Export to periodically write the output result to a target destination that you specify.
Treasure Data's scheduler feature supports periodic query execution to achieve high availability.
When two specifications provide conflicting schedule specifications, the specification requesting to execute more often is followed while the other schedule specification is ignored.
For example, if the cron schedule is '0 0 1 * 1', then the 'day of month' specification and 'day of week' are discordant because the former specification requires it to run every first day of each month at midnight (00:00), while the latter specification requires it to run every Monday at midnight (00:00). The latter specification is followed.
Navigate to Data Workbench > Queries
Create a new query or select an existing query.
Next to Schedule, select None.

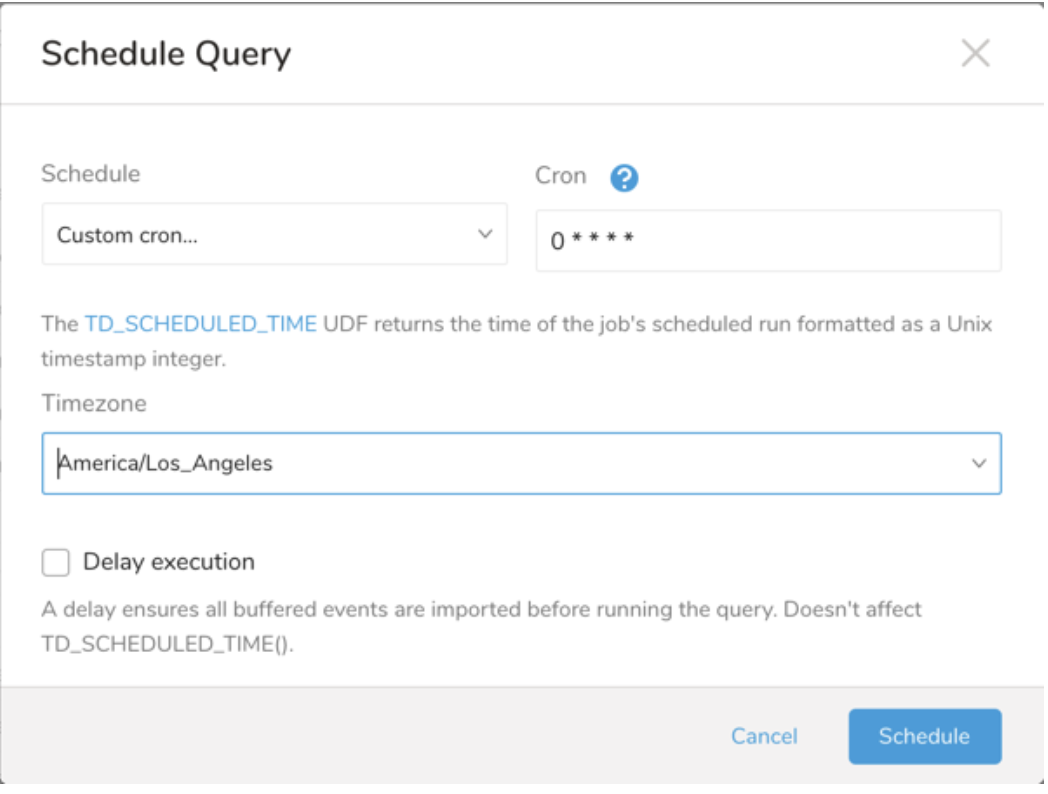
In the drop-down, select one of the following schedule options:
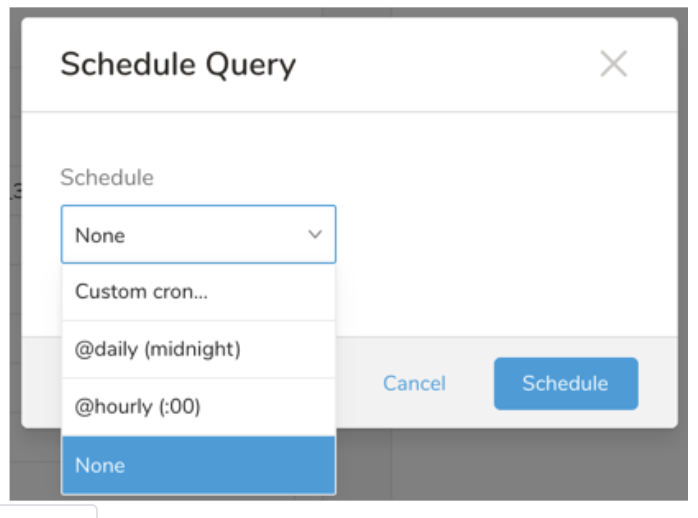
Drop-down Value Description Custom cron... Review Custom cron... details. @daily (midnight) Run once a day at midnight (00:00 am) in the specified time zone. @hourly (:00) Run every hour at 00 minutes. None No schedule.
| Cron Value | Description |
|---|---|
0 * * * * | Run once an hour. |
0 0 * * * | Run once a day at midnight. |
0 0 1 * * | Run once a month at midnight on the morning of the first day of the month. |
| "" | Create a job that has no scheduled run time. |
 *    *    *    *    *
 -    -    -    -    -
 |    |    |    |    |
 |    |    |    |    +----- day of week (0 - 6) (Sunday=0)
 |    |    |    +---------- month (1 - 12)
 |    |    +--------------- day of month (1 - 31)
 |    +-------------------- hour (0 - 23)
 +------------------------- min (0 - 59)
The following named entries can be used:
- Day of Week: sun, mon, tue, wed, thu, fri, sat.
- Month: jan, feb, mar, apr, may, jun, jul, aug, sep, oct, nov, dec.
A single space is required between each field. The values for each field can be composed of:
| Field Value | Example | Example Description |
|---|---|---|
| A single value, within the limits displayed above for each field. | ||
A wildcard '*' to indicate no restriction based on the field. | '0 0 1 * *' | Configures the schedule to run at midnight (00:00) on the first day of each month. |
A range '2-5', indicating the range of accepted values for the field. | '0 0 1-10 * *' | Configures the schedule to run at midnight (00:00) on the first 10 days of each month. |
A list of comma-separated values '2,3,4,5', indicating the list of accepted values for the field. | 0 0 1,11,21 * *' | Configures the schedule to run at midnight (00:00) every 1st, 11th, and 21st day of each month. |
A periodicity indicator '*/5' to express how often based on the field's valid range of values a schedule is allowed to run. | '30 */2 1 * *' | Configures the schedule to run on the 1st of every month, every 2 hours starting at 00:30. '0 0 */5 * *' configures the schedule to run at midnight (00:00) every 5 days starting on the 5th of each month. |
A comma-separated list of any of the above except the '*' wildcard is also supported '2,*/5,8-10'. | '0 0 5,*/10,25 * *' | Configures the schedule to run at midnight (00:00) every 5th, 10th, 20th, and 25th day of each month. |
- (Optional) You can delay the start time of a query by enabling the Delay execution.
Save the query with a name and run, or just run the query. Upon successful completion of the query, the query result is automatically exported to the specified destination.
Scheduled jobs that continuously fail due to configuration errors may be disabled on the system side after several notifications.
(Optional) You can delay the start time of a query by enabling the Delay execution.
You can also send segment data to the target platform by creating an activation in the Audience Studio.
- Navigate to Audience Studio.
- Select a parent segment.
- Open the target segment, right-mouse click, and then select Create Activation.
- In the Details panel, enter an Activation name and configure the activation according to the previous section on Configuration Parameters.
- Customize the activation output in the Output Mapping panel.
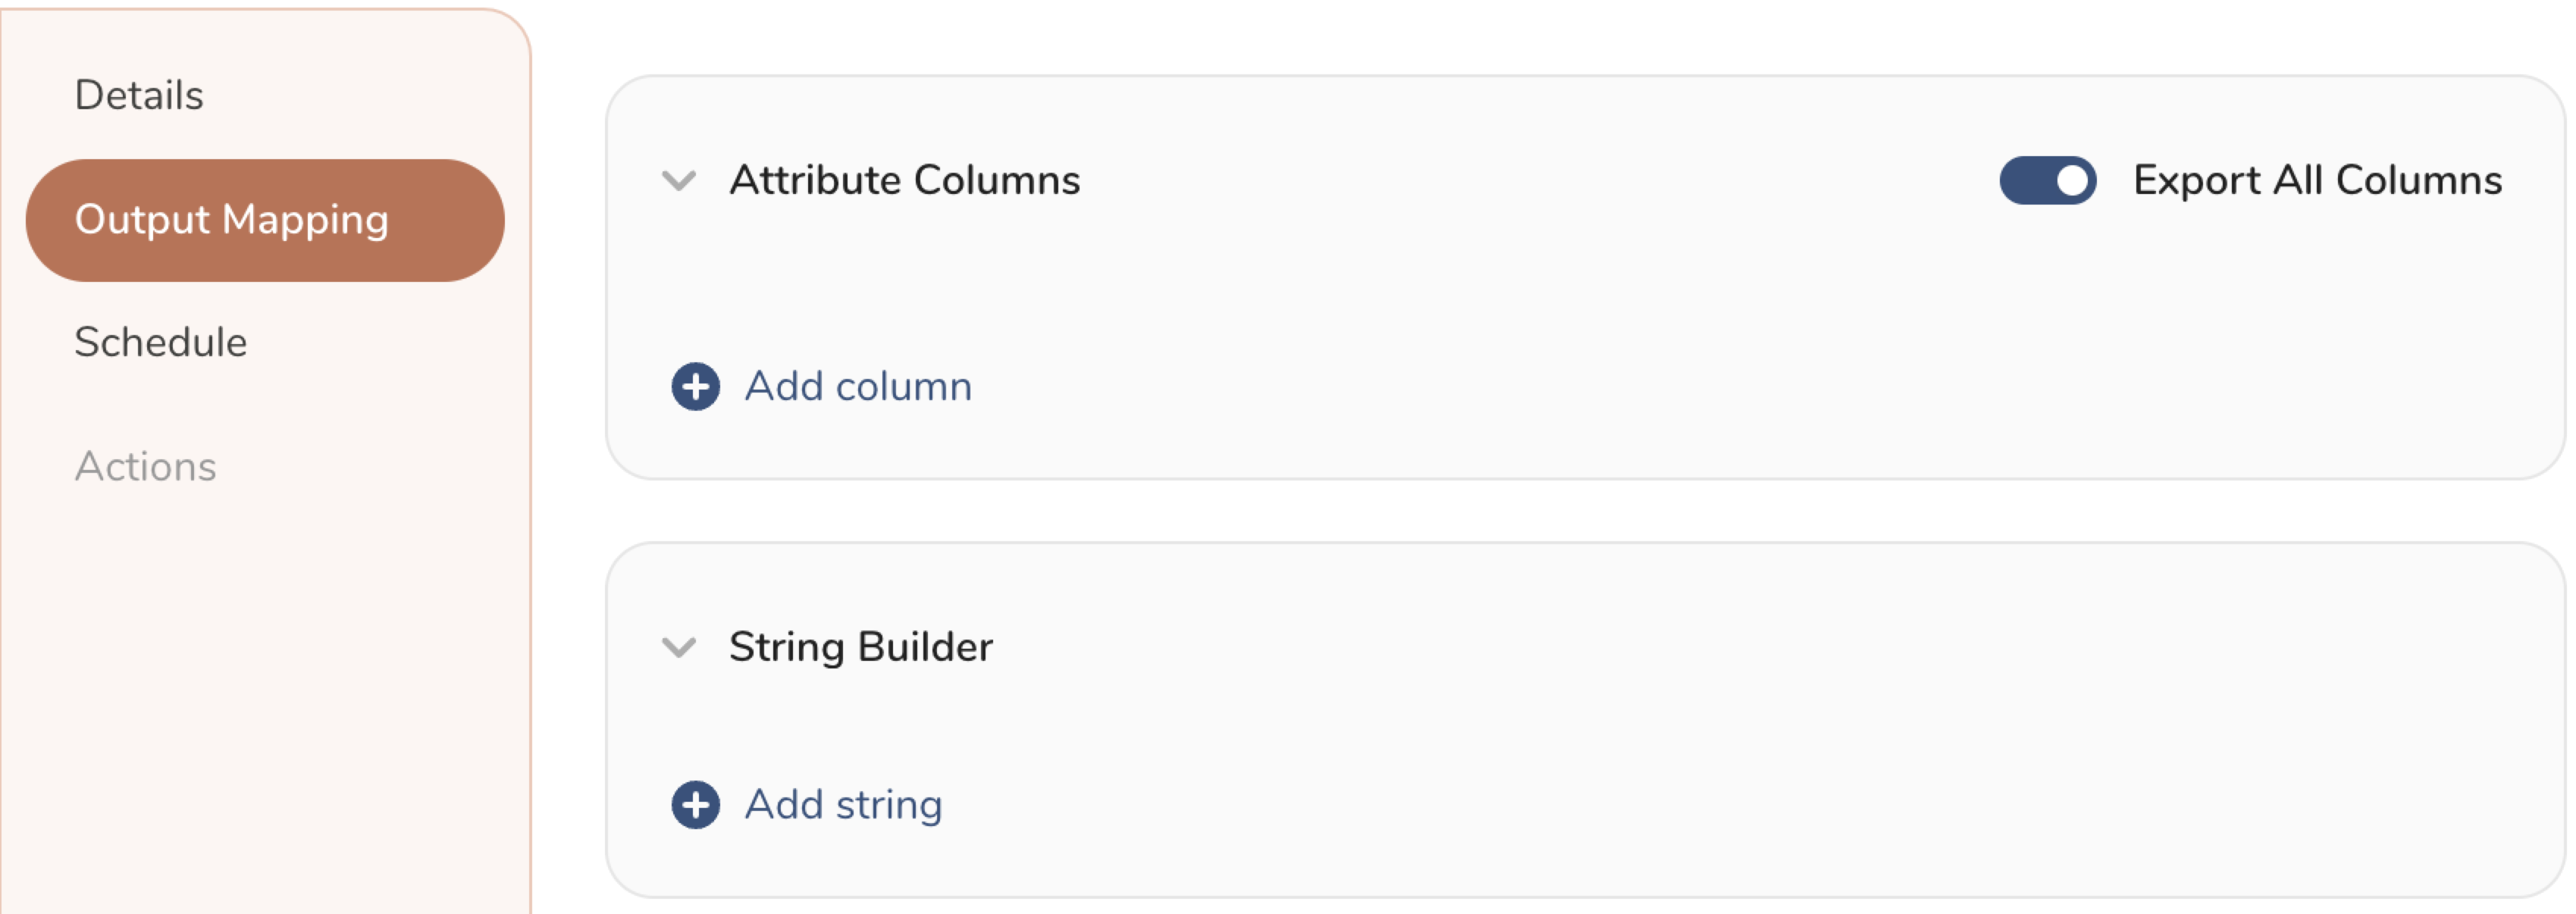
- Attribute Columns
- Select Export All Columns to export all columns without making any changes.
- Select + Add Columns to add specific columns for the export. The Output Column Name pre-populates with the same Source column name. You can update the Output Column Name. Continue to select + Add Columnsto add new columns for your activation output.
- String Builder
- + Add string to create strings for export. Select from the following values:
- String: Choose any value; use text to create a custom value.
- Timestamp: The date and time of the export.
- Segment Id: The segment ID number.
- Segment Name: The segment name.
- Audience Id: The parent segment number.
- + Add string to create strings for export. Select from the following values:
- Set a Schedule.
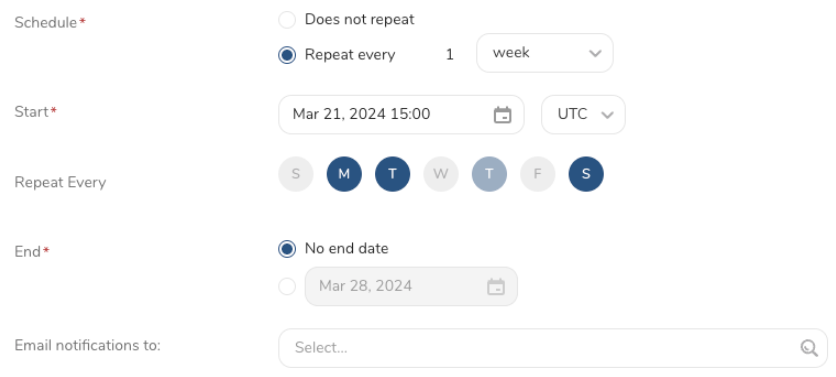
- Select the values to define your schedule and optionally include email notifications.
- Select Create.
If you need to create an activation for a batch journey, review Creating a Batch Journey Activation.
Within Treasure Workflow, you can specify the use of this data connector to export data.
timezone: UTC

_export:
  td:
    database: sample_datasets

+td-result-into-target:
  td>: queries/sample.sql
  result_connection: your_connections_name
  result_settings:
    base_url: http://base_url.com/rest
    api_endpoint: /all/async/bulk/V1/customers
    username: admin
    password: **xyz***
    #auth_method: token
    #token: **xyz***
    json_columns: customer
    ignore_invalid_records: true
    retry_count: 7
    retry_initial_wait_millis: 500
    max_retry_wait_millis: 300000
    request_connect_timeout: 300
    request_read_timeout: 300
    request_write_timeout: 300