このプラグインは大規模なデータセットに推奨されます。
または、小規模なデータセットの場合は、Salesforce Marketing Cloud (ExactTarget) Data Connectorを使用してジョブ結果を書き込むことができます。
Treasure Dataは、ユーザーセグメントをSalesforce Marketing Cloud (ExactTarget)に公開し、顧客にパーソナライズされたメールを送信できるようにします。Web、モバイル、CRM、およびその他のデータソースからのファーストパーティデータを使用して、データ駆動型のメールキャンペーンを実行できます。
This feature is in BETA version. For more information, contact your Customer Success Representative.
- Treasure Dataの基本知識
- Salesforce Marketing Cloudの基本知識
- TDアカウント
Open SSH 7.8 Private Keyがサポートされています。鍵の形式が検出され、使用する正しいライブラリが選択されます。
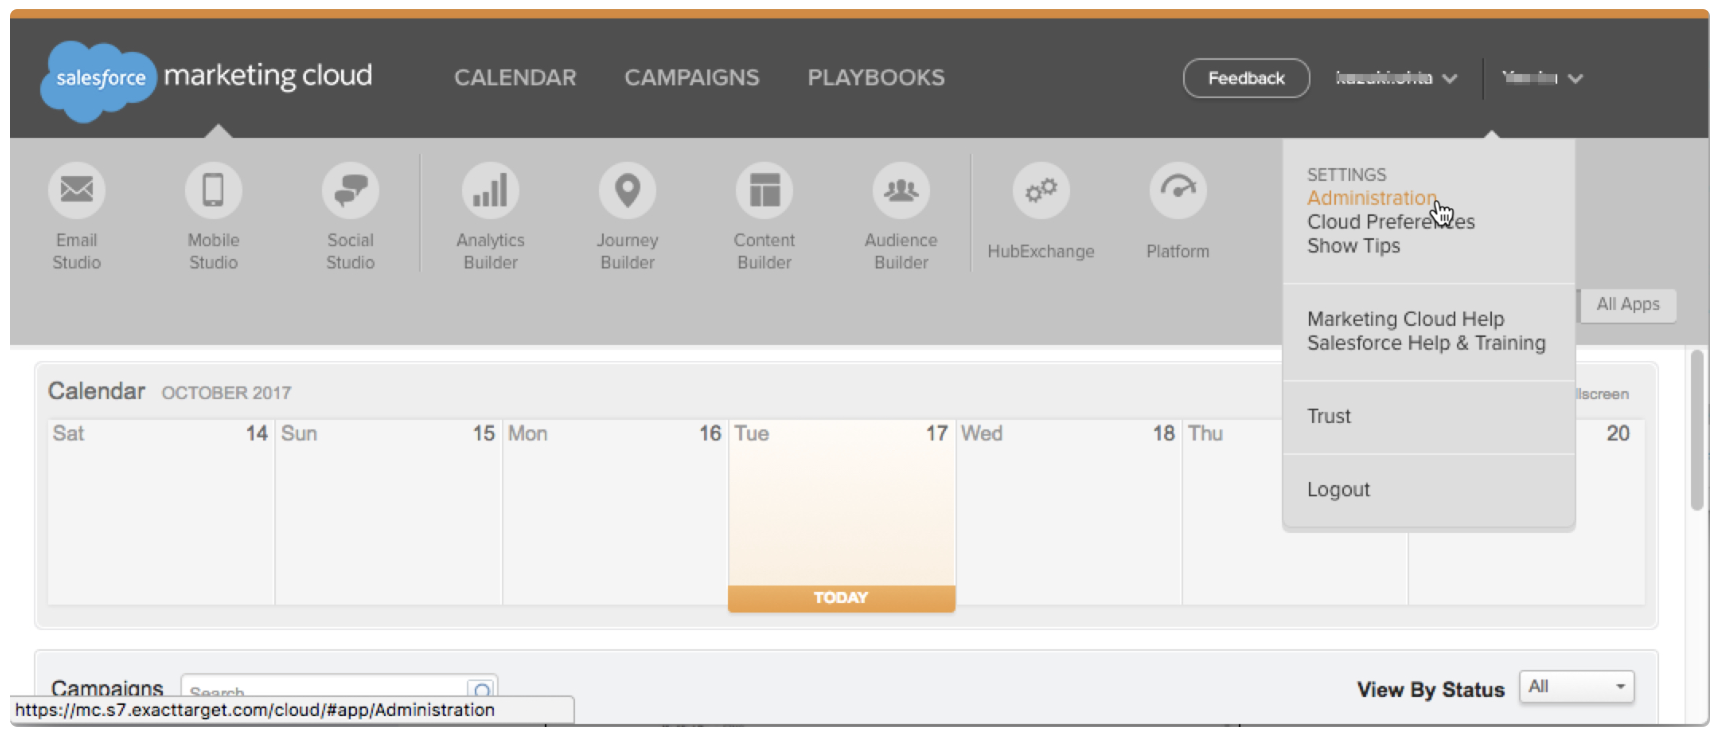
セットアップを開始するには、Salesforceアカウントにアクセスします。
SFMCダッシュボードで、アカウント内のAdministrationを選択します。
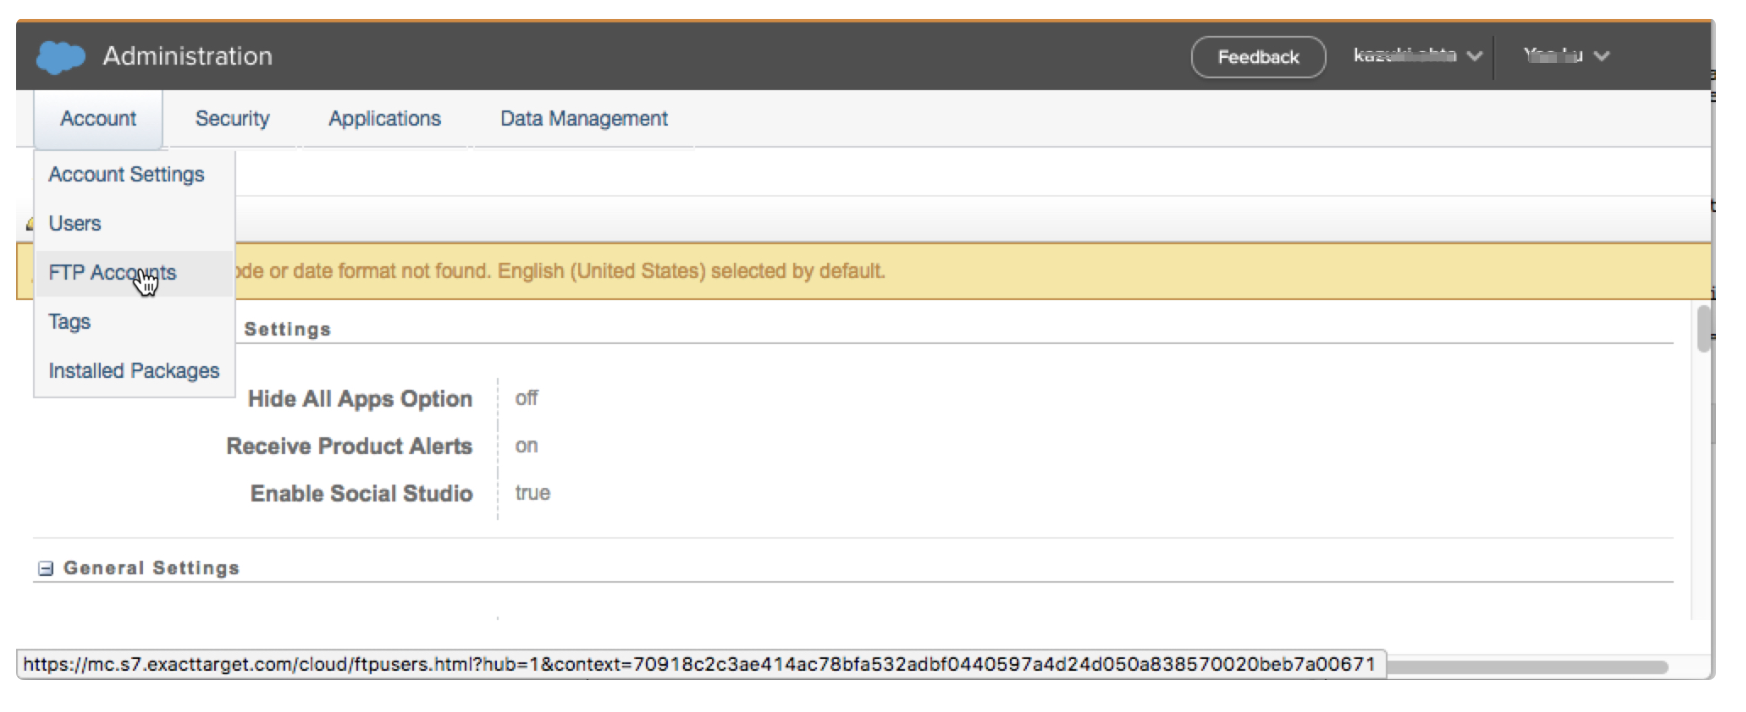
Accountドロップダウンメニューから、FTP Accountsを選択します。これにより、SFTPアカウントを確立できます。
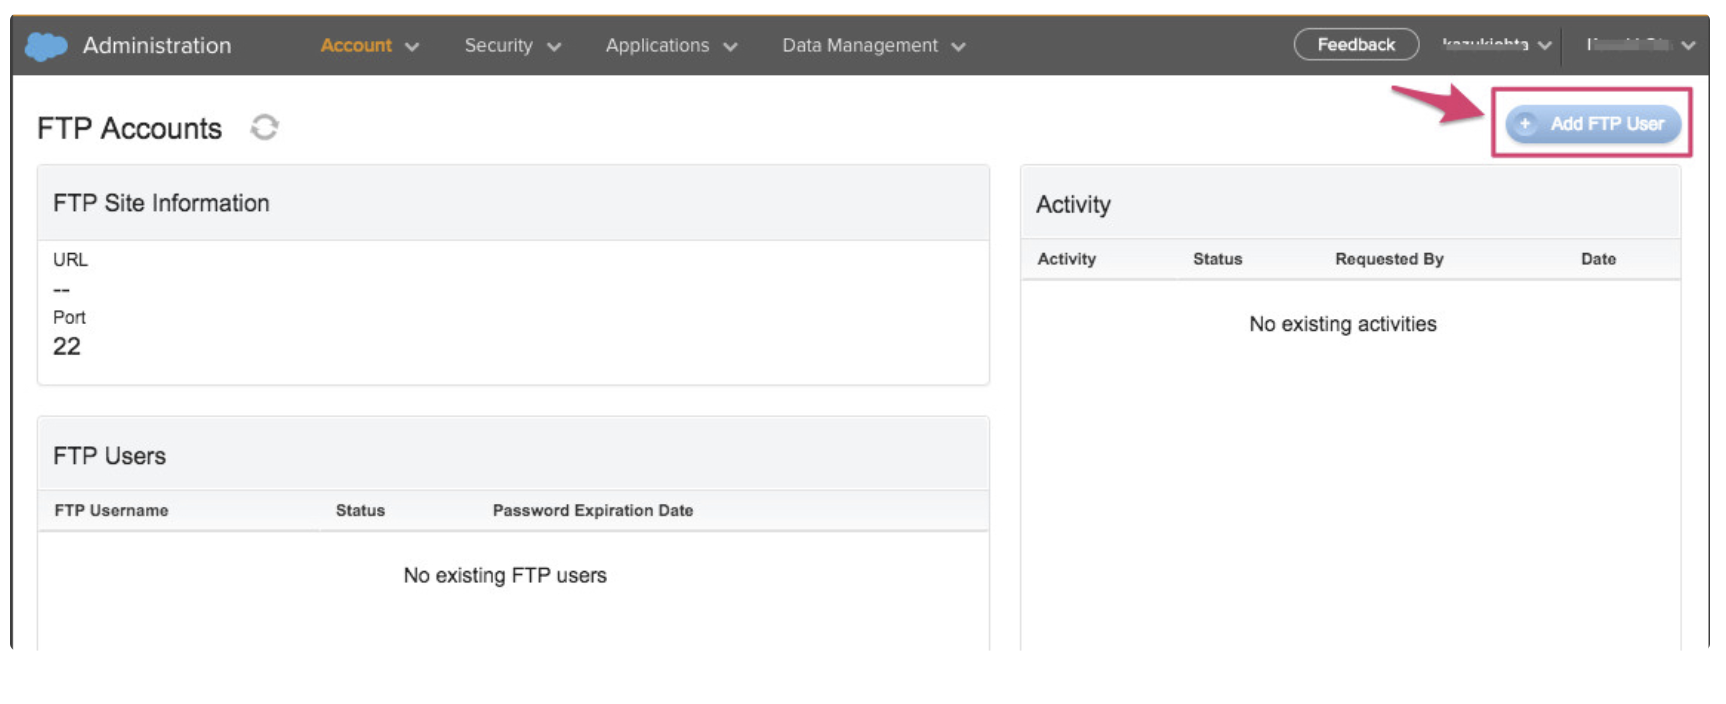
FTP Accountsパネルで、Add FTP Userを選択します。
FTPアカウントのパスワードを入力します。
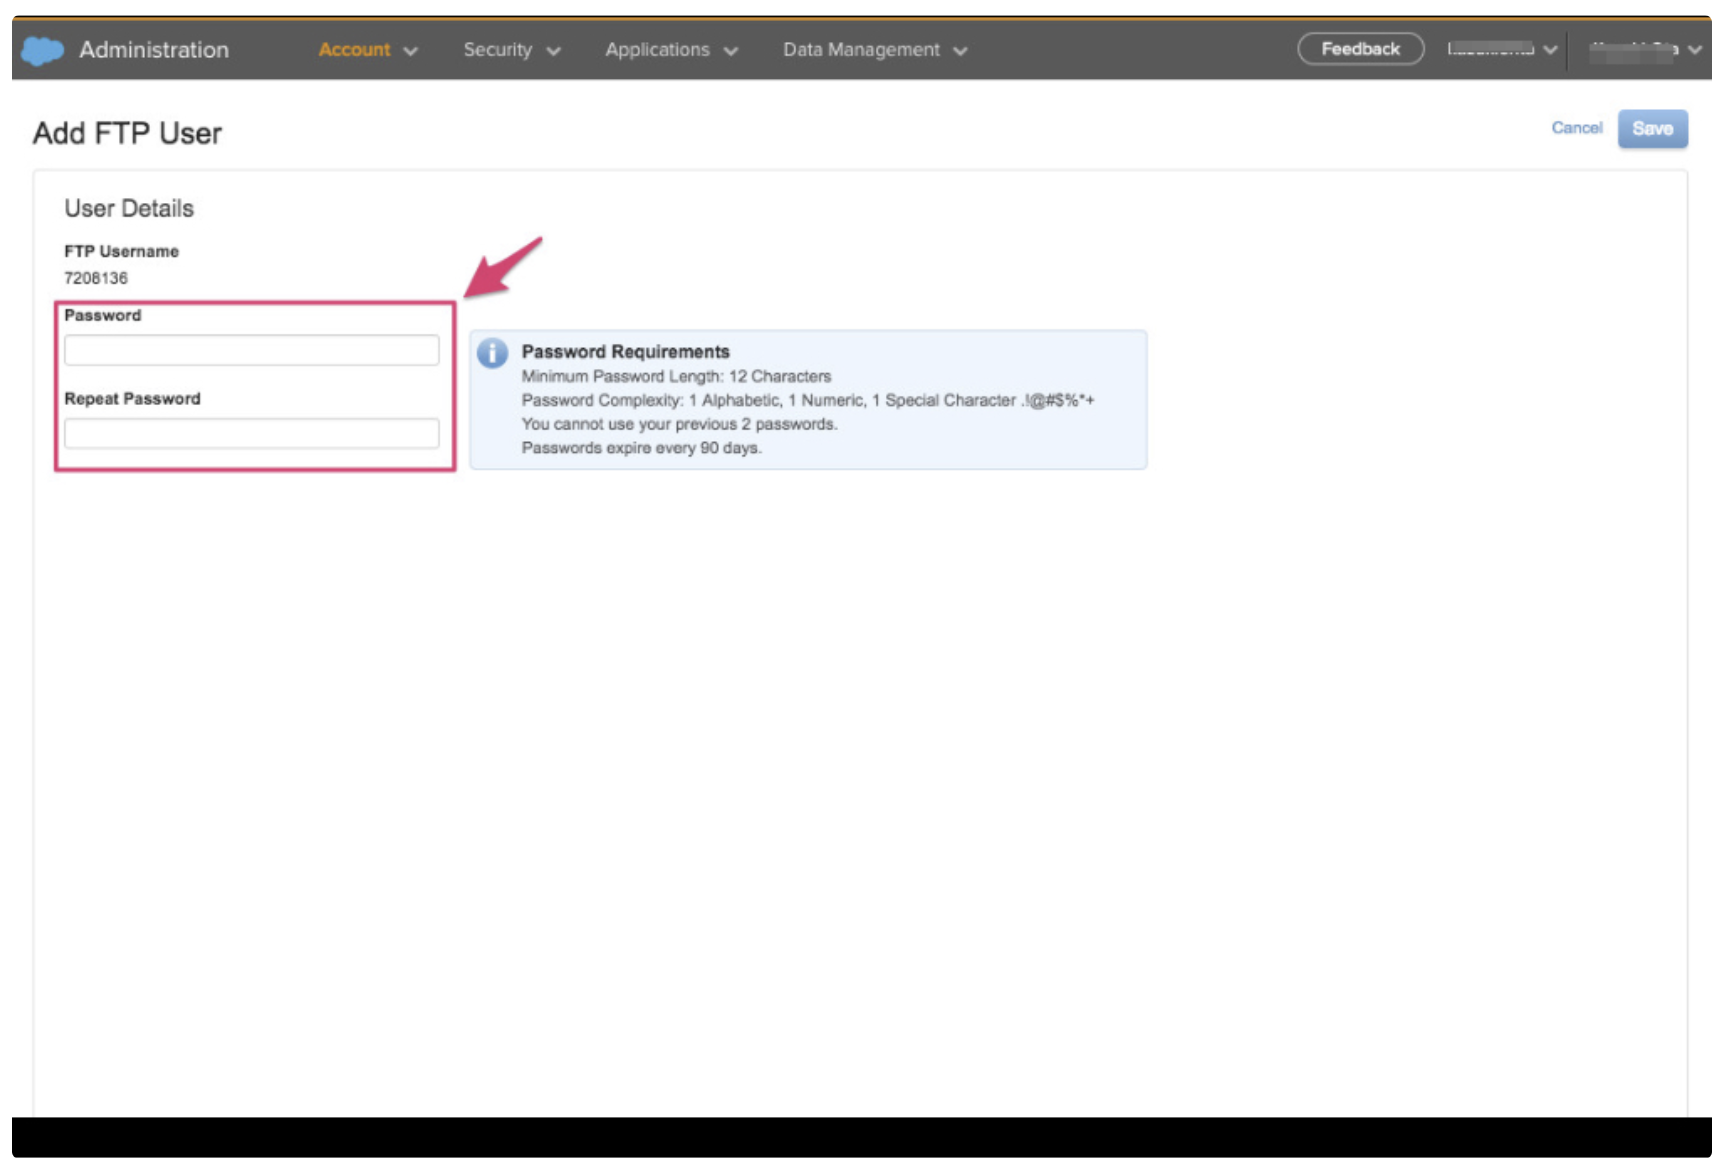
SFTPアカウント情報を確認します。

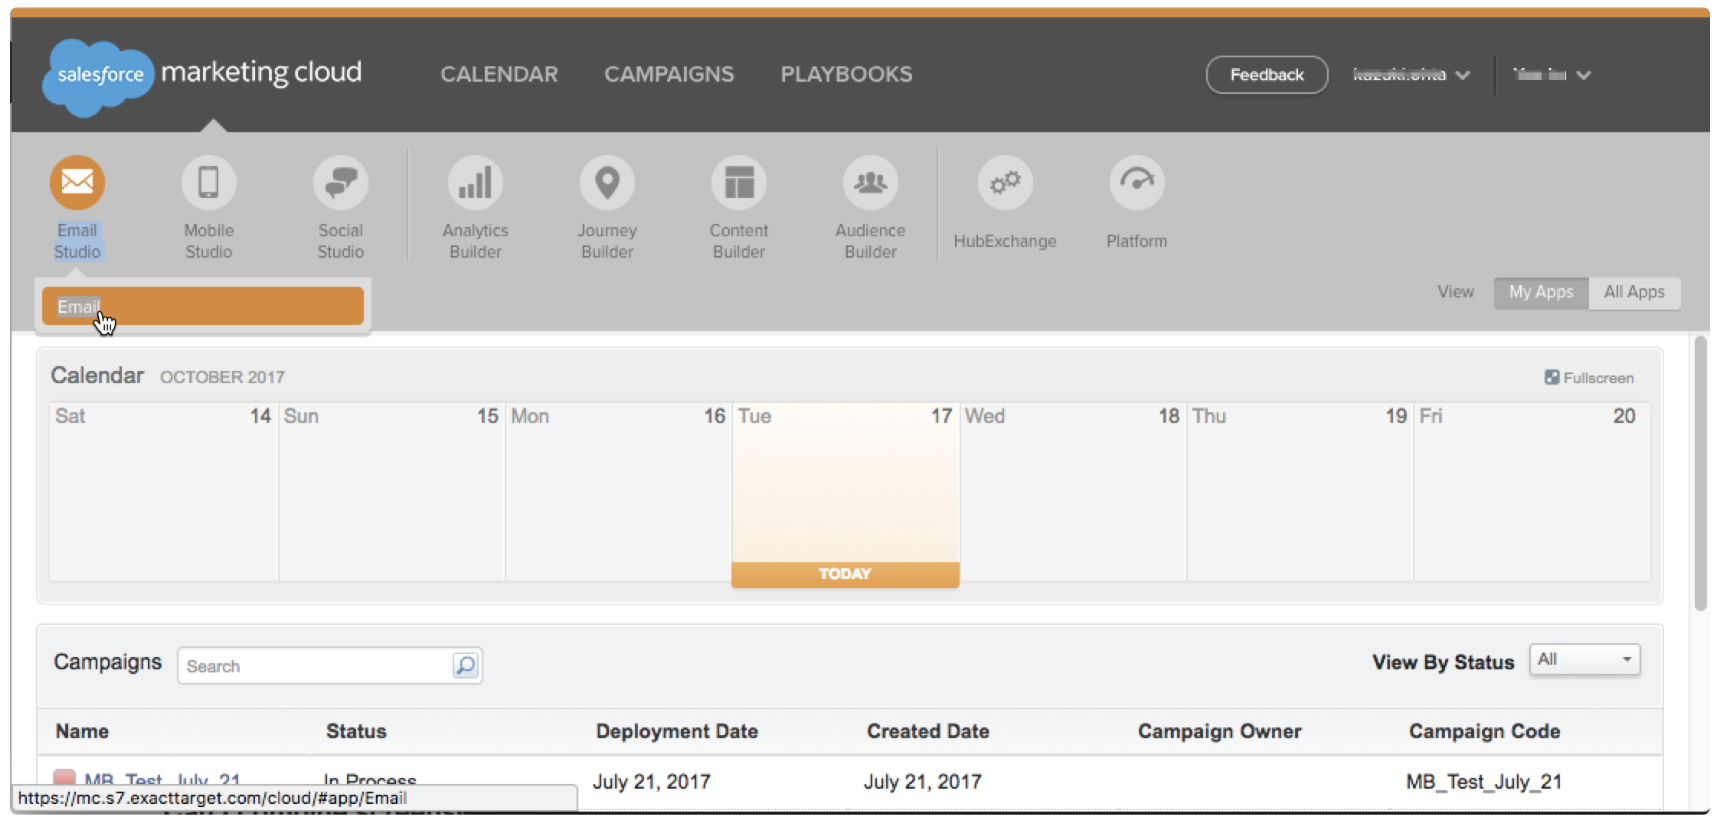
SFMCダッシュボードに戻り、Email Studio > Emailを選択します。
Content > Create > Template > From Existing Templateを選択して、メールテンプレートを作成します。
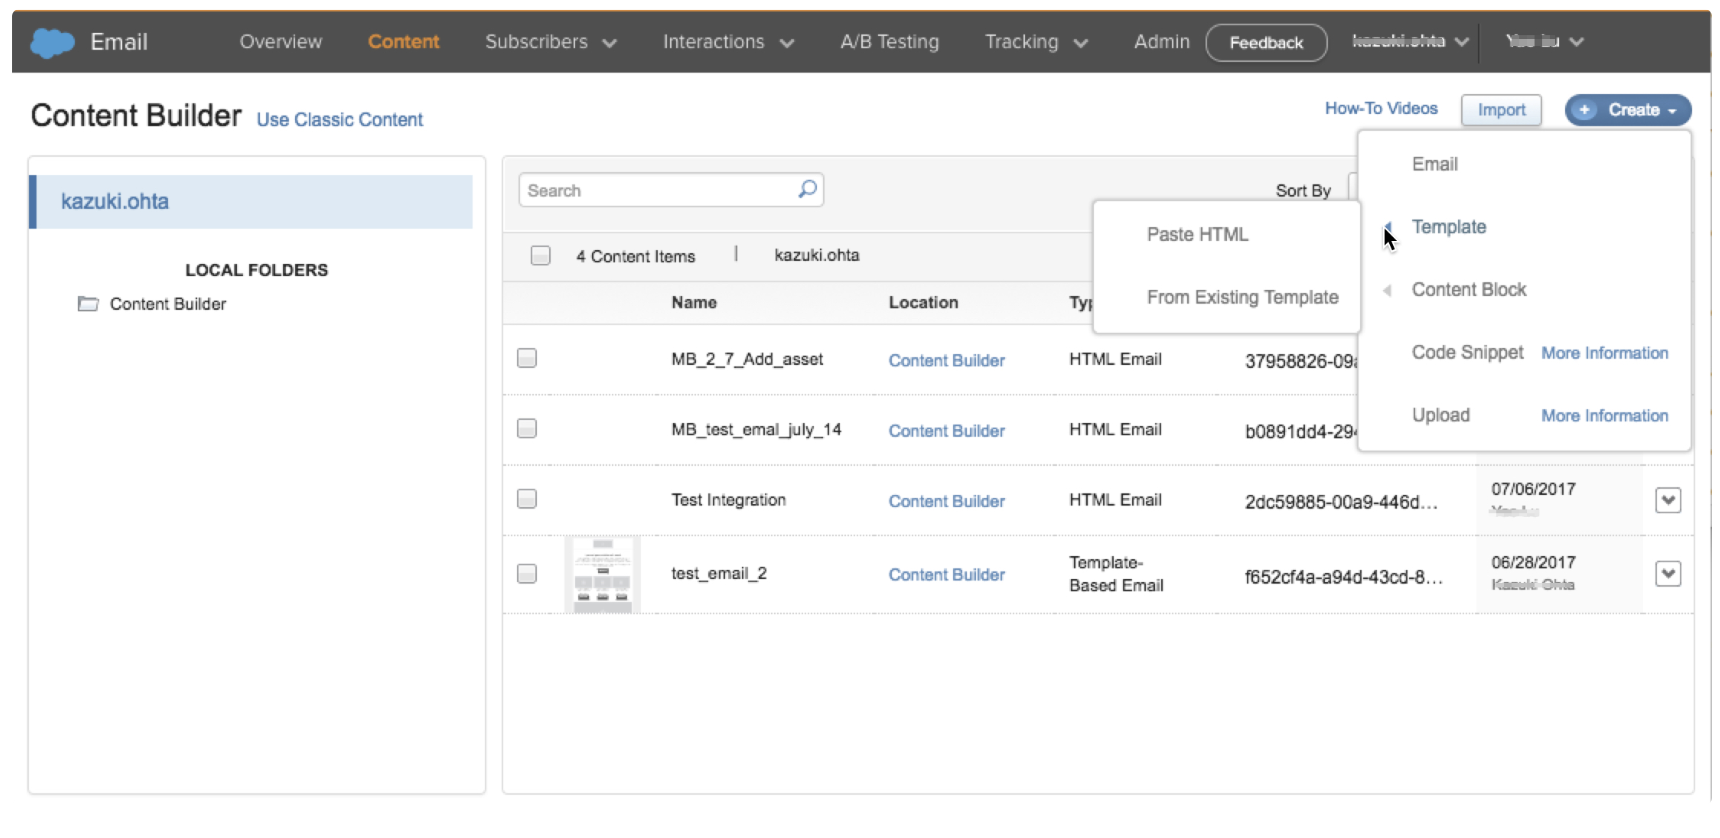
テンプレートを作成したら、Save > Save and Exitを選択し、テンプレート名と場所を入力し、その情報も保存します。
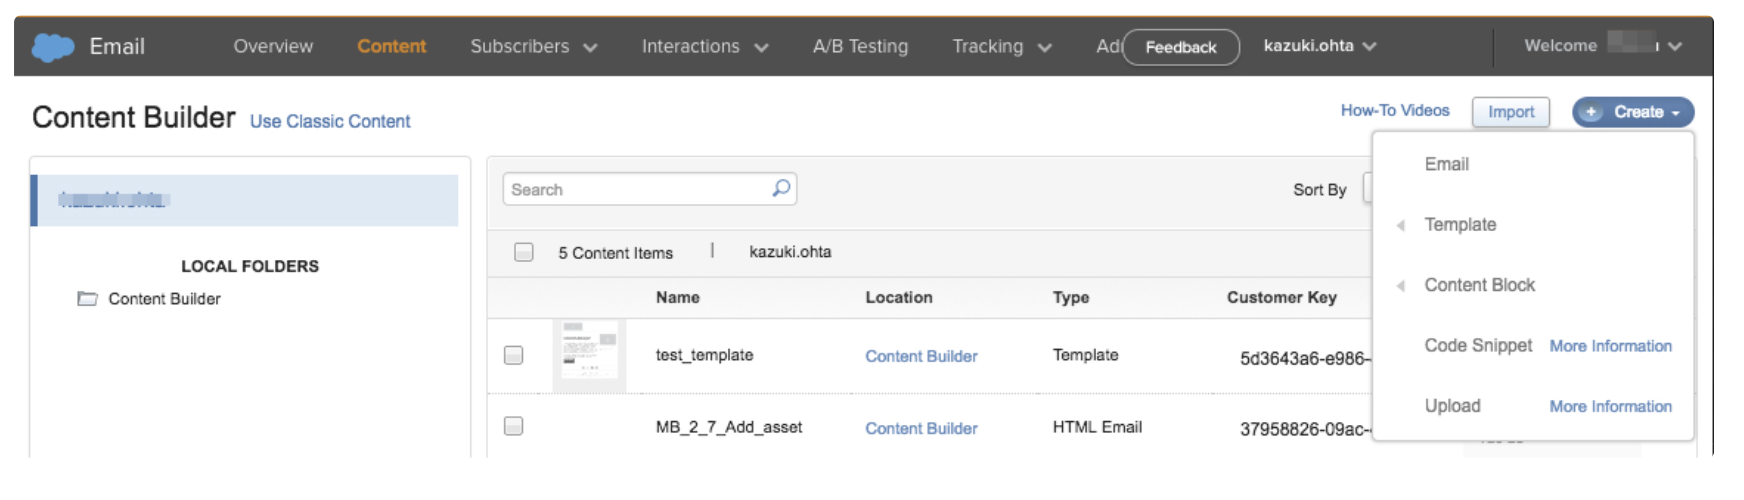
Emailページに留まったまま、Create > Emailを選択して、テンプレートからメールコンテンツ(例:キャンペーン用)を作成します。
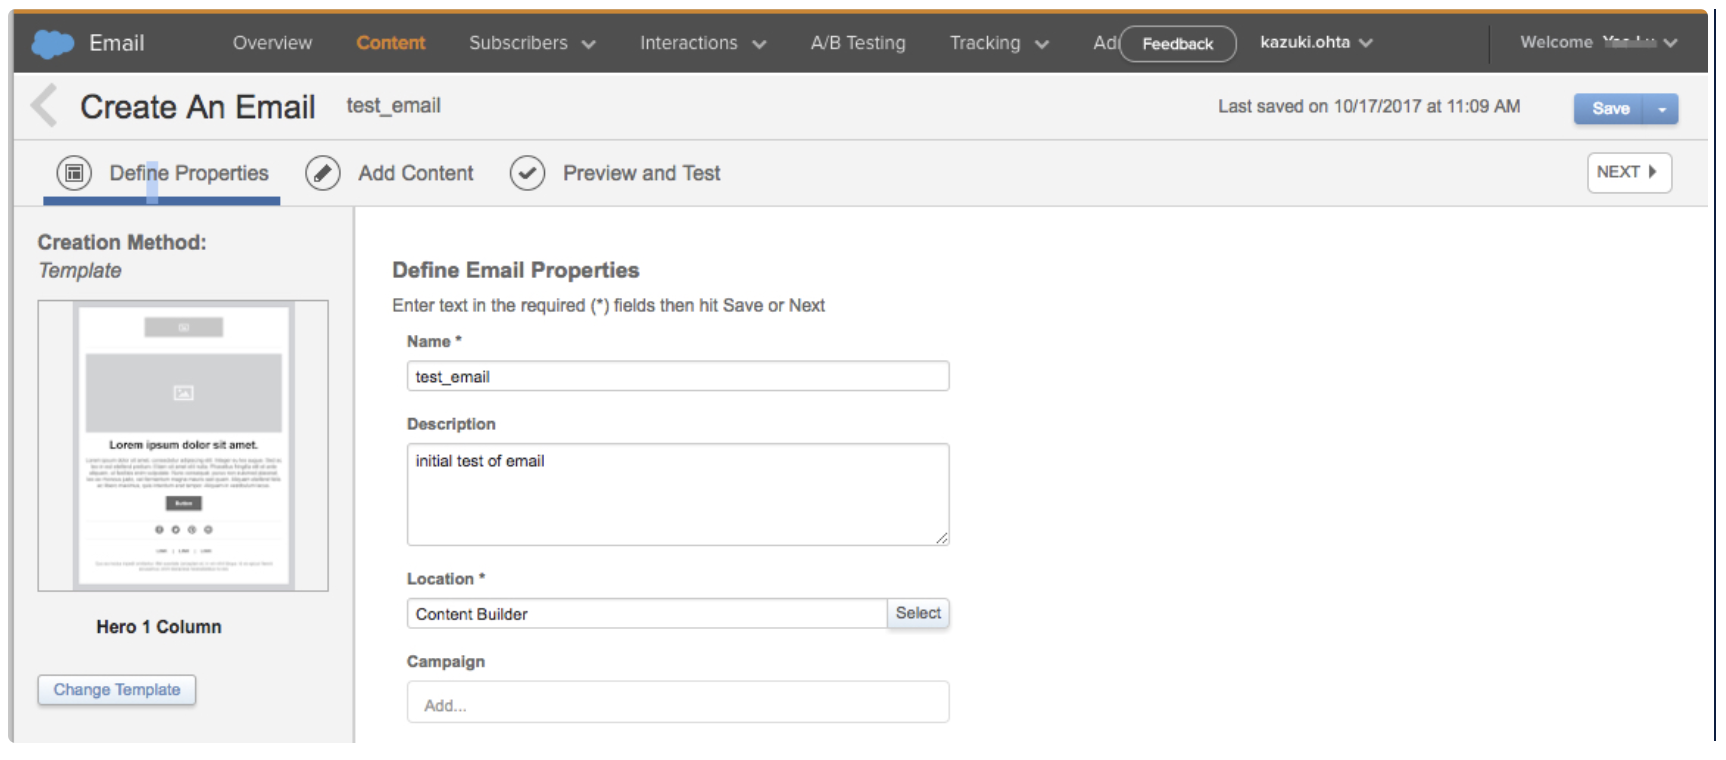
テンプレートを選択し、名前や場所を含むメールプロパティを定義し、Nextを選択してコンテンツを提供します。メールの作成を続け、完了したら保存します。
Emailビューから、Interactionsを選択します。
Importを選択します。
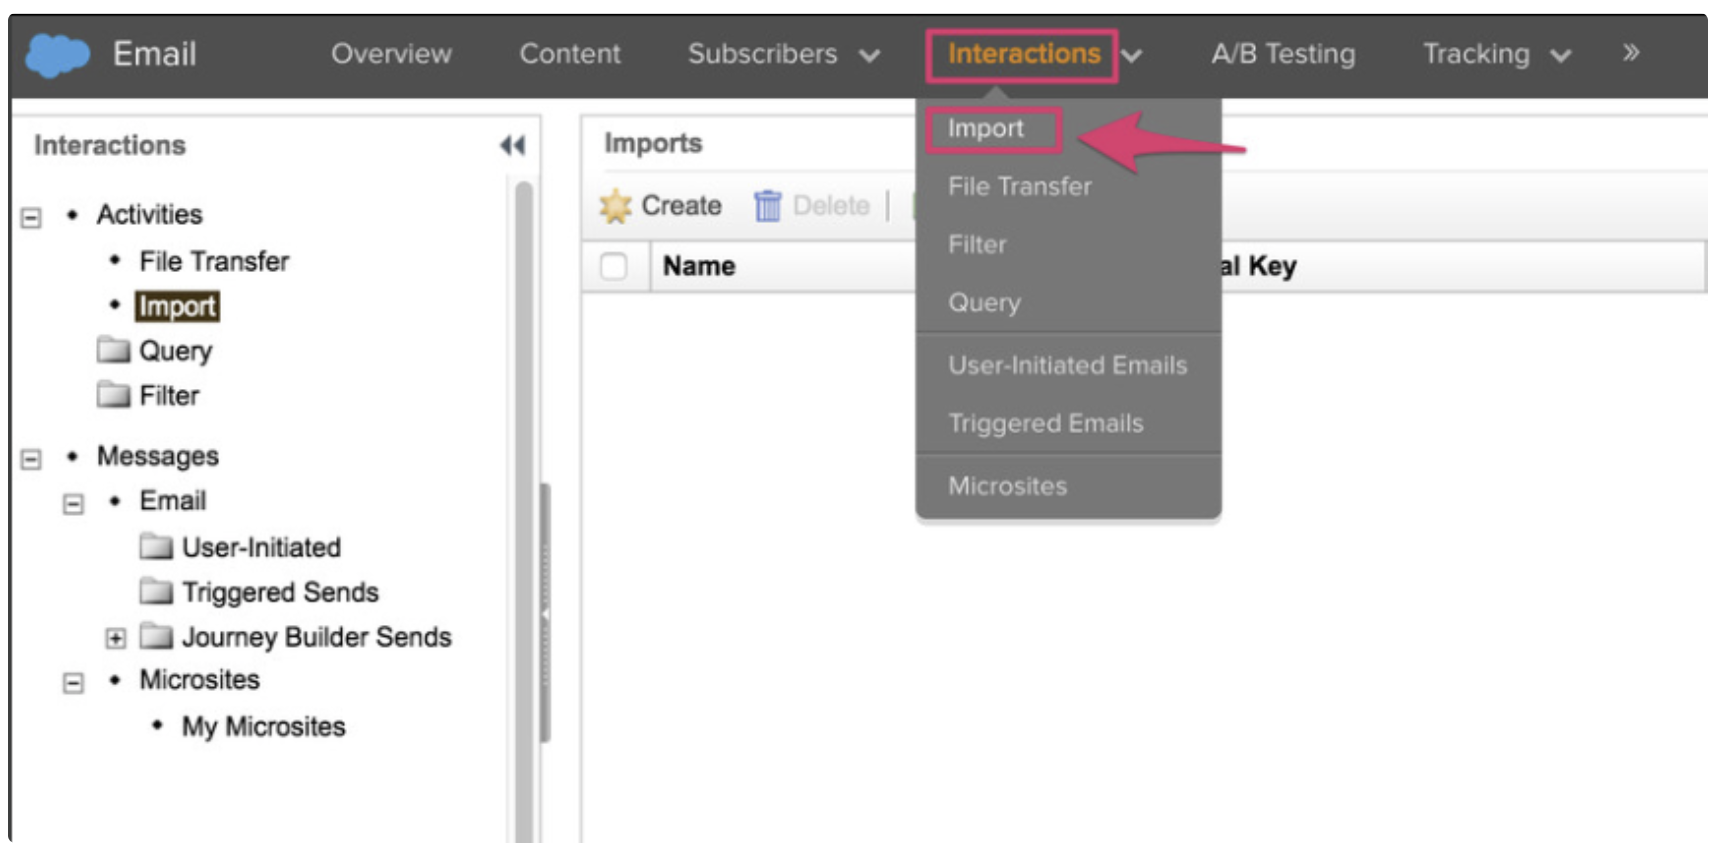
Createを選択して、新しいインポートインタラクション定義を作成します。
SFTP情報とデータインポート場所を含むインポートインタラクション情報を入力します。情報を保存します。
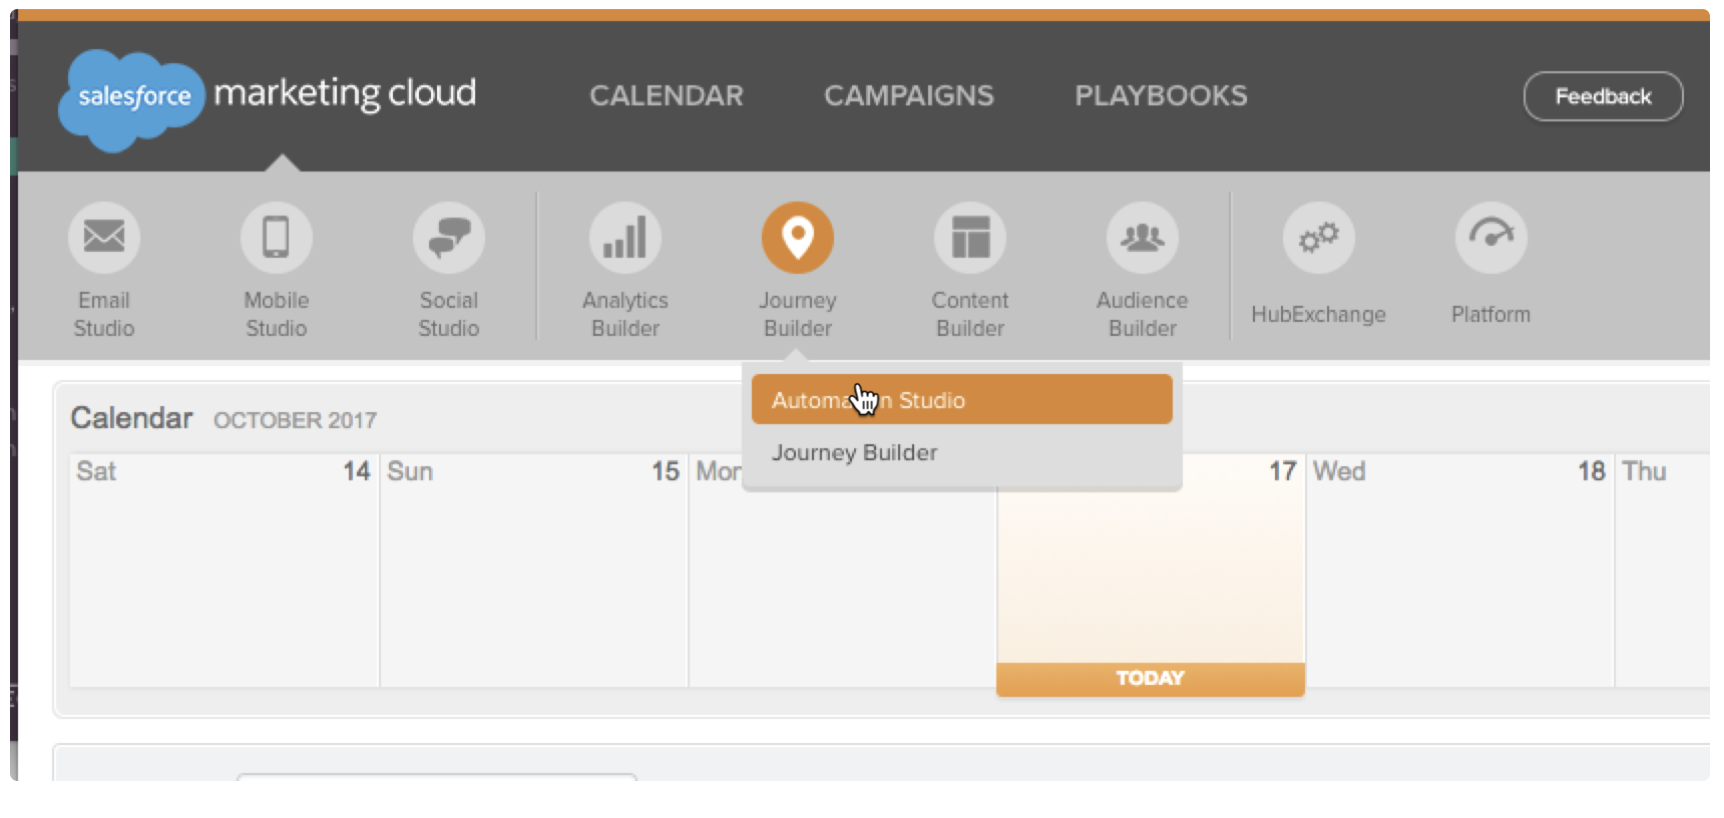
Emailビューから、SFDCの青いクラウドアイコンを選択してメニューオプションを表示します。
Journey Builder > Automation Studioを選択します。
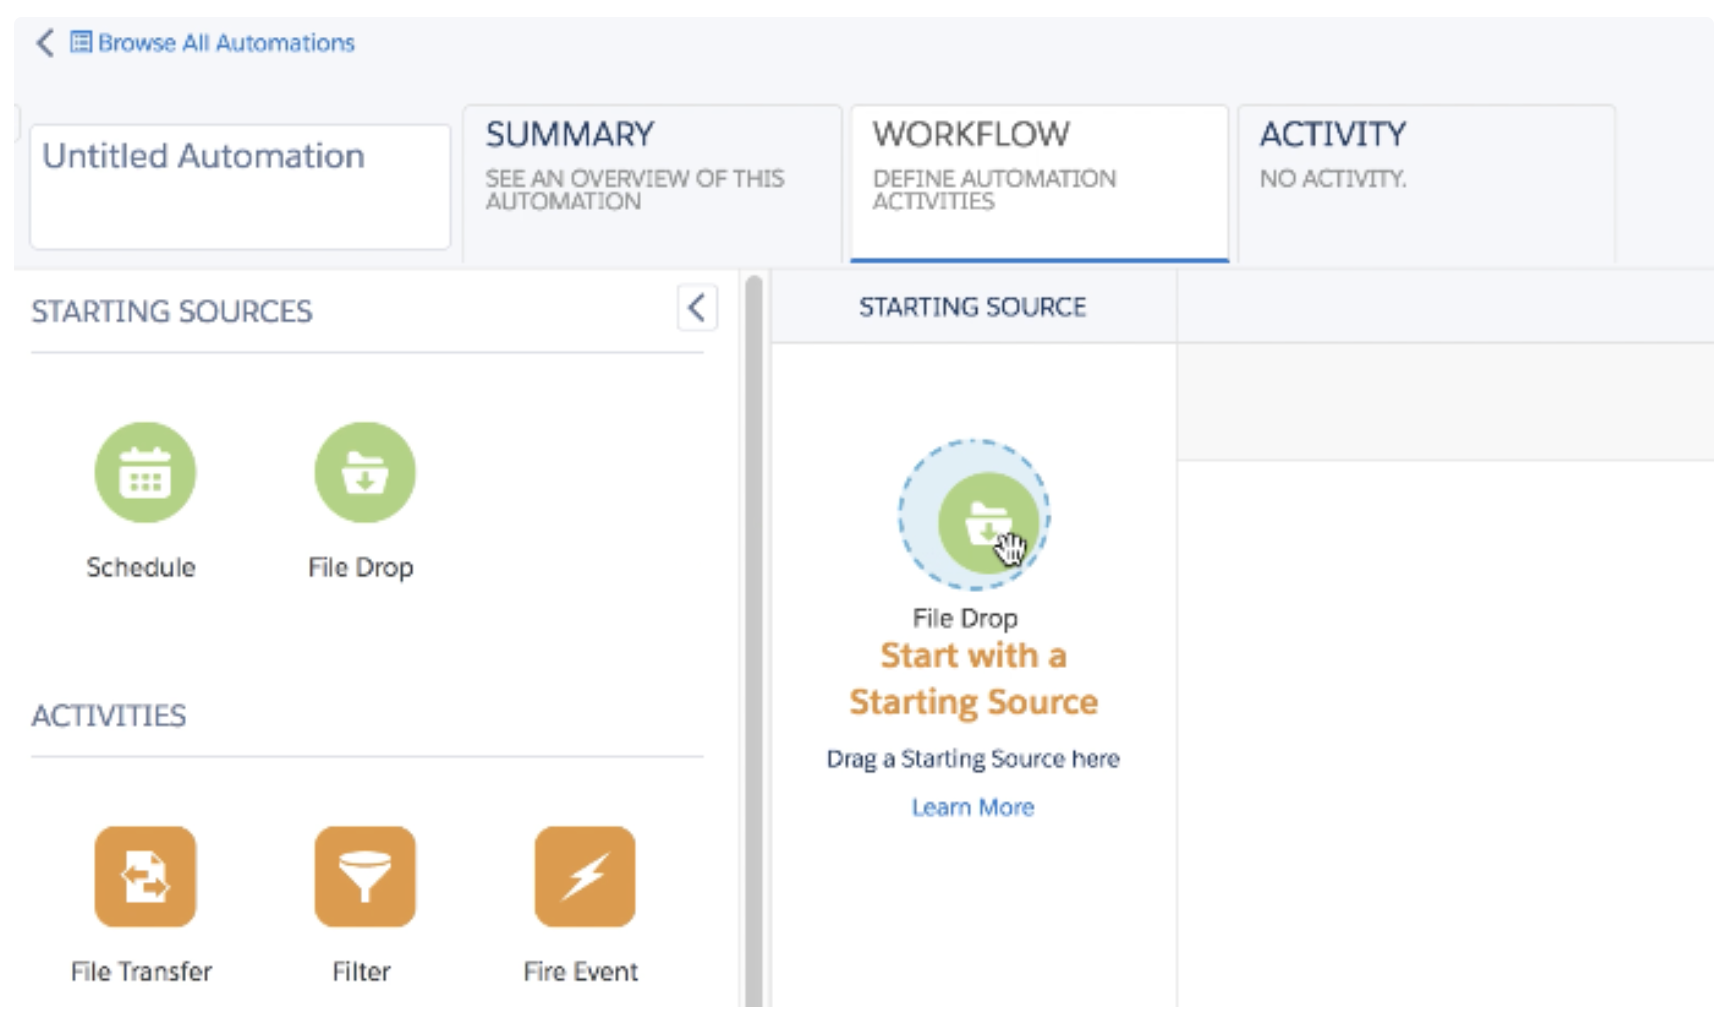
New Automationを選択します。
File DropアイコンをStarting Sourceにドラッグします。
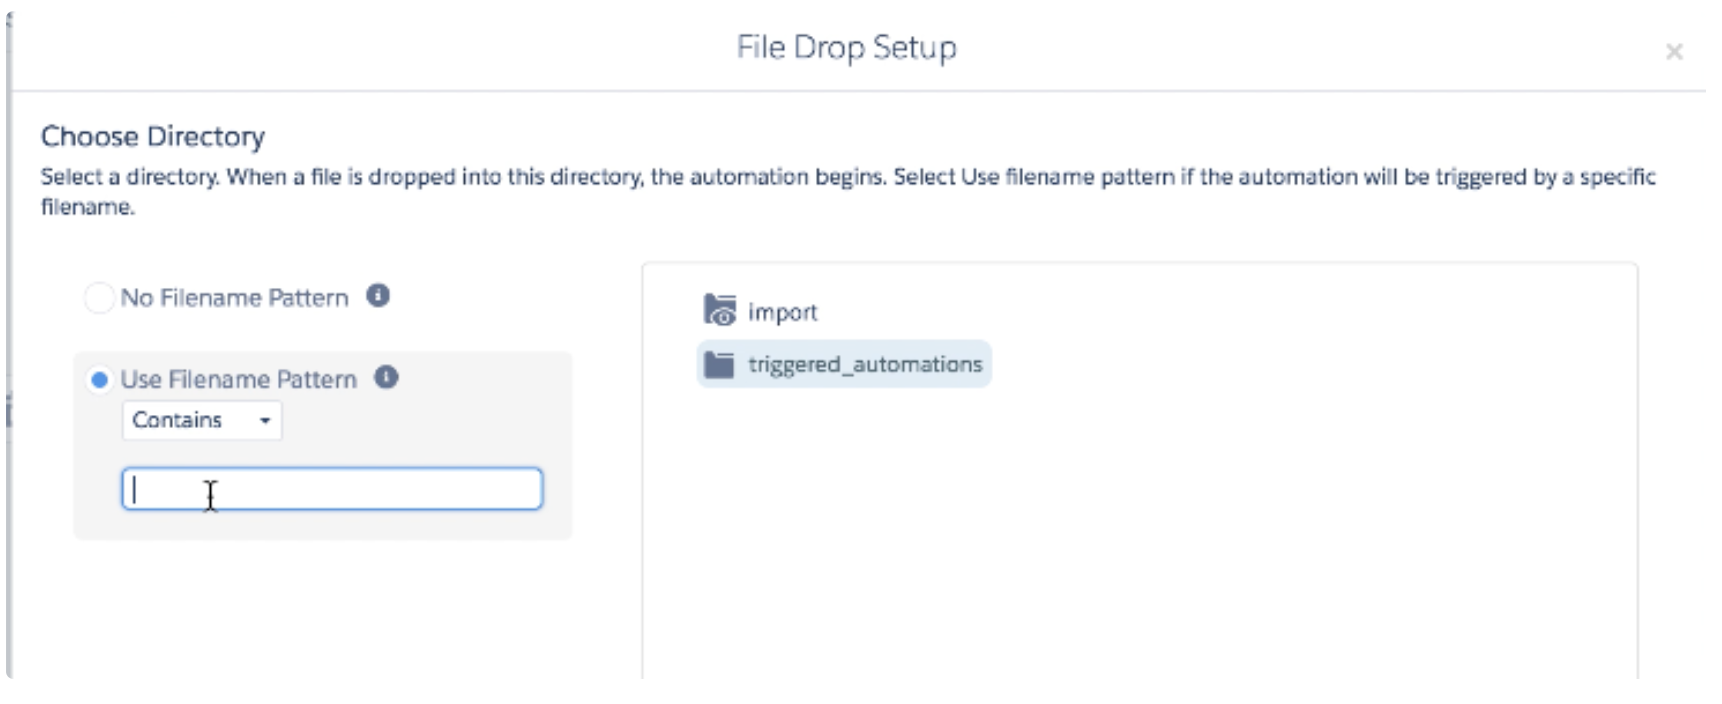
Configure> Trigger Automationを選択します。
Use Filename Patternを指定し、Doneを選択します。
Send Emailアイコンをキャンバスにドラッグし、Create Newを選択します。

メールオブジェクトを選択します(例:このセクションで作成したもの)。Nextを選択します。メールのターゲットリストを選択します。Nextを選択します。メール設定情報を確認し、Finishを選択します。
インポートトリガーの名前とTreasure Dataが参照する外部キーを入力し、Saveを選択します。
Activeを選択して、インポートトリガーを有効にします。
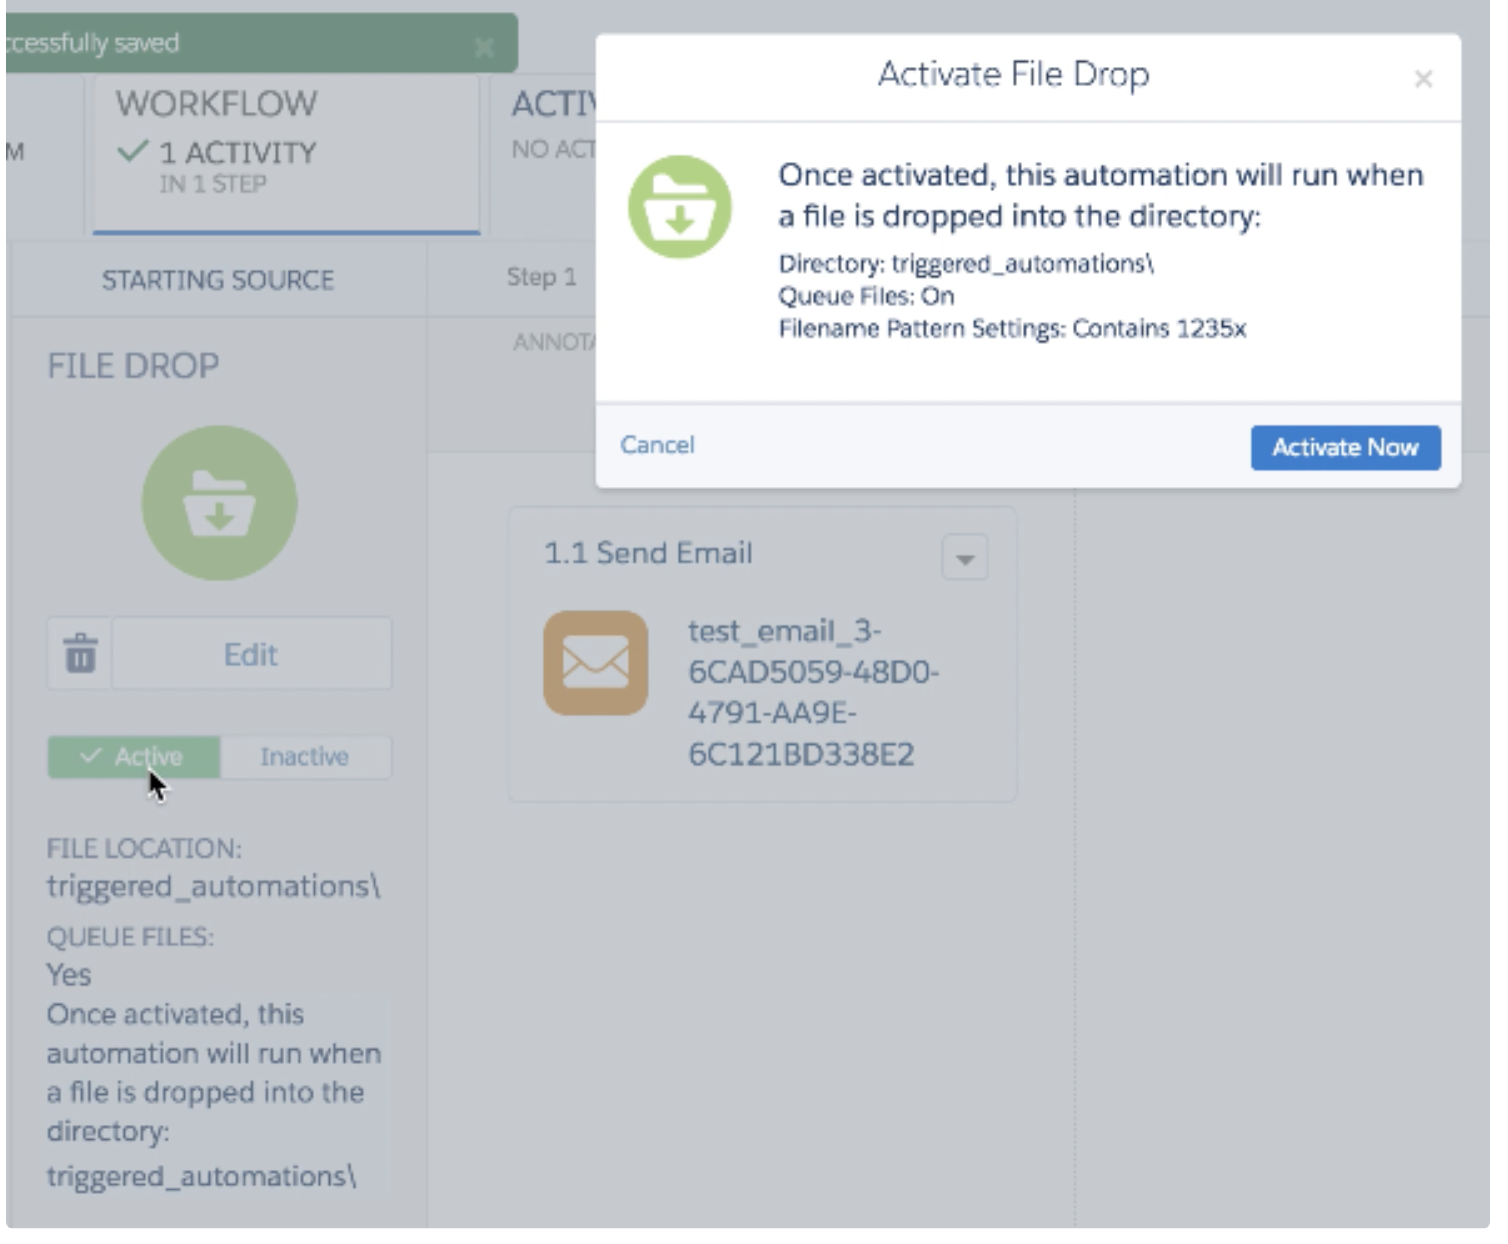
SaveとCloseを選択します。
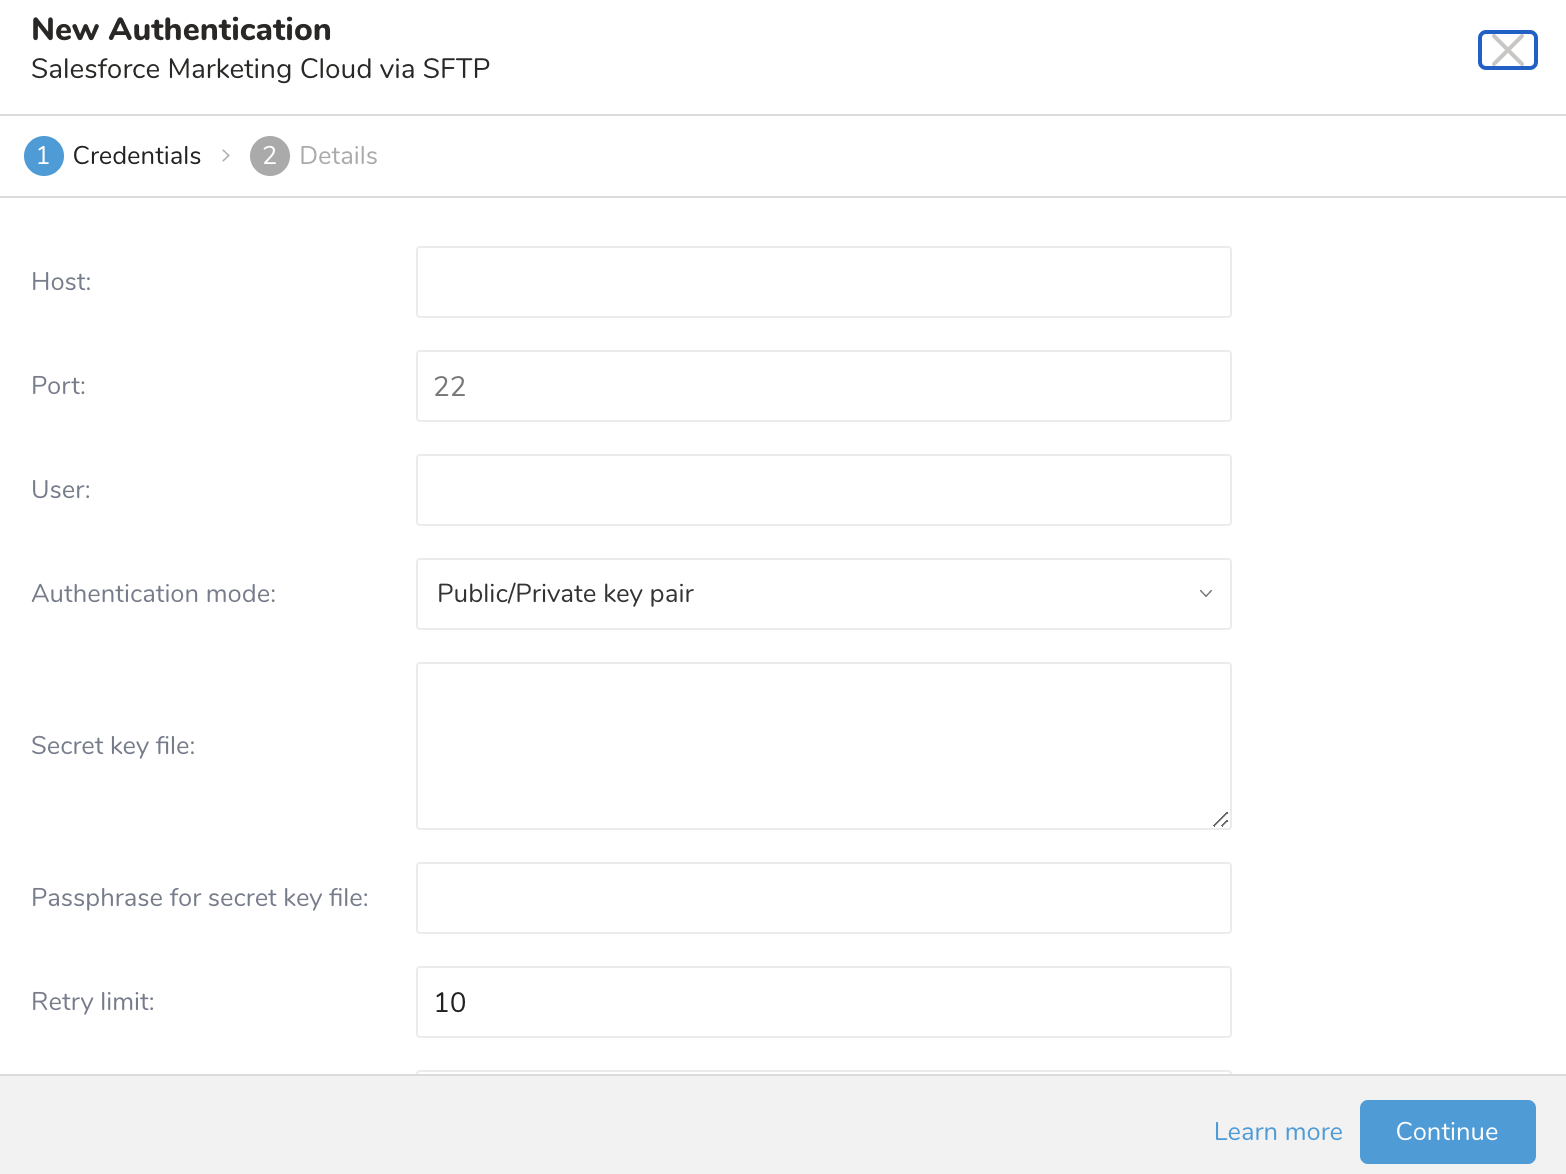
Treasure Dataでは、クエリを実行する前にデータ接続を作成して設定する必要があります。データ接続の一部として、統合にアクセスするための認証を提供します。
リモートSFTPインスタンスに必要な資格情報を入力します。接続に名前を付けます。組織内の他のユーザーとこの接続を共有したい場合は、Share with othersチェックボックスをオンにします。このボックスがオフの場合、この接続はあなたにのみ表示されます。
TD Consoleを開きます。
Integrations Hub > Catalogに移動します。
Salesforce Marketing Cloud via SFTPを検索して選択します。
Create Credentialsを選択します。
認証するための資格情報を入力します。
- パラメータの値を入力または選択します:
| Parameter | Description |
|---|---|
| Host | リモートSFTPインスタンスのホスト情報(例:IPアドレス)。 |
| Port | リモートFTPインスタンスの接続ポート、デフォルトは22です。 |
| User | リモートFTPインスタンスへの接続に使用されるユーザー名。 |
| Authentication mode | SFTPサーバーで認証する方法を選択します。
|
| Secret key file | Authentication Modeから'public / private key pair'が選択されている場合は必須です。(鍵タイプed25519はサポートされていませんが、ecdsaキータイプはサポートされています。) |
| Passphrase for secret key file | (オプション)必要な場合は、提供されたシークレットファイルのパスフレーズを入力します。 |
| Retry limit | 接続失敗時に再試行する回数(デフォルト10)。 |
| Timeout | 接続タイムアウト(秒) |
| Use proxy? | 選択した場合、プロキシサーバーの詳細を入力します。 - Type - Host - Port - User - Password - Command |
| Sequence format | 出力ファイルのシーケンス部分の形式(string、デフォルト: ".%03d.%02d") |
Continueを選択します。
接続の名前を入力します。
Doneを選択します。
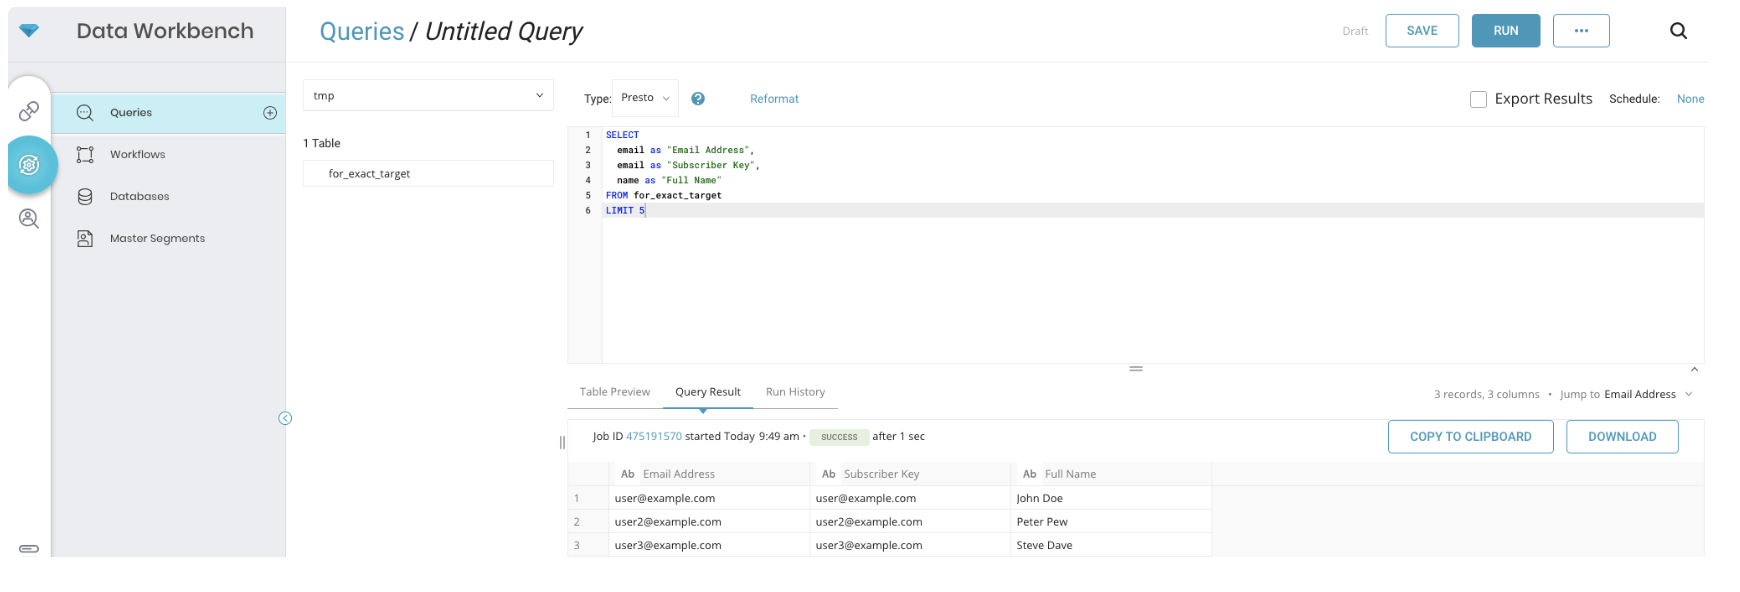
Treasure Data内からデータを選択するジョブを作成します。マッピングに指定する列名は、SFMC Exact Targetメールの列名と一致する必要があります。「Email Address」と「Subscriber Key」の列が必要です。必要に応じて、TDデータベース内のマップされた列名を変更できます。TD Console内から列名を変更できます。
- Creating a Destination Integrationの手順を完了します。
- Data Workbench > Queriesに移動します。
- データをエクスポートするクエリを選択します。
- クエリを実行して結果セットを検証します。
- Export Resultsを選択します。
- 既存の統合認証を選択します。
- 追加のExport Resultsの詳細を定義します。エクスポート統合コンテンツで統合パラメータを確認します。 たとえば、Export Results画面が異なる場合や、入力する追加の詳細がない場合があります:
- Doneを選択します。
- クエリを実行します。
- 指定した宛先にデータが移動したことを検証します。
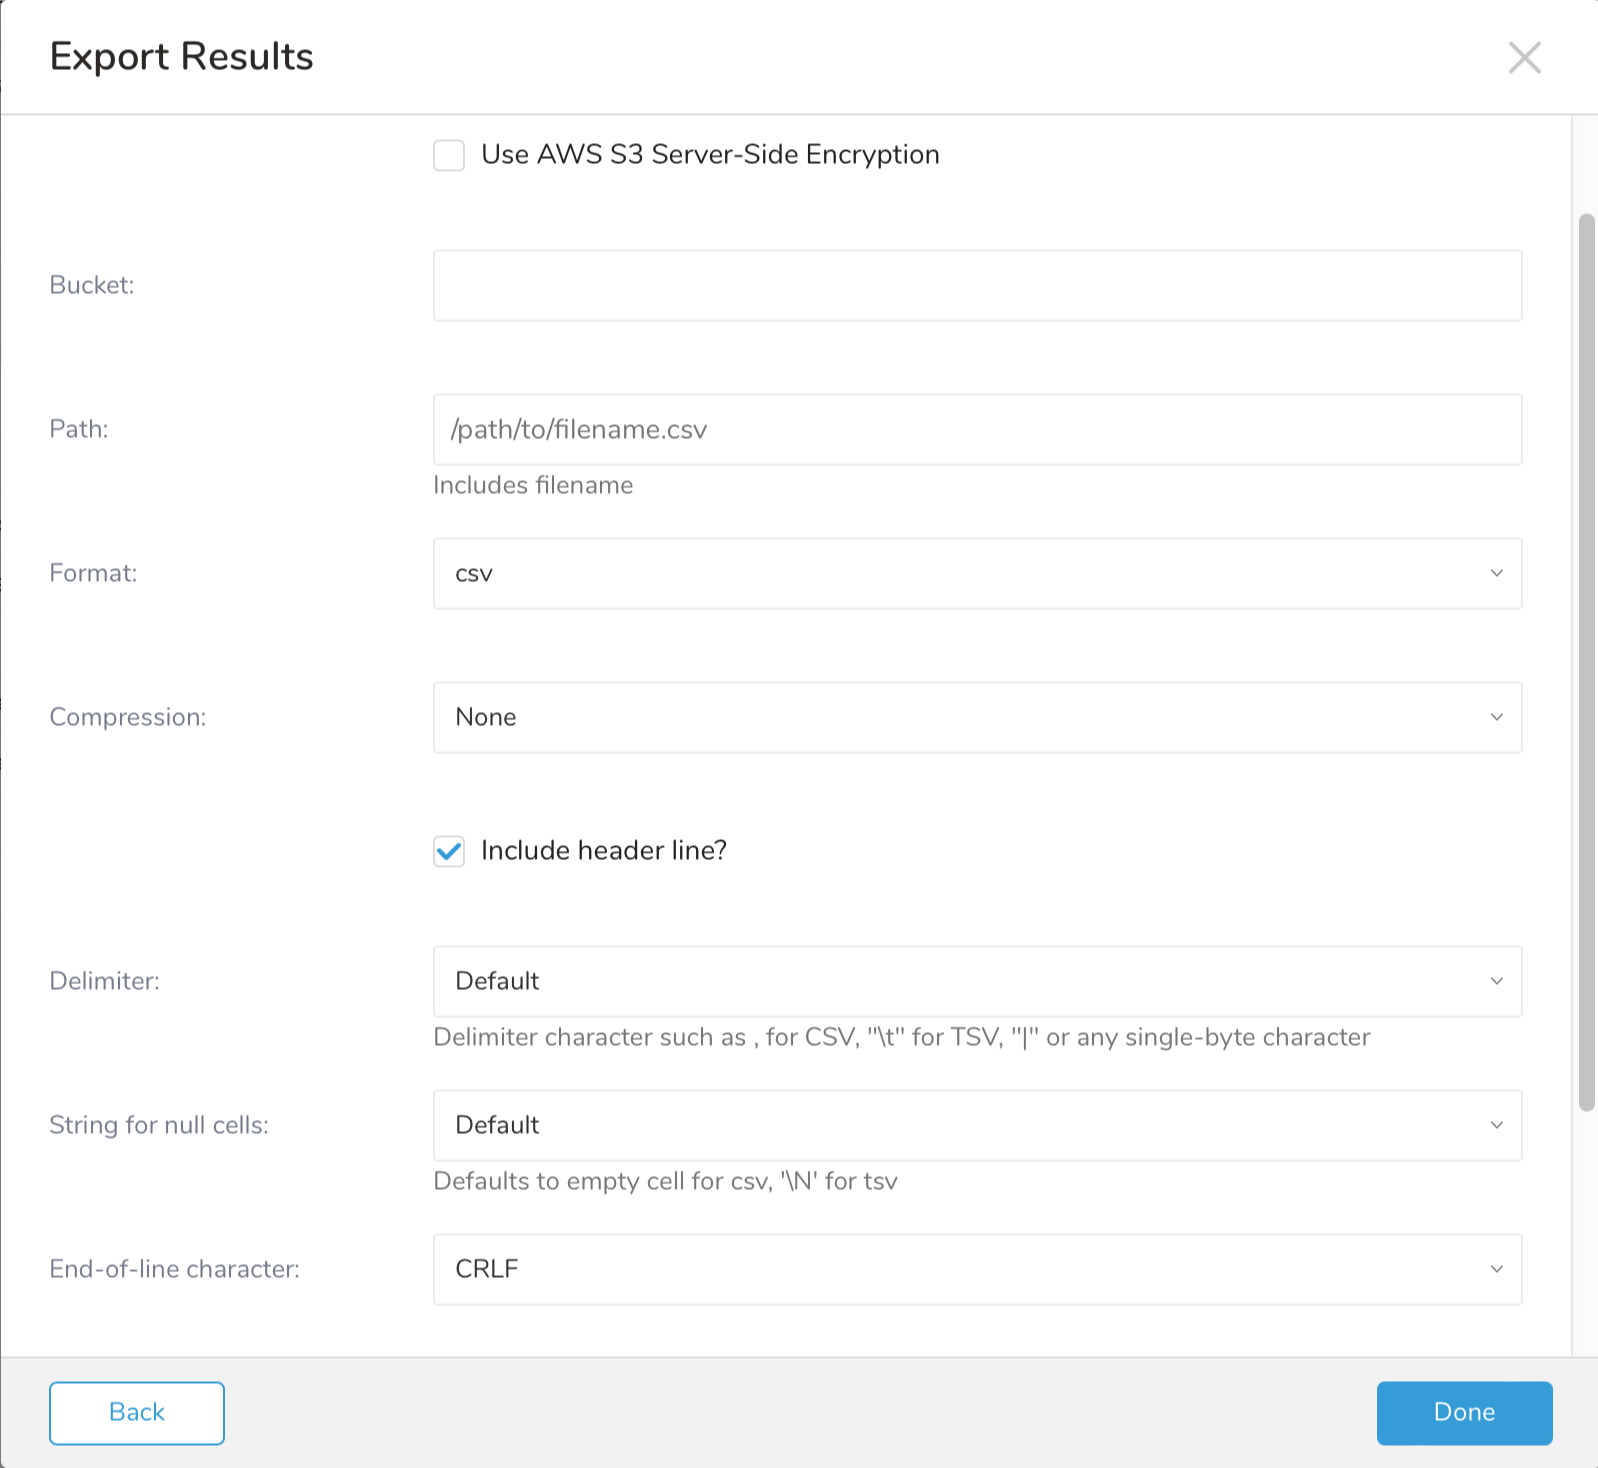
ターゲットエクスポートファイルに追加のパラメータを指定できます:
- Path prefix: プラグインがターゲットサーバーに出力ファイルを保存するパス
- Rename file after upload finish: 最初に.tmp拡張子付きでファイルをアップロードし、ファイルが正常にアップロードされたら.tmpなしでファイル名を変更する場合に選択します
- Format: ファイルの形式(CSVまたはTSV)
- Compression: ファイルを圧縮する場合に選択します。gzipとbzip2圧縮をサポートしています
- Header line: 最初の行を列名として書き込む場合に選択します
- Delimiter: ターゲットファイル内の値間の区切り文字、|、タブ、またはカンマを使用します
- Quote policy: 各列間の引用符、MINIMUM、ALL、またはNONEを指定できます
- Null string: クエリ内のnullフィールドの値
- End-of-line character: 行末に指定する文字。Carriage Return Line Feed (CRLF - Windows OSファイルシステムで使用**)** または Line Feed (LF - Unix、macOSで使用**)** または Carriage Return (CR - クラシックmacOSで使用**)**
- Encryption column names: カンマで区切られた暗号化列のリスト
- Encryption key: 暗号化アルゴリズムを実行するために必要なキーを指定します
- Encryption iv: データ暗号化での繰り返しを防ぐために数値を指定します
You can use Scheduled Jobs with Result Export to periodically write the output result to a target destination that you specify.
Treasure Data's scheduler feature supports periodic query execution to achieve high availability.
When two specifications provide conflicting schedule specifications, the specification requesting to execute more often is followed while the other schedule specification is ignored.
For example, if the cron schedule is '0 0 1 * 1', then the 'day of month' specification and 'day of week' are discordant because the former specification requires it to run every first day of each month at midnight (00:00), while the latter specification requires it to run every Monday at midnight (00:00). The latter specification is followed.
Navigate to Data Workbench > Queries
Create a new query or select an existing query.
Next to Schedule, select None.

In the drop-down, select one of the following schedule options:
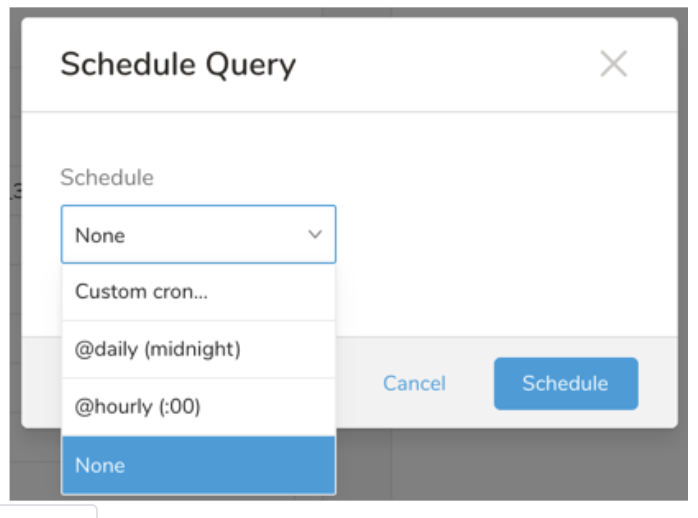
Drop-down Value Description Custom cron... Review Custom cron... details. @daily (midnight) Run once a day at midnight (00:00 am) in the specified time zone. @hourly (:00) Run every hour at 00 minutes. None No schedule.
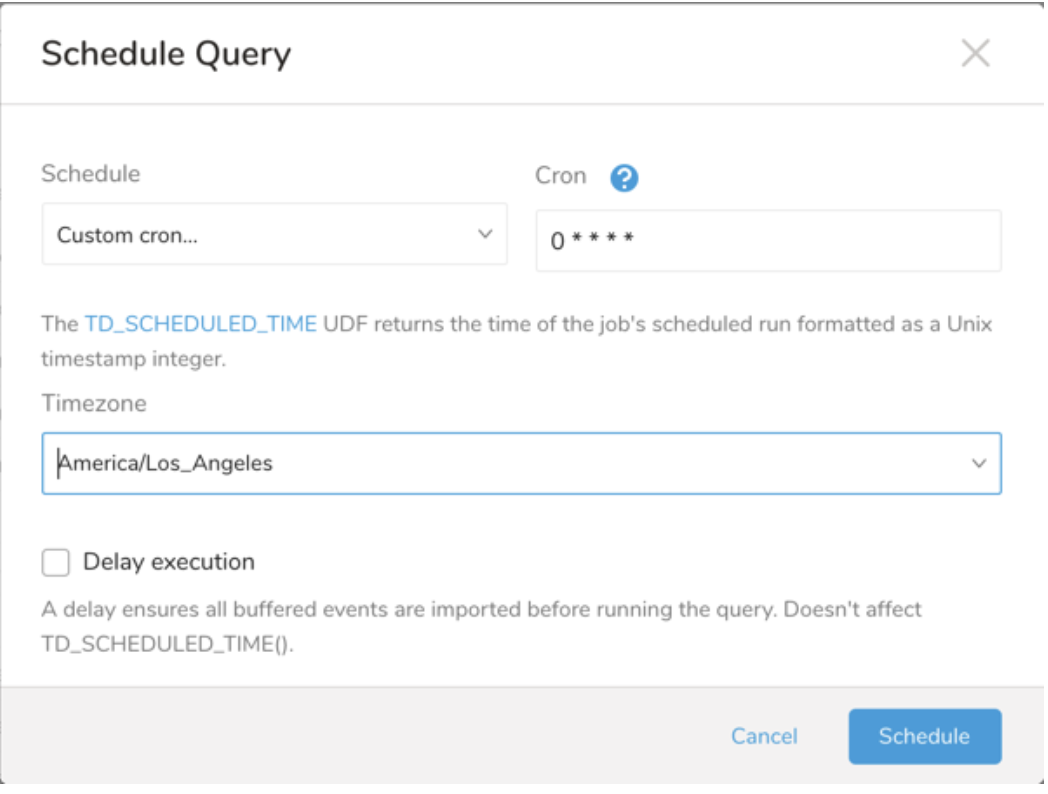
| Cron Value | Description |
|---|---|
0 * * * * | Run once an hour. |
0 0 * * * | Run once a day at midnight. |
0 0 1 * * | Run once a month at midnight on the morning of the first day of the month. |
| "" | Create a job that has no scheduled run time. |
 *    *    *    *    *
 -    -    -    -    -
 |    |    |    |    |
 |    |    |    |    +----- day of week (0 - 6) (Sunday=0)
 |    |    |    +---------- month (1 - 12)
 |    |    +--------------- day of month (1 - 31)
 |    +-------------------- hour (0 - 23)
 +------------------------- min (0 - 59)
The following named entries can be used:
- Day of Week: sun, mon, tue, wed, thu, fri, sat.
- Month: jan, feb, mar, apr, may, jun, jul, aug, sep, oct, nov, dec.
A single space is required between each field. The values for each field can be composed of:
| Field Value | Example | Example Description |
|---|---|---|
| A single value, within the limits displayed above for each field. | ||
A wildcard '*' to indicate no restriction based on the field. | '0 0 1 * *' | Configures the schedule to run at midnight (00:00) on the first day of each month. |
A range '2-5', indicating the range of accepted values for the field. | '0 0 1-10 * *' | Configures the schedule to run at midnight (00:00) on the first 10 days of each month. |
A list of comma-separated values '2,3,4,5', indicating the list of accepted values for the field. | 0 0 1,11,21 * *' | Configures the schedule to run at midnight (00:00) every 1st, 11th, and 21st day of each month. |
A periodicity indicator '*/5' to express how often based on the field's valid range of values a schedule is allowed to run. | '30 */2 1 * *' | Configures the schedule to run on the 1st of every month, every 2 hours starting at 00:30. '0 0 */5 * *' configures the schedule to run at midnight (00:00) every 5 days starting on the 5th of each month. |
A comma-separated list of any of the above except the '*' wildcard is also supported '2,*/5,8-10'. | '0 0 5,*/10,25 * *' | Configures the schedule to run at midnight (00:00) every 5th, 10th, 20th, and 25th day of each month. |
- (Optional) You can delay the start time of a query by enabling the Delay execution.
Save the query with a name and run, or just run the query. Upon successful completion of the query, the query result is automatically exported to the specified destination.
Scheduled jobs that continuously fail due to configuration errors may be disabled on the system side after several notifications.
(Optional) You can delay the start time of a query by enabling the Delay execution.
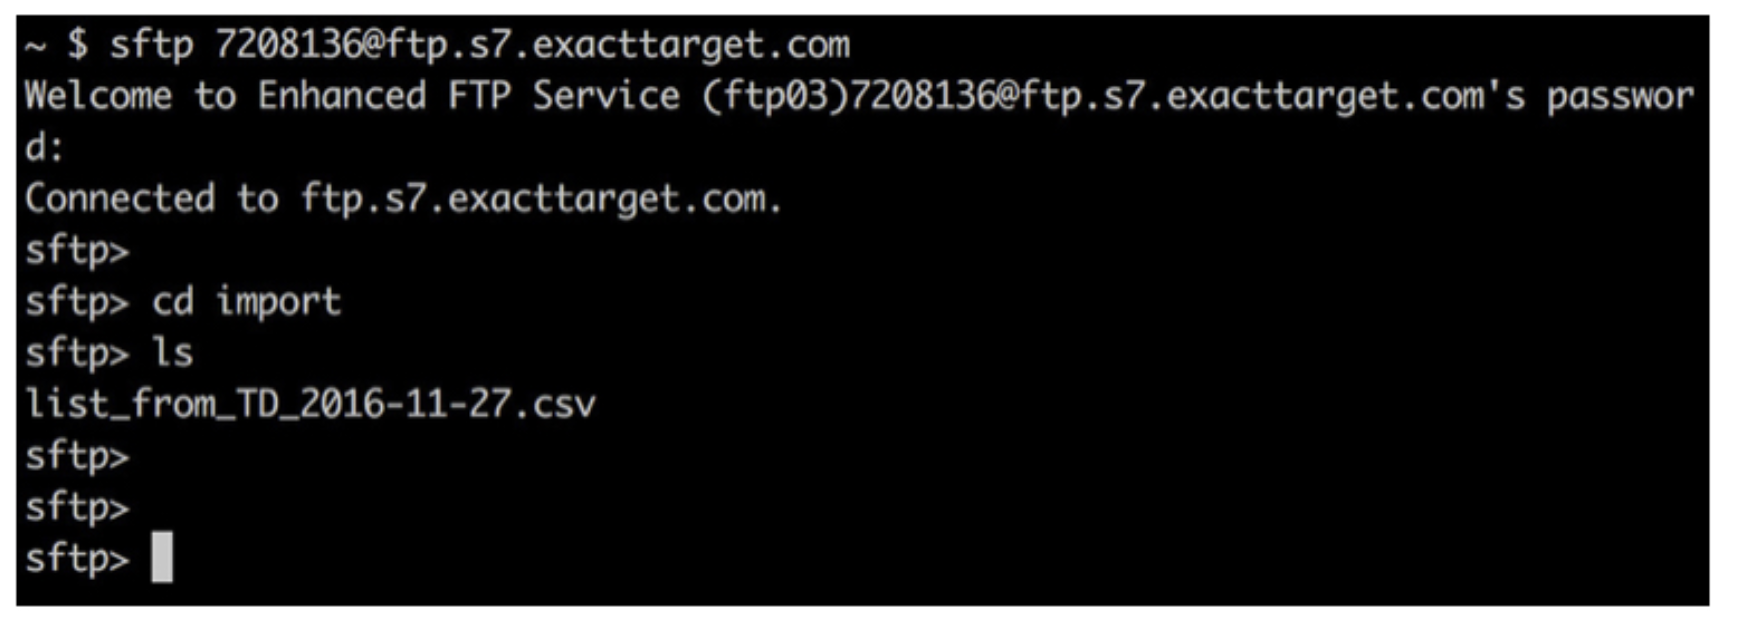
ジョブが完了したら、次の例に示すように、一般的なSFTPコマンドを使用してSFTPサーバー上の出力ファイルを確認できます:
SFMCダッシュボードを確認して、インポートが成功したことを確認します。インポートとメール配信が成功した場合、Automation Studio OverviewページにComplete**が表示されます。
You can also send segment data to the target platform by creating an activation in the Audience Studio.
- Navigate to Audience Studio.
- Select a parent segment.
- Open the target segment, right-mouse click, and then select Create Activation.
- In the Details panel, enter an Activation name and configure the activation according to the previous section on Configuration Parameters.
- Customize the activation output in the Output Mapping panel.
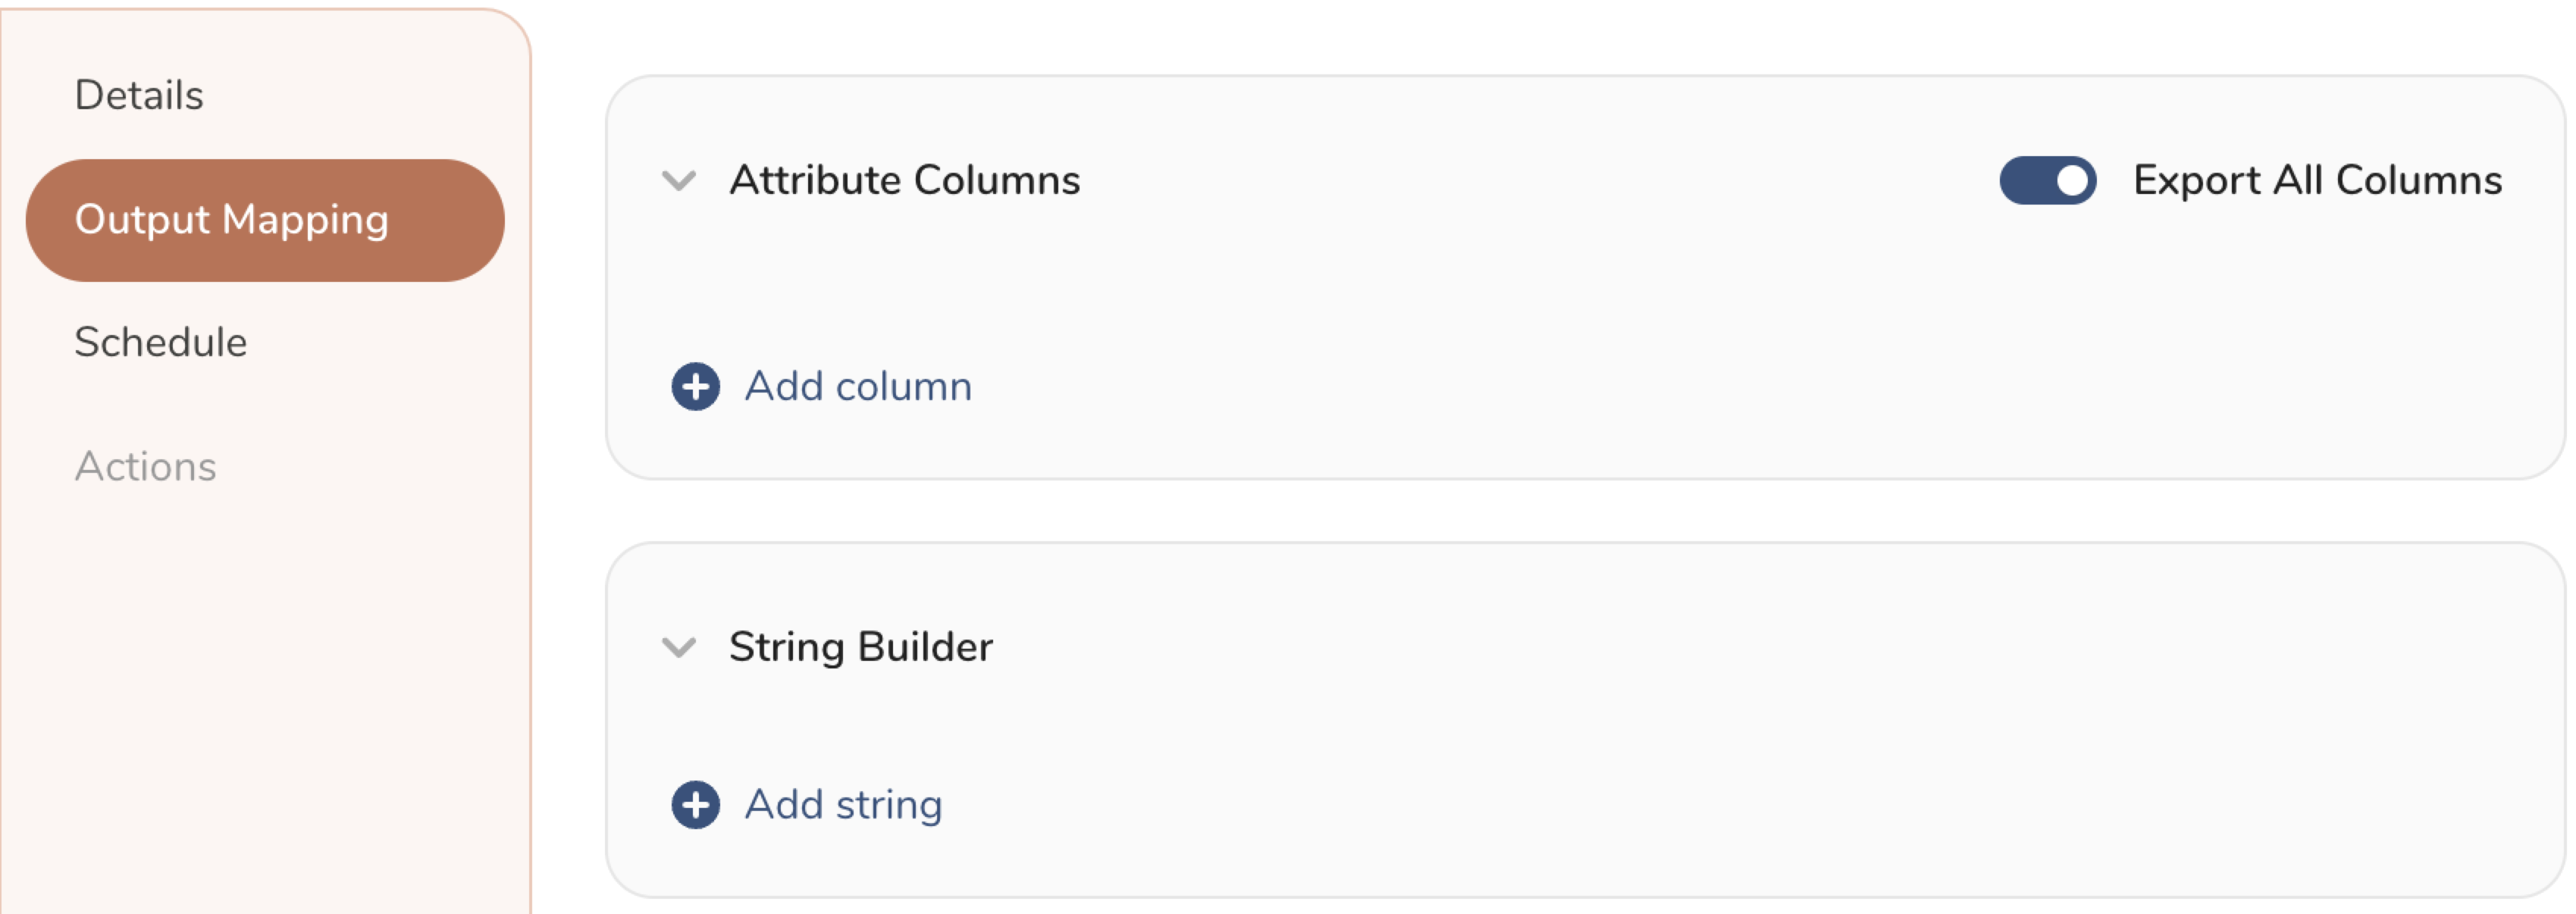
- Attribute Columns
- Select Export All Columns to export all columns without making any changes.
- Select + Add Columns to add specific columns for the export. The Output Column Name pre-populates with the same Source column name. You can update the Output Column Name. Continue to select + Add Columnsto add new columns for your activation output.
- String Builder
- + Add string to create strings for export. Select from the following values:
- String: Choose any value; use text to create a custom value.
- Timestamp: The date and time of the export.
- Segment Id: The segment ID number.
- Segment Name: The segment name.
- Audience Id: The parent segment number.
- + Add string to create strings for export. Select from the following values:
- Set a Schedule.
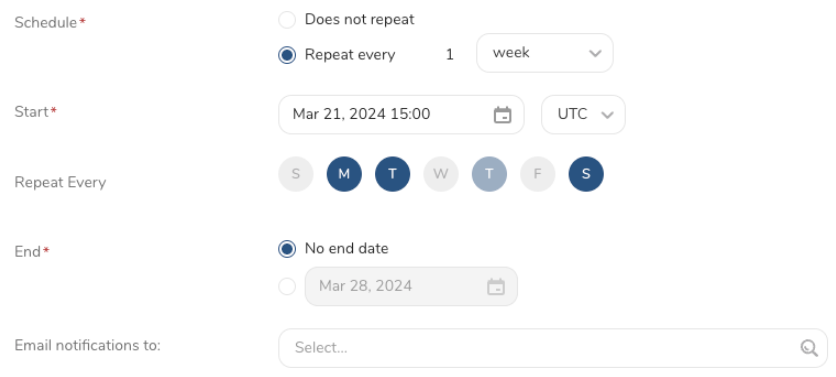
- Select the values to define your schedule and optionally include email notifications.
- Select Create.
If you need to create an activation for a batch journey, review Creating a Batch Journey Activation.
- より高度なデータパイプラインの一部として、この統合をTD workflowに含めることができます