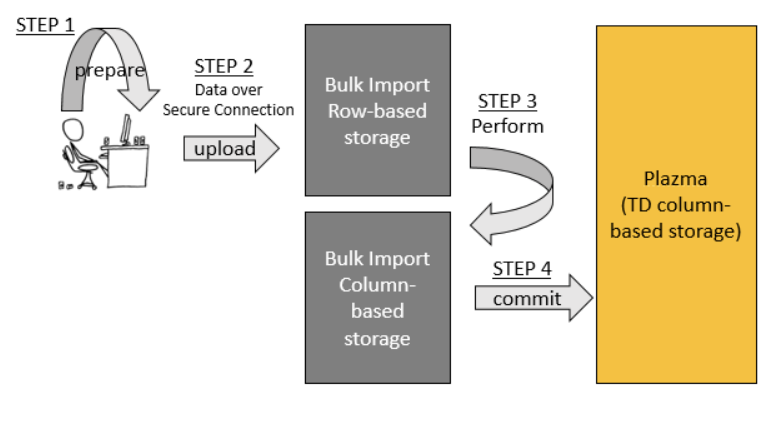
- Bulk Import は、prepare、upload、perform、commit の4つの主要なステップで構成されています。
- Prepare: まず、データは高度に空間効率の良い圧縮(gzip)MessagePack形式に変換されます。このステップにはネットワーク接続は必要ありません。
- Upload: 次に、準備されたデータはTreasure Dataの(行ベースの)バルクアップロードストレージシステムにアップロードされます。アップロードはセキュアなインターネット接続を介して行われます。
- Perform: アップロードされたデータは、MapReduceを使用してカラム指向データ形式に変換されます。
- Commit: performステップの後、データはPlazma(Treasure Dataのカラム指向分散ストレージシステム)と互換性を持つようになります。commitステップはデータをPlazmaにコピーします。
ユーザーが作成したBulk Importセッションは、ユーザーが以下を指定した場合にのみ削除されます:
$ td import:delete session_nameBulk Importセッションは参照するデータベースとテーブルを指定して作成され、そのデータベースとテーブルにのみデータをインポートできるため、テーブルまたはデータベースが削除された場合、Bulk Importセッションは自動的に削除されませんが、無効になります。参照先のテーブルまたはデータベース(または両方)が削除されたセッションを使用してUpload、Perform、Commitを試みると、エラーが返されセッションが無効化されます。無効化されたセッションで許可される操作は以下のみです:
- ステータスの表示(
import:show) - 削除(
import:delete)
以下のセクションでは、Bulk Importを更新する方法を説明します。最新バージョンのBulk Importを使用するには、以下を実行してください:
$ td import:jar_update以下のセクションでは、Bulk Importの使用方法を説明します。これらのステップをすべて個別に実行するのは扱いにくいことがよくあります。そのため、prepare-upload-perform-commitワークフローを自動化(およびパイプライン化)するために、いくつかのコマンドラインオプションを使用する方法を示します。
td import:upload を次のように実行します:
$ td import:upload \
  --auto-create my_db.my_tbl \
  --auto-perform --auto-commit \
  --column-header \
  --output prepared_parts \
  data_*.csv
たとえば、以下の場合:
- 元のファイルが data_*.csv
- 準備されたデータが "prepared_parts" ディレクトリに保存される(
--output / -oオプションで指定) - データがTreasure Dataデータベース
my_dbとテーブルmy_tblに、bulk importセッションmy_db.my_tblを使用してアップロードされる(--auto-createオプションで指定)
以下を実行できます:
$ td import:upload \
  --auto-create my_db.my_tbl \
  --auto-perform --auto-commit \
  --column-header \
  --output prepared_parts \
  data_*.csv
上記のインポートおよびアップロード操作は、以下を想定しています:
--formatオプションで別の形式が指定されていない限り、データはCSV形式です- 各入力ファイルの最初の行にはカラム名が含まれています。 カラム名は
--column-headerオプションで指定されます。または、すべての行をデータとして扱い、--columns c1,c2,c3..でカラム名を指定することもできます。
正規表現はWindowsでは使用できません。ファイル名を data_*.csv から(YOUR_TARGET_FILENAME)に書き換える必要があります
まず、session(複数のパーツを含む単一のインスタンス)を作成します。1つのセッションは1つのテーブルに関連付けられます。
$ td import:create my_session my_db my_tbl./logs_201208/ ディレクトリにCSVファイルがあるとします。まず、ファイルをMessagePack.gz形式(効率的なストレージのための内部形式)に変換する必要があります。これを行うには、以下のコマンドを実行します:
$ td import:prepare ./logs_201208/*.csv \
    --format csv \
    --columns time,uid,price,count --time-column 'time' \
    -o ./parts_201208/
データを月ごとに別々のディレクトリに分割することをお勧めします。圧縮後のデータが1日あたり1GB以上ある場合は、日付ごとにデータを分割することもできます。
ファイルの最初の行にカラム名が含まれている場合は、--column-header オプションを使用します。
$ td import:prepare ./logs_201208/*.csv \
    --format csv \
    --column-header \
    --time-column 'time' \
-o ./parts_201208/--formatオプションでは、csv、tsv、jsonの形式がサポートされています。例は以下の通りです:
# tsv
$ td import:prepare ./logs_201208/*.tsv \
    --format tsv \
    --column-header \
    --time-column 'time' \
    -o ./parts_201208/

# json
$ td import:prepare ./logs_201208/*.json \
    --format json \
    --time-column 'time' \
-o ./parts_201208/これで、partsディレクトリをセッションにアップロードできます。
$ td import:upload my_session ./parts_201208/*アップロードが失敗した場合は、いつでも再試行できます。データの重複は発生しません。
$ td import:show my_sessionimport:performコマンドは、アップロードされたファイルをクラウド上でより効率的な形式に変換します(これが処理に時間がかかる理由です)。ファイルはMapReduceジョブを実行することで並列に変換されます。
$ td import:freeze my_session
$ td import:perform my_session --wait
$ td import:list
+-------------+--------------+--------+--------+-------+-------------+-------------+---------------+---------------+
| Name        | Table        | Status | Frozen | JobID | Valid Parts | Error Parts | Valid Records | Error Records |
+-------------+--------------+--------+--------+-------+-------------+-------------+---------------+---------------+
| my_session  | my_db.my_tbl | Ready  |        | 70220 | 2           | 1           | 100           | 10            |
+-------------+--------------+--------+--------+-------+-------------+-------------+---------------+---------------+この例では、import:performコマンドを発行する前にimport:freezeを呼び出して、データが変換されている間に他のスクリプトがセッションに追加データをアップロードするのを防ぎます。
import:performコマンドは、オプションの--waitオプションを受け付け、実行ジョブが完了するまでコマンドをビジーウェイトさせることができます。あるいは、--waitオプションを省略することもでき、その場合import:performコマンドは実行ジョブが送信されるとすぐにユーザー/スクリプトに制御を返します。
その後、追加データをアップロードするには、import:unfreezeコマンドを使用してセッションのフリーズを解除する必要があります。
import:performコマンドを実行した後、一部のレコードが無効としてフラグが立てられることがあります。これらの無効なレコードは、import:error_recordsコマンドで一覧表示できます。
$ td import:error_records my_sessionアップロードされたデータが正しいことを確認したら、import:commitコマンドを使用して、データをトランザクション的に宛先データベースmy_dbとテーブルmy_tblにインポートします。
$ td import:commit my_session --waitデータがTreasure Dataのテーブルに到達したら、2つのオプションがあります:さらにデータをインポートするか、セッションを閉じて削除するかです。
さらにデータをインポートするには、ステップ2に戻ってプロセスを繰り返します。
セッションを閉じて削除するには、import:deleteコマンドを使用します:
$ td import:delete my_sessiontd help importを参照してください。
$ td help import
Additional commands, type "td help COMMAND" for more details:

  import:list                                # List bulk import sessions
  import:show name                         # Show list of uploaded parts
  import:create name db table          # Create a new bulk import session to the the table
  import:prepare <files...>                  # Convert files into part file format
  import:upload name <files...>            # Upload or re-upload files into a bulk import session
  import:perform name                      # Start to validate and convert uploaded files
  import:error_records name                # Show records which did not pass validations
  import:commit name                       # Start to commit a performed bulk import session
  import:delete name                       # Delete a bulk import session
  import:freeze name                       # Reject succeeding uploadings to a bulk import session
import:unfreeze name # Unfreeze a frozen bulk import sessionサブコマンドについては、td help import:subcommand name を実行できます。例: td help import:upload
$ td help import:upload
usage:
  $ td import:upload session name <files...>

example:
  $ td import:upload mysess parts/* --parallel 4
  $ td import:upload mysess parts/*.csv --format csv --columns time,uid,price,count --time-column time -o parts/
  $ td import:upload parts/*.csv --auto-create mydb.mytbl --format csv --columns time,uid,price,count --time-column time -o parts/
  $ td import:upload mysess mytable --format mysql --db-url jdbc:mysql://localhost/mydb --db-user myuser --db-password mypass

description:
  Upload or re-upload files into a bulk import session
options:
    --retry-count NUM                upload process will automatically retry at specified time; default: 10
    --auto-create DATABASE.TABLE     create automatically bulk import session by specified database and table names
                                     If you use 'auto-create' option, you MUST not specify any session name as first argument.
    --auto-perform                   perform bulk import job automatically
    --auto-commit                    commit bulk import job automatically
    --auto-delete                    delete bulk import session automatically
    --parallel NUM                   upload in parallel (default: 2; max 8)

    -f, --format FORMAT              source file format [csv, tsv, json, msgpack, apache, regex, mysql]; default=csv
    -C, --compress TYPE              compressed type [gzip, none, auto]; default=auto detect
    -T, --time-format FORMAT         STRF_FORMAT; strftime(3) format of the time column
    -e, --encoding TYPE              encoding type [utf-8]
    -o, --output DIR                 output directory. default directory is 'out'.
    -s, --split-size SIZE_IN_KB      size of each parts (default: 16384)
    -t, --time-column NAME           name of the time column
    --time-value TIME,HOURS          time column's value. If the data doesn't have a time column,
                                     users can auto-generate the time column's value in 2 ways:
                                      * Fixed time value with --time-value TIME:
                                        where TIME is a Unix time in seconds since Epoch. The time
                                        column value is constant and equal to TIME seconds.
                                        E.g. '--time-value 1394409600' assigns the equivalent of
                                        timestamp 2014-03-10T00:00:00 to all records imported.
                                      * Incremental time value with --time-value TIME,HOURS:
                                        where TIME is the Unix time in seconds since Epoch and
                                        HOURS is the maximum range of the timestamps in hours.
                                        This mode can be used to assign incremental timestamps to
                                        subsequent records. Timestmaps will be incremented by 1 second
                                        each record. If the number of records causes the timestamp to
                                        overflow the range (timestamp >= TIME + HOURS * 3600), the
                                        next timestamp will restart at TIME and continue from there.
                                        E.g. '--time-value 1394409600,10' will assign timestamp 1394409600
                                        to the first record, timestamp 1394409601 to the second, 1394409602
                                        to the third, and so on until the 36000th record which will have
                                        timestmap 1394445600 (1394409600 + 10 * 3600). The timestamp assigned
                                        to the 36001th record will be 1394409600 again and the timestamp
                                        will restart from there.
    --primary-key NAME:TYPE          pair of name and type of primary key declared in your item table
    --prepare-parallel NUM           prepare in parallel (default: 2; max 96)
    --only-columns NAME,NAME,...     only columns
    --exclude-columns NAME,NAME,...  exclude columns
    --error-records-handling MODE    error records handling mode [skip, abort]; default=skip
    --error-records-output DIR       write error records; default directory is 'error-records'.
    --columns NAME,NAME,...          column names (use --column-header instead if the first line has column names)
    --column-types TYPE,TYPE,...     column types [string, int, long, double]
    --column-type NAME:TYPE          column type [string, int, long, double]. A pair of column name and type can be specified like 'age:int'
    -S, --all-string                 disable automatic type conversion

    CSV/TSV specific options:
    --column-header                  first line includes column names
    --delimiter CHAR                 delimiter CHAR; default="," at csv, "\t" at tsv
    --newline TYPE                   newline [CRLF, LF, CR];  default=CRLF
    --quote CHAR                     quote [DOUBLE, SINGLE, NONE]; if csv format, default=DOUBLE. if tsv format, default=NONE

    MySQL specific options:
    --db-url URL                     JDBC connection URL
    --db-user NAME                   user name for MySQL account
    --db-password PASSWORD           password for MySQL account

    REGEX specific options:
    --regex-pattern PATTERN          pattern to parse line. When 'regex' is used as source file format, this option is required