Advertisers that share server events using the Conversions API can see the event match quality score in Meta Events Manager. However, this only works on an individual basis and is difficult to scale in cases where a tech provider partner, agency partner or advertiser is managing hundreds and thousands of Meta Pixels for their businesses. The Dataset Quality (formerly known as Integration Quality) API can help solve this problem by consolidating dataset quality metrics programmatically at scale.
This connector will help customer import the metrics for the Conversions API, including event match quality, event coverage, event deduplication, additional conversions reported.
- Have a basic knowledge about the Treasure Data
- Have a basic knowledge about the Meta Conversion
- Have the Meta access token and dataset id (Ref this page for more detail https://developers.facebook.com/docs/marketing-api/conversions-api/dataset-quality-api)
If your security policy requires IP whitelisting, you must add Treasure Data's IP addresses to your allowlist to ensure a successful connection.
Please find the complete list of static IP addresses, organized by region, at the following document
Ex.1 Match Key Coverage by Dataset
The heatmap below illustrates coverage rates (%) of different match keys (such as email, phone, external_id, fbp, fbc) across multiple datasets.
- Rows: Match keys (the identifiers used for event matching)
- Columns: Dataset IDs (representing different integration sources or campaigns)
- Cells: Coverage percentage — i.e., the share of events in that dataset containing the specific match key
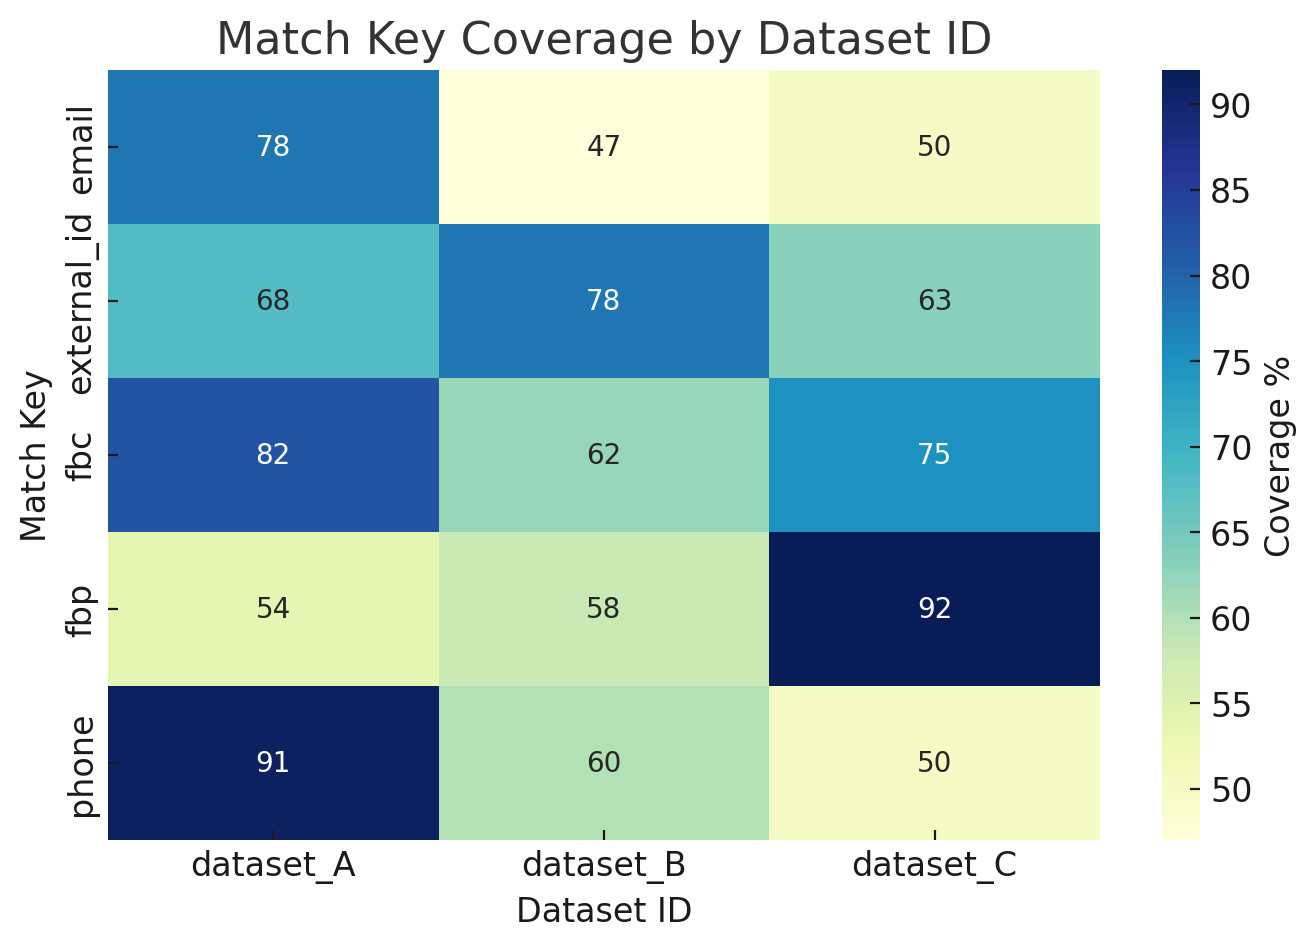
How to use this dashboard:
- Identify weak match keys in each dataset (e.g., dataset_B shows low coverage for phone).
- Prioritize improvements in match keys with the biggest gap across datasets, since higher coverage directly improves Event Match Quality (EMQ).
- Use this view together with EMQ trends and deduplication stats to build a complete picture of dataset quality.
Your first step is to create a new authentication with a set of credentials.
Select Integrations Hub.
Select Catalog.
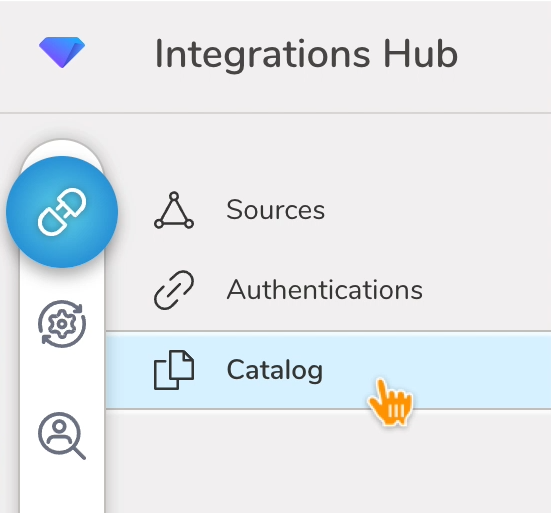
Search for your Integration in the Catalog; hover your mouse over the icon and select Create Authentication.

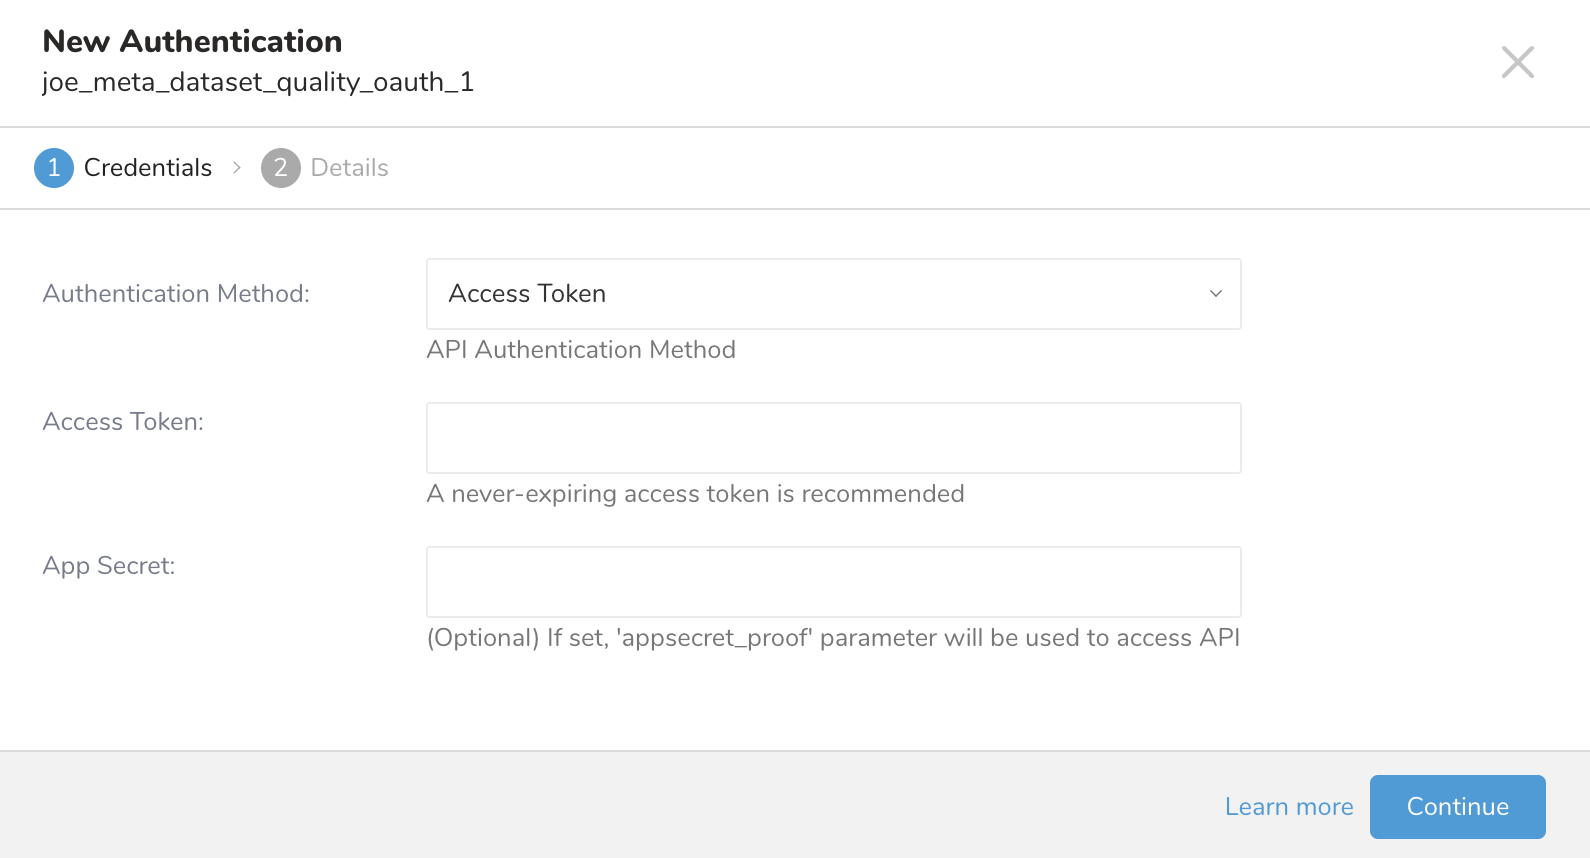
Ensure that the Credentials tab is selected and then enter credential information for the integration.
| Parameter | Description |
|---|---|
| Authentication Method | OAuth Authentication method |
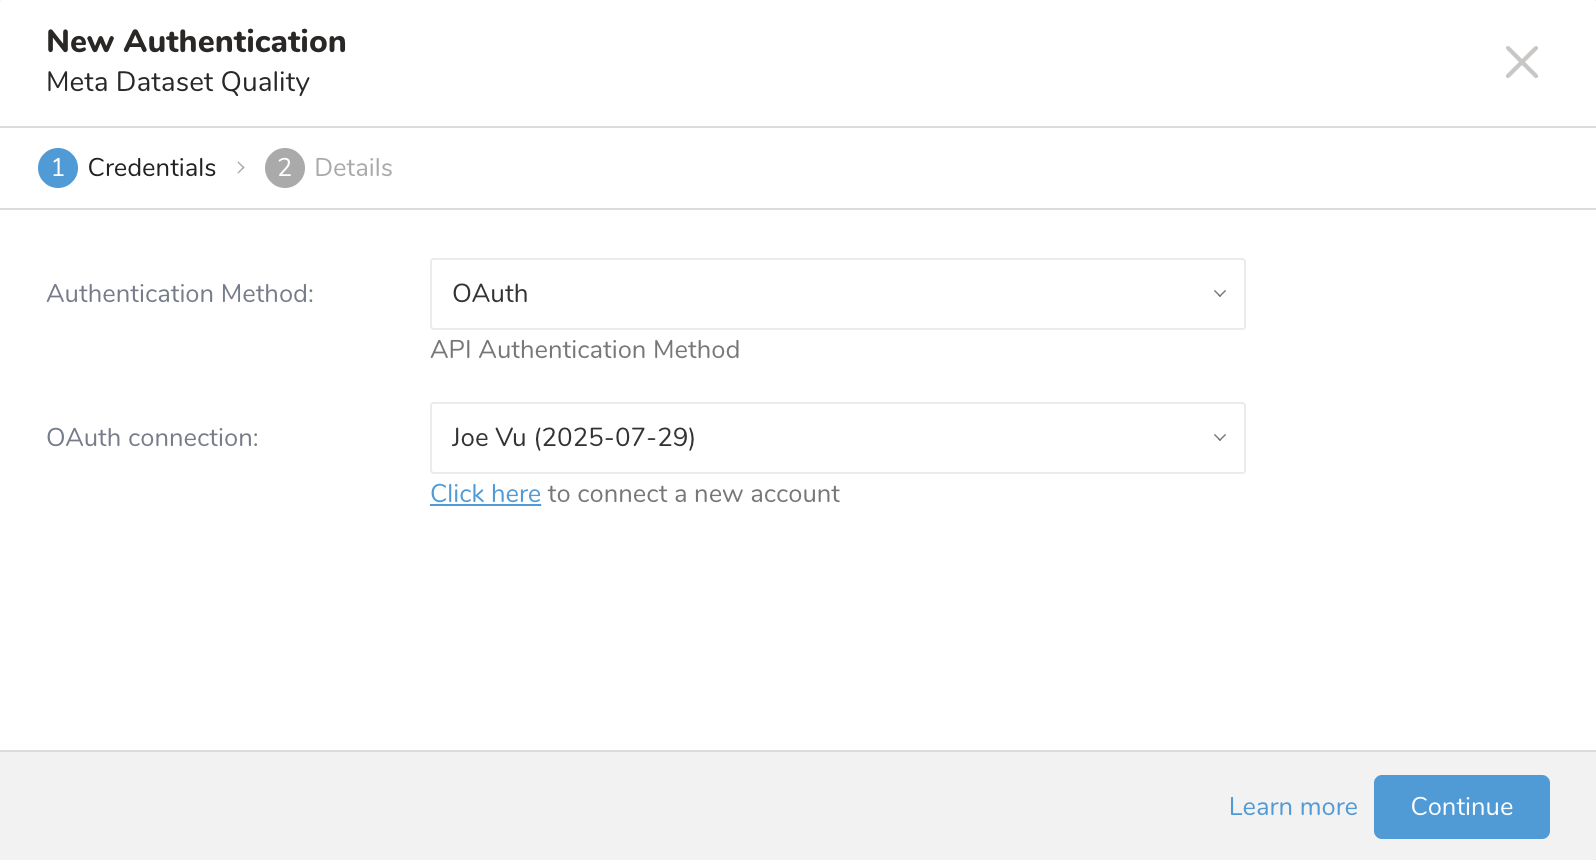
Click on the link Click here to start the OAuth authentication, after login with Facebook successfully, it will redirect to the TD console website then click on the Continue button
| Parameter | Description |
|---|---|
| Authentication | Access Token Authentication method |
| Access Token | Meta Access Token |
| App Secret | Meta App Secret |
- Enter a name for your authentication and select Done.
Open TD Console.
Navigate to Integrations Hub > Authentications.
Locate your new authentication and select New Source.
| Parameter | Description |
|---|---|
| Data Transfer Name | You can enter the name of your transfer. |
| Authentication | The authentication name that is used for a transfer. |
Type a source name in the Data Transfer Name field.
Select Next.
The Create Source page displays with the Source Table tab selected.
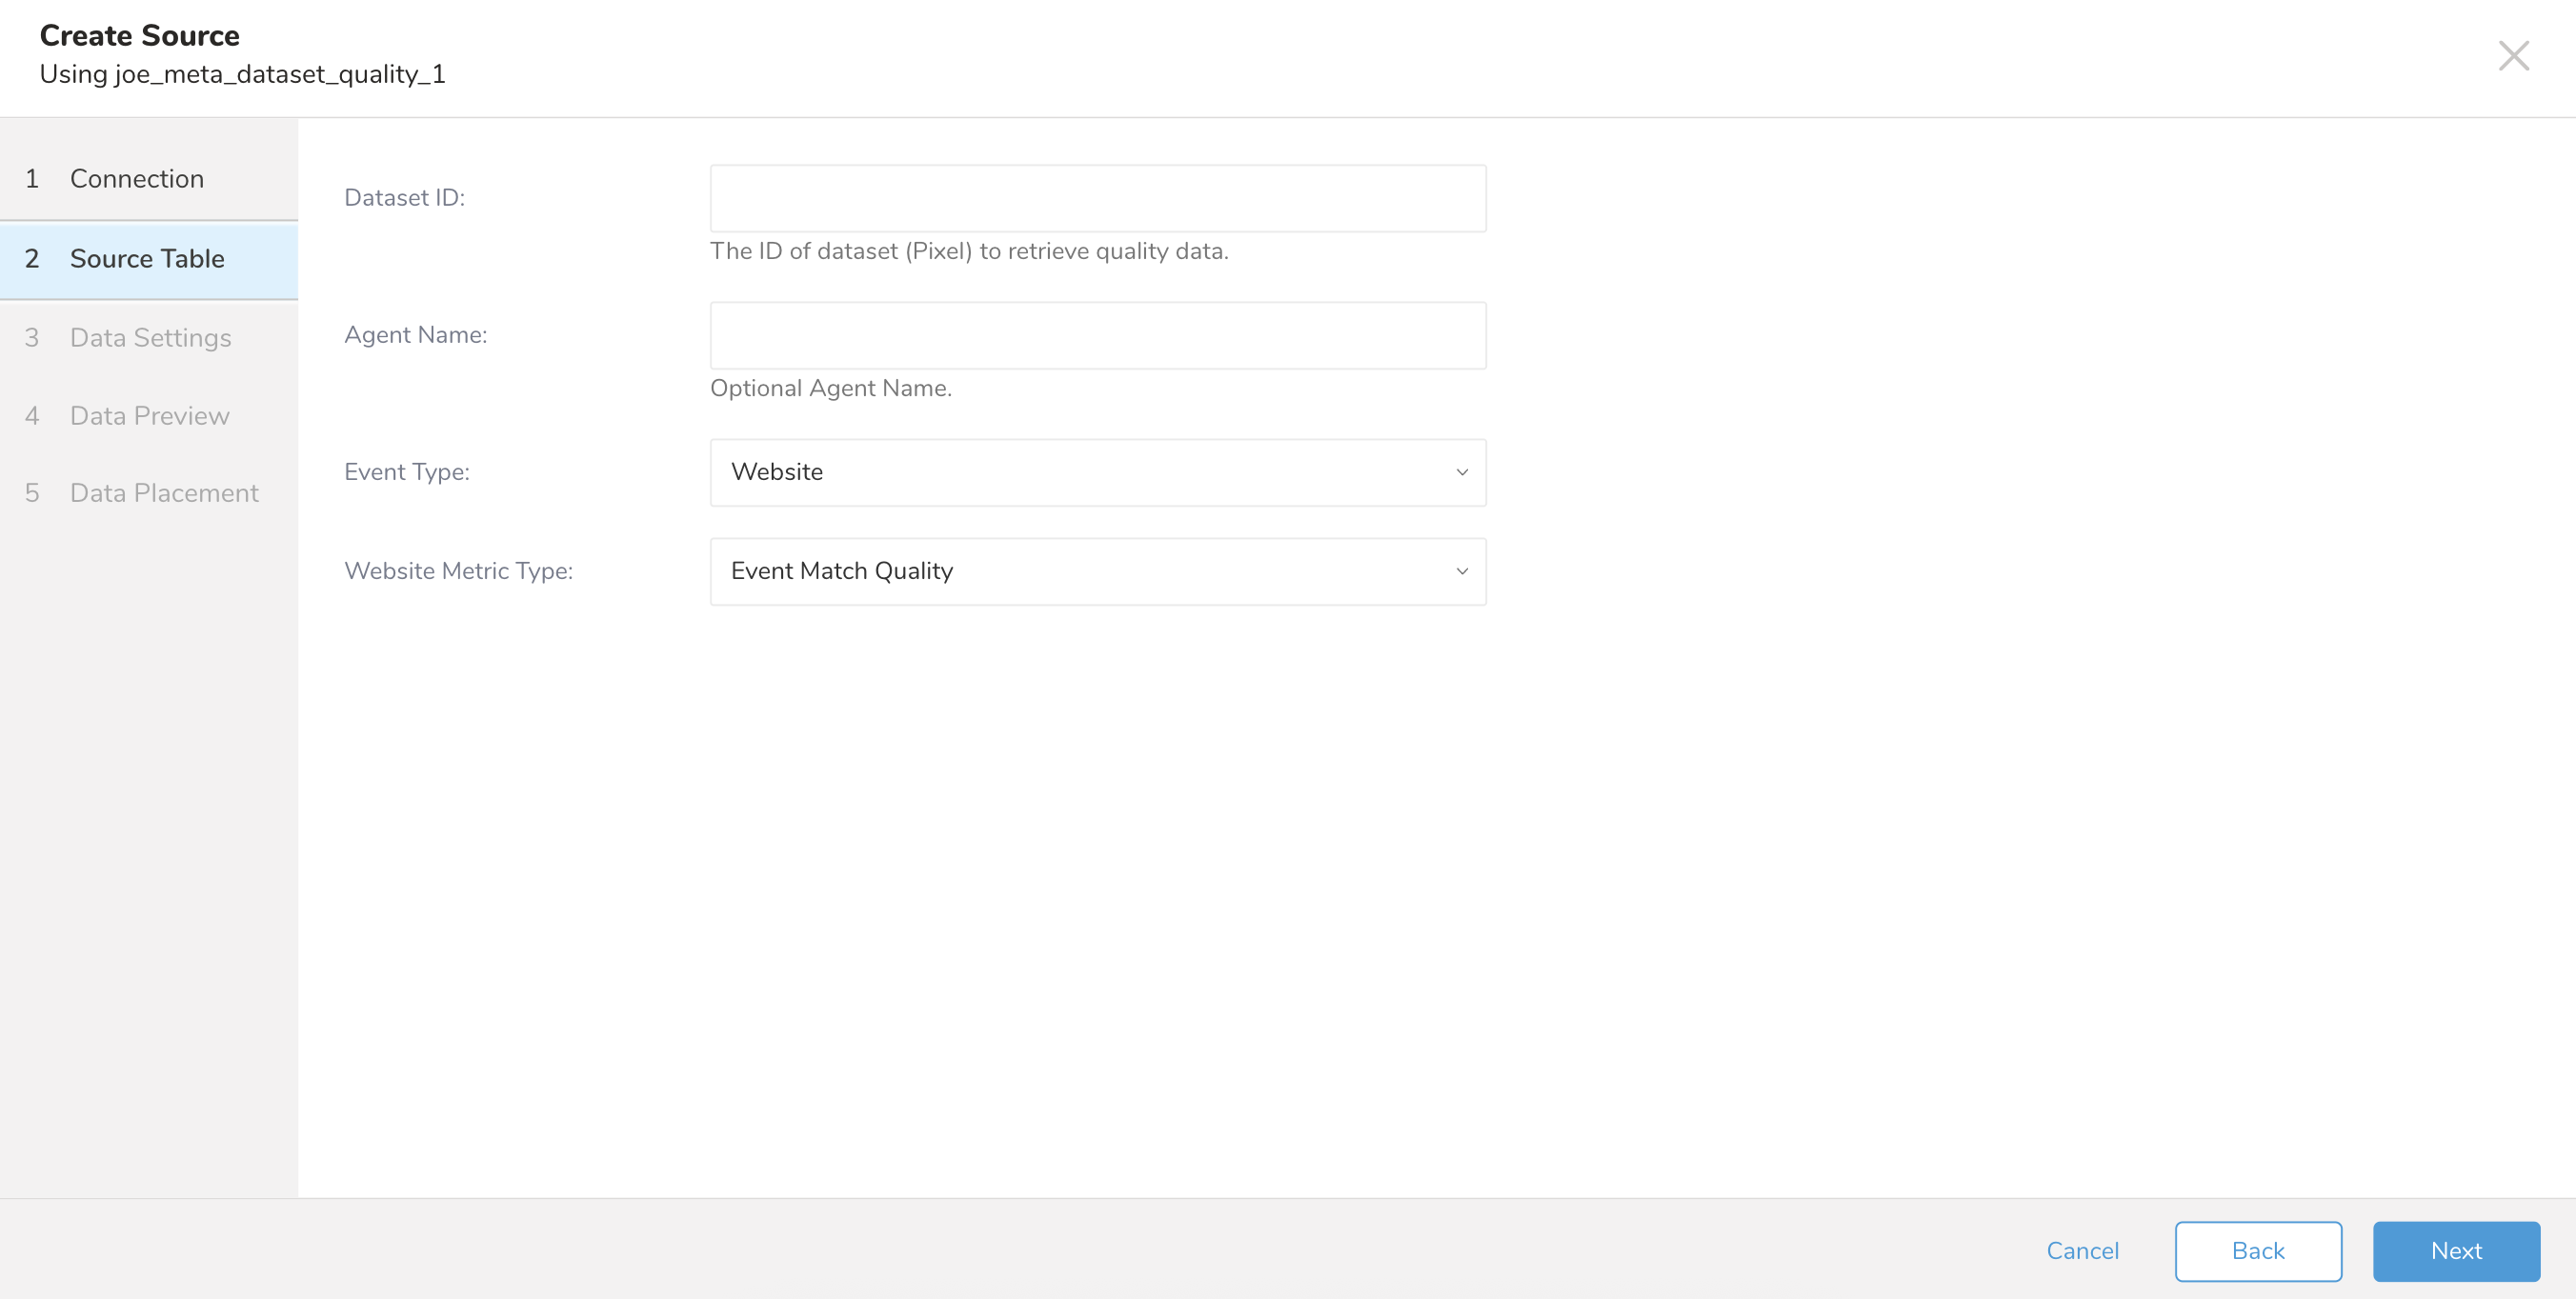
| Parameter | Description |
|---|---|
| Dataset ID | The ID of dataset (Pixel) to retrieve quality data. |
| Agent Name | The normalized value of the partner_agent field is used to filter only events sent with partner_agent |
| Event Type | The type of event. Currently supported only website event. |
| Website Metric Type | The metric of event for website and supported following values - Event Match Quality - Additional Conversions Reported for Parameters - Event Match Quality Diagnostics - Event Coverage - Additional Conversions Reported for Event Coverage - Event Deduplication - Data Freshness - Additional Conversions Reported for Event - Additional Conversions Reported |
Select Next.

| Parameter | Description |
|---|---|
| Retry Limit | The maximum retry limit. |
| Initial Retry Wait | The time await for the first retry in seconds. |
| Maximum Retry Wait | The maximum time for the retry in seconds. |
| HTTP Connection Timeout | The timeout connection setting in seconds. |
| HTTP Read Timeout | The read timeout setting in seconds. |
Select Next.
You can see a preview of your data before running the import by selecting Generate Preview. Data preview is optional and you can safely skip to the next page of the dialog if you choose to.
- Select Next. The Data Preview page opens.
- If you want to preview your data, select Generate Preview.
- Verify the data.
For data placement, select the target database and table where you want your data placed and indicate how often the import should run.
Select Next. Under Storage, you will create a new or select an existing database and create a new or select an existing table for where you want to place the imported data.
Select a Database > Select an existing or Create New Database.
Optionally, type a database name.
Select a Table> Select an existing or Create New Table.
Optionally, type a table name.
Choose the method for importing the data.
- Append (default)-Data import results are appended to the table. If the table does not exist, it will be created.
- Always Replace-Replaces the entire content of an existing table with the result output of the query. If the table does not exist, a new table is created.
- Replace on New Data-Only replace the entire content of an existing table with the result output when there is new data.
Select the Timestamp-based Partition Key column. If you want to set a different partition key seed than the default key, you can specify the long or timestamp column as the partitioning time. As a default time column, it uses upload_time with the add_time filter.
Select the Timezone for your data storage.
Under Schedule, you can choose when and how often you want to run this query.
- Select Off.
- Select Scheduling Timezone.
- Select Create & Run Now.
- Select On.
- Select the Schedule. The UI provides these four options: @hourly, @daily and @monthly or custom cron.
- You can also select Delay Transfer and add a delay of execution time.
- Select Scheduling Timezone.
- Select Create & Run Now.
After your transfer has run, you can see the results of your transfer in Data Workbench > Databases.
You can import data from Meta Dataset by using td_load>: operator of workflow. If you have already created a SOURCE, you can run it; if you don't want to create a SOURCE, you can import it using a yml file.
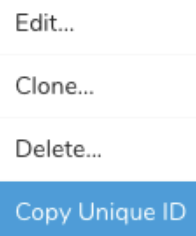
- Identify your source.
- To obtain a unique ID, open the Source list and then filter by Meta Dataset Quality.
- Open the menu and select Copy Unique ID.
- Define a workflow task using td_load> operator.
+load:
  td_load>: unique_id_of_your_source
  database: ${td.dest_db}
table: ${td.dest_table}- Run a workflow.
- Identify your yml file. If you need to create the yml file, review Amazon S3 Import Integration Using CLI for reference.
- Define a workflow task using td_load> operator.
+load:
  td_load>: config/daily_load.yml
  database: ${td.dest_db}
table: ${td.dest_table}- Run a workflow
| Name | Description | Value | Default Value | Required |
|---|---|---|---|---|
| type | The connector type | meta_dataset_quality | Yes | |
| access_token | The Meta access token | Yes | ||
| app_secret | The Meta OAuth app secret. | No | ||
| dataset_id | The ID of dataset (Pixel) to retrieve quality data. | Yes | ||
| agent_name | The normalized value of the partner_agent field is used to filter only events sent with partner_agent | No | ||
| event_type | The type of event. Currently supported only website event. | WEBSITE | Yes | |
| web_metric_type | The metric of event for website and supported following values. | Supported values: - EVENT_MATCH_QUALITY - ADDITIONAL_CONVERSIONS_REPORTED_FOR_PARAMETERS - EVENT_MATCH_QUALITY_DIAGNOSTICS - EVENT_COVERAGE - ADDITIONAL_CONVERSIONS_REPORTED_FOR_EVENT_COVERAGE - EVENT_DEDUPLICATION - DATA_FRESHNESS - ADDITIONAL_CONVERSIONS_REPORTED_FOR_EVENT - ADDITIONAL_CONVERSIONS_REPORTED | EVENT_MATCH_QUALITY | Yes |
| retry_limit | The maximum retry limit. | 7 | No | |
| initial_retry_wait | The time await for the first retry in seconds. | 2 seconds | No | |
| max_retry_wait | The maximum time for the retry in seconds. | 240 seconds | No | |
| connection_timeout | The timeout connection setting in seconds. | 300 seconds | No | |
| read_timeout | The read timeout setting in seconds. | 120 seconds | No |
Visit Treasure Boxes for a sample workflow code.
Before setting up the connector, install the most current TD Toolbelt.
in:type: meta_dataset_quality
access_token: token
app_secret: 9111...
dataset_id: 1234567901
agent_name:
event_type: WEBSITE
web_metric_type: EVENT_MATCH_QUALITY
retry_limit: 7
initial_retry_wait: 2
max_retry_wait: 240
connection_timeout: 300
read_timeout: 120
out:
mode: append| Name | Description | Value | Default Value | Required |
|---|---|---|---|---|
| type | The connector type | meta_dataset_quality | Yes | |
| access_token | The Meta access token | Yes | ||
| app_secret | The Meta OAuth app secret. | No | ||
| dataset_id | The ID of dataset (Pixel) to retrieve quality data. | Yes | ||
| agent_name | The normalized value of the partner_agent field is used to filter only events sent with partner_agent | No | ||
| event_type | The type of event. Currently supported only website event. | WEBSITE | Yes | |
| web_metric_type | The metric of event for website and supported following values. | Supported values: - EVENT_MATCH_QUALITY - ADDITIONAL_CONVERSIONS_REPORTED_FOR_PARAMETERS - EVENT_MATCH_QUALITY_DIAGNOSTICS - EVENT_COVERAGE - ADDITIONAL_CONVERSIONS_REPORTED_FOR_EVENT_COVERAGE - EVENT_DEDUPLICATION - DATA_FRESHNESS - ADDITIONAL_CONVERSIONS_REPORTED_FOR_EVENT - ADDITIONAL_CONVERSIONS_REPORTED | EVENT_MATCH_QUALITY | Yes |
| retry_limit | The maximum retry limit. | 7 | No | |
| initial_retry_wait | The time await for the first retry in seconds. | 2 seconds | No | |
| max_retry_wait | The maximum time for the retry in seconds. | 240 seconds | No | |
| connection_timeout | The timeout connection setting in seconds. | 300 seconds | No | |
| read_timeout | The read timeout setting in seconds. | 120 seconds | No |
To preview the data, use the td connector:preview command.
$ td connector:preview load.ymlThe guess command requires more than 3 rows and 2 columns in the source data file because the command assesses the column definition using sample rows from the source data.
If the system detects your column name or column type unexpectedly, modify the load.yml file and preview again.
Submit the load job. It might take a couple of hours, depending on the size of the data. Be sure to specify the Treasure Data database and table where the data should be stored.
Treasure Data also recommends specifying --time-column option because Treasure Data’s storage is partitioned by time (see data partitioning). If this option is not provided, the data connector chooses the first long or timestamp column as the partitioning time. The type of the column specified by --time-column must be either of long and timestamp type.
If your data doesn’t have a time column, you can add a time column by using add_time filter option. For more details see add_time filter plugin.
$ td connector:issue load.yml --database td_sample_db --table td_sample_table \
  --time-column created_at
The connector:issue command assumes that you have already created a *database(td_sample_db)*and a table(td_sample_table). If the database or the table does not exist in TD, this command fails. Create the database and table manually or use --auto-create-table option with td connector:issue command to auto-create the database and table.
$ td connector:issue load.yml --database td_sample_db --table td_sample_table
 --time-column created_at --auto-create-table
The data connector does not sort records on the server side. To use time-based partitioning effectively, sort records in files beforehand.
If you have a field called time, you don’t have to specify the --time-column option.
$ td connector:issue load.yml --database td_sample_db --table td_sample_tableYou can specify file import mode in the out section of the load.yml file. The out: section controls how data is imported into a Treasure Data table. For example, you may choose to append data or replace data in an existing table in Treasure Data.
| Mode | Description | Examples |
|---|---|---|
| Append | Records are appended to the target table. | in: ... out: mode: append |
| Always Replace | Replaces data in the target table. Any manual schema changes made to the target table remain intact. | in: ... out: mode: replace |
| Replace on new data | Replaces data in the target table only when there is new data to import. | in: ... out: mode: replace_on_new_data |
You can schedule periodic data connector execution for incremental file import. Treasure Data configures our scheduler carefully to ensure high availability.
For the scheduled import, you can import all files that match the specified prefix and one of these fields by condition:
- If use_modified_time is disabled, the last path is saved for the next execution. On the second and subsequent runs, the connector only imports files that come after the last path in alphabetical order.
- Otherwise, the time that the job is executed is saved for the next execution. On the second and subsequent runs, the connector only imports files that were modified after that execution time in alphabetical order.
A new schedule can be created using the td connector:create command.
$ td connector:create daily_import "10 0 * * *" \
    td_sample_db td_sample_table load.yml
Treasure Data also recommends that you specify the --time-column option, because Treasure Data’s storage is partitioned by time (see also data partitioning).
$ td connector:create daily_import "10 0 * * *" \
    td_sample_db td_sample_table load.yml \
    --time-column created_at
The cron parameter also accepts three special options: @hourly, @daily, and @monthly.
By default, the schedule is set up in the UTC timezone. You can set the schedule in a timezone using -t or --timezone option. --timezone option supports only extended timezone formats like 'Asia/Tokyo', 'America/Los_Angeles', etc. Timezone abbreviations like PST, CST are not supported and might lead to unexpected schedules.
You can see the list of currently scheduled entries by running the command td connector:list.
$ td connector:list
+--------------+--------------+----------+-------+--------------+-----------------+---------------------------------------------+
| Name         | Cron         | Timezone | Delay | Database     | Table           | Config                                      |
+--------------+--------------+----------+-------+--------------+-----------------+---------------------------------------------+
| daily_import | 10 0 * * *   | UTC      | 0     | td_sample_db | td_sample_table | {"in"=>{"type"=>"meta_dataset_quality",...} |
+--------------+--------------+----------+-------+--------------+-----------------+---------------------------------------------+td connector:show shows the execution setting of a schedule entry.
% td connector:show daily_importName : daily_import
Cron : 10 0 * * *
Timezone : UTC
Delay : 0
Database : joe_db
Table : meta_dataset_quality_shed
Config
in:
access_token: "***"
app_secret: "***"
dataset_id: '1234567890'
event_type: WEBSITE
web_metric_type: EVENT_MATCH_QUALITY
retry_limit: 3
initial_retry_wait: 1
max_retry_wait: 240
connection_timeout: 300
read_timeout: 120
type: meta_dataset_quality
td connector:history shows the execution history of a scheduled entry. To investigate the results of each individual run, use td job jobid.
% td connector:history daily_import
+--------+---------+---------+--------------+-----------------+----------+---------------------------+----------+
| JobID  | Status  | Records | Database     | Table           | Priority | Started                   | Duration |
+--------+---------+---------+--------------+-----------------+----------+---------------------------+----------+
| 578066 | success | 10000   | td_sample_db | td_sample_table | 0        | 2015-04-18 00:10:05 +0000 | 160      |
| 577968 | success | 10000   | td_sample_db | td_sample_table | 0        | 2015-04-17 00:10:07 +0000 | 161      |
| 577914 | success | 10000   | td_sample_db | td_sample_table | 0        | 2015-04-16 00:10:03 +0000 | 152      |
| 577872 | success | 10000   | td_sample_db | td_sample_table | 0        | 2015-04-15 00:10:04 +0000 | 163      |
| 577810 | success | 10000   | td_sample_db | td_sample_table | 0        | 2015-04-14 00:10:04 +0000 | 164      |
| 577766 | success | 10000   | td_sample_db | td_sample_table | 0        | 2015-04-13 00:10:04 +0000 | 155      |
| 577710 | success | 10000   | td_sample_db | td_sample_table | 0        | 2015-04-12 00:10:05 +0000 | 156      |
| 577610 | success | 10000   | td_sample_db | td_sample_table | 0        | 2015-04-11 00:10:04 +0000 | 157      |
+--------+---------+---------+--------------+-----------------+----------+---------------------------+----------+
8 rows in settd connector:delete removes the schedule.
$ td connector:delete daily_import