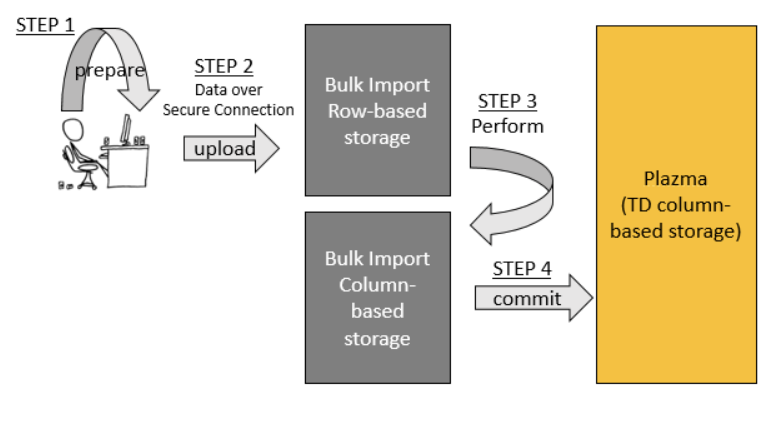
- Bulk Import consists of four key steps: prepare, upload, perform and commit.
- Prepare: first, your data is transformed into the highly space-efficient compressed (gzip) MessagePack format. This step does not require a network connection.
- Upload: then, the prepared data is uploaded into Treasure Data’s (row-based) bulk upload storage system. The upload is done over a secure Internet connection.
- Perform: the uploaded data is then transformed into our column-oriented data format using MapReduce.
- Commit: After the perform step, the data is now compatible with Plazma (Treasure Data’s columnar, distributed storage system). The commit step copies the data over into Plazma.
Bulk Import sessions created by the users are only deleted if the user specifies:
$ td import:delete session_nameBecause Bulk Import sessions are created with a database and table of reference and can import data to that database and table only, when the table or the database is deleted, the Bulk Import session is not automatically deleted but becomes invalid. Any attempt to Upload, Perform, or Commit using a session whose reference table or database (or both) have been deleted, returns an error and the session is invalidated. The only interactions allowed with an invalidated session are:
- showing the status (
import:show) - deleting it (
import:delete)
The following section shows how to update Bulk Import. To ensure that you use the newest version of Bulk Import, run:
$ td import:jar_updateThe following section shows how to use Bulk Import. It is often unwieldy to perform all these steps one by one. Therefore, you are shown how to use several command line options to automate (and pipeline) the prepare-upload-perform-commit workflow.
You’ll want to run td import:upload like this:
$ td import:upload \
  --auto-create my_db.my_tbl \
  --auto-perform --auto-commit \
  --column-header \
  --output prepared_parts \
  data_*.csv
For example, if:
- the original files are data_*.csv
- the prepared data is stored in the directory “prepared_parts” (specified with the
--output / -ooption) - the data is uploaded in the Treasure Data database
my_dband tablemy_tblusing the bulk import sessionmy_db.my_tbl(specified with the--auto-createoption)
you can run:
$ td import:upload \
  --auto-create my_db.my_tbl \
  --auto-perform --auto-commit \
  --column-header \
  --output prepared_parts \
  data_*.csv
The preceding import and upload operation makes the following assumptions:
- The data is in CSV format unless a different format is specified with the
—formatoption - The first row of each input file contains column names.
Column names are specified with the--column-headeroption. Alternatively you can also treat all rows as data and specify column names with--columns c1,c2,c3...
Regular expressions can't be used on Windows. You must rewrite your filenames from data_*.csv to (YOUR_TARGET_FILENAME)
First, create a session (a single instance containing multiple parts). One session is associated with one table.
$ td import:create my_session my_db my_tblLet’s say you have CSV files in the ./logs_201208/ directory. You must first convert the files into MessagePack.gz format (our internal format for efficient storage). To do this, run the following commands:
$ td import:prepare ./logs_201208/*.csv \
    --format csv \
    --columns time,uid,price,count --time-column 'time' \
    -o ./parts_201208/
Splitting the data into separate directories by month is recommended. You can also split the data by date if you have more than 1GB per day of data post-compression.
If your files include column names in the first line, use the --column-header option.
$ td import:prepare ./logs_201208/*.csv \
    --format csv \
    --column-header \
    --time-column 'time' \
    -o ./parts_201208/
The formats csv, tsv, and json are supported for the --format option. Examples are as follows:
# tsv
$ td import:prepare ./logs_201208/*.tsv \
    --format tsv \
    --column-header \
    --time-column 'time' \
    -o ./parts_201208/

# json
$ td import:prepare ./logs_201208/*.json \
    --format json \
    --time-column 'time' \
-o ./parts_201208/You can now upload the parts directory into the session.
$ td import:upload my_session ./parts_201208/*If the upload fails, you can retry any time. No data duplication occurs.
$ td import:show my_sessionThe import:perform command converts the uploaded files into a more efficient format on the cloud (this is why it takes time to process). The files are converted in parallel by executing MapReduce jobs.
$ td import:freeze my_session
$ td import:perform my_session --wait
$ td import:list
+-------------+--------------+--------+--------+-------+-------------+-------------+---------------+---------------+
| Name        | Table        | Status | Frozen | JobID | Valid Parts | Error Parts | Valid Records | Error Records |
+-------------+--------------+--------+--------+-------+-------------+-------------+---------------+---------------+
| my_session  | my_db.my_tbl | Ready  |        | 70220 | 2           | 1           | 100           | 10            |
+-------------+--------------+--------+--------+-------+-------------+-------------+---------------+---------------+
In this example, we invoke the import:freeze prior to issuing the import:perform command to prevent other scripts from uploading additional data into the session while the data is being converted.
The import:perform command takes an optional --wait option to make command busy-wait until the perform job has completed. Alternatively you can omit the --wait option and the import:perform command returns to control to the user/script as soon as the perform job is submitted.
Afterward, to upload additional data you must unfreeze the session by using the import:unfreeze command.
After running the import:perform command, some records can be flagged as invalid. You can list these invalid records with the import:error_records command.
$ td import:error_records my_sessionWhen you have confirmed that the uploaded data is correct, use the import:commit command to transactionally import the data into the destination database my_db and table my_tbl.
$ td import:commit my_session --waitWhen the data reaches the destination Treasure Data table, there are two options: either import mode data or close the session and delete it.
To implement import mode data, go back to Step 2.) and repeat the process.
To close the session and delete, use the import:delete command:
$ td import:delete my_sessionRefer to td help import.
$ td help import
Additional commands, type "td help COMMAND" for more details:

  import:list                                # List bulk import sessions
  import:show name                         # Show list of uploaded parts
  import:create name db table          # Create a new bulk import session to the the table
  import:prepare <files...>                  # Convert files into part file format
  import:upload name <files...>            # Upload or re-upload files into a bulk import session
  import:perform name                      # Start to validate and convert uploaded files
  import:error_records name                # Show records which did not pass validations
  import:commit name                       # Start to commit a performed bulk import session
  import:delete name                       # Delete a bulk import session
  import:freeze name                       # Reject succeeding uploadings to a bulk import session
  import:unfreeze name                     # Unfreeze a frozen bulk import session
For subcommands, you can do td help import:subcommand name, e.g., td help import:upload
$ td help import:upload
usage:
  $ td import:upload session name <files...>

example:
  $ td import:upload mysess parts/* --parallel 4
  $ td import:upload mysess parts/*.csv --format csv --columns time,uid,price,count --time-column time -o parts/
  $ td import:upload parts/*.csv --auto-create mydb.mytbl --format csv --columns time,uid,price,count --time-column time -o parts/
  $ td import:upload mysess mytable --format mysql --db-url jdbc:mysql://localhost/mydb --db-user myuser --db-password mypass

description:
  Upload or re-upload files into a bulk import session
options:
    --retry-count NUM                upload process will automatically retry at specified time; default: 10
    --auto-create DATABASE.TABLE     create automatically bulk import session by specified database and table names
                                     If you use 'auto-create' option, you MUST not specify any session name as first argument.
    --auto-perform                   perform bulk import job automatically
    --auto-commit                    commit bulk import job automatically
    --auto-delete                    delete bulk import session automatically
    --parallel NUM                   upload in parallel (default: 2; max 8)

    -f, --format FORMAT              source file format [csv, tsv, json, msgpack, apache, regex, mysql]; default=csv
    -C, --compress TYPE              compressed type [gzip, none, auto]; default=auto detect
    -T, --time-format FORMAT         STRF_FORMAT; strftime(3) format of the time column
    -e, --encoding TYPE              encoding type [utf-8]
    -o, --output DIR                 output directory. default directory is 'out'.
    -s, --split-size SIZE_IN_KB      size of each parts (default: 16384)
    -t, --time-column NAME           name of the time column
    --time-value TIME,HOURS          time column's value. If the data doesn't have a time column,
                                     users can auto-generate the time column's value in 2 ways:
                                      * Fixed time value with --time-value TIME:
                                        where TIME is a Unix time in seconds since Epoch. The time
                                        column value is constant and equal to TIME seconds.
                                        E.g. '--time-value 1394409600' assigns the equivalent of
                                        timestamp 2014-03-10T00:00:00 to all records imported.
                                      * Incremental time value with --time-value TIME,HOURS:
                                        where TIME is the Unix time in seconds since Epoch and
                                        HOURS is the maximum range of the timestamps in hours.
                                        This mode can be used to assign incremental timestamps to
                                        subsequent records. Timestmaps will be incremented by 1 second
                                        each record. If the number of records causes the timestamp to
                                        overflow the range (timestamp >= TIME + HOURS * 3600), the
                                        next timestamp will restart at TIME and continue from there.
                                        E.g. '--time-value 1394409600,10' will assign timestamp 1394409600
                                        to the first record, timestamp 1394409601 to the second, 1394409602
                                        to the third, and so on until the 36000th record which will have
                                        timestmap 1394445600 (1394409600 + 10 * 3600). The timestamp assigned
                                        to the 36001th record will be 1394409600 again and the timestamp
                                        will restart from there.
    --primary-key NAME:TYPE          pair of name and type of primary key declared in your item table
    --prepare-parallel NUM           prepare in parallel (default: 2; max 96)
    --only-columns NAME,NAME,...     only columns
    --exclude-columns NAME,NAME,...  exclude columns
    --error-records-handling MODE    error records handling mode [skip, abort]; default=skip
    --error-records-output DIR       write error records; default directory is 'error-records'.
    --columns NAME,NAME,...          column names (use --column-header instead if the first line has column names)
    --column-types TYPE,TYPE,...     column types [string, int, long, double]
    --column-type NAME:TYPE          column type [string, int, long, double]. A pair of column name and type can be specified like 'age:int'
    -S, --all-string                 disable automatic type conversion

    CSV/TSV specific options:
    --column-header                  first line includes column names
    --delimiter CHAR                 delimiter CHAR; default="," at csv, "\t" at tsv
    --newline TYPE                   newline [CRLF, LF, CR];  default=CRLF
    --quote CHAR                     quote [DOUBLE, SINGLE, NONE]; if csv format, default=DOUBLE. if tsv format, default=NONE

    MySQL specific options:
    --db-url URL                     JDBC connection URL
    --db-user NAME                   user name for MySQL account
    --db-password PASSWORD           password for MySQL account

    REGEX specific options:
    --regex-pattern PATTERN          pattern to parse line. When 'regex' is used as source file format, this option is required