If you prefer, you can configure a Treasure Data connector from the command line interface (CLI) instead of the Console UI. Treasure Data’s connectors use a configuration file that is in the form of a YAML plug-in that enables you to export to the Treasure data account.
Before you begin, ensure that you have ‘td’ command v0.11.9 or later installed.
$ td —versionIf needed, go to Treasure Data Toolbelt.
Create or retrieve a data connector .yml file.
Specify the input data in the In: section of the data configuration file. Then, in the out: section, specify the destination information, which would be details about your Treasure data account.
In this example, you can see the service account, that was originally created in section 2, is specified. You also use the private key information of the JSON file, also created in section 2.
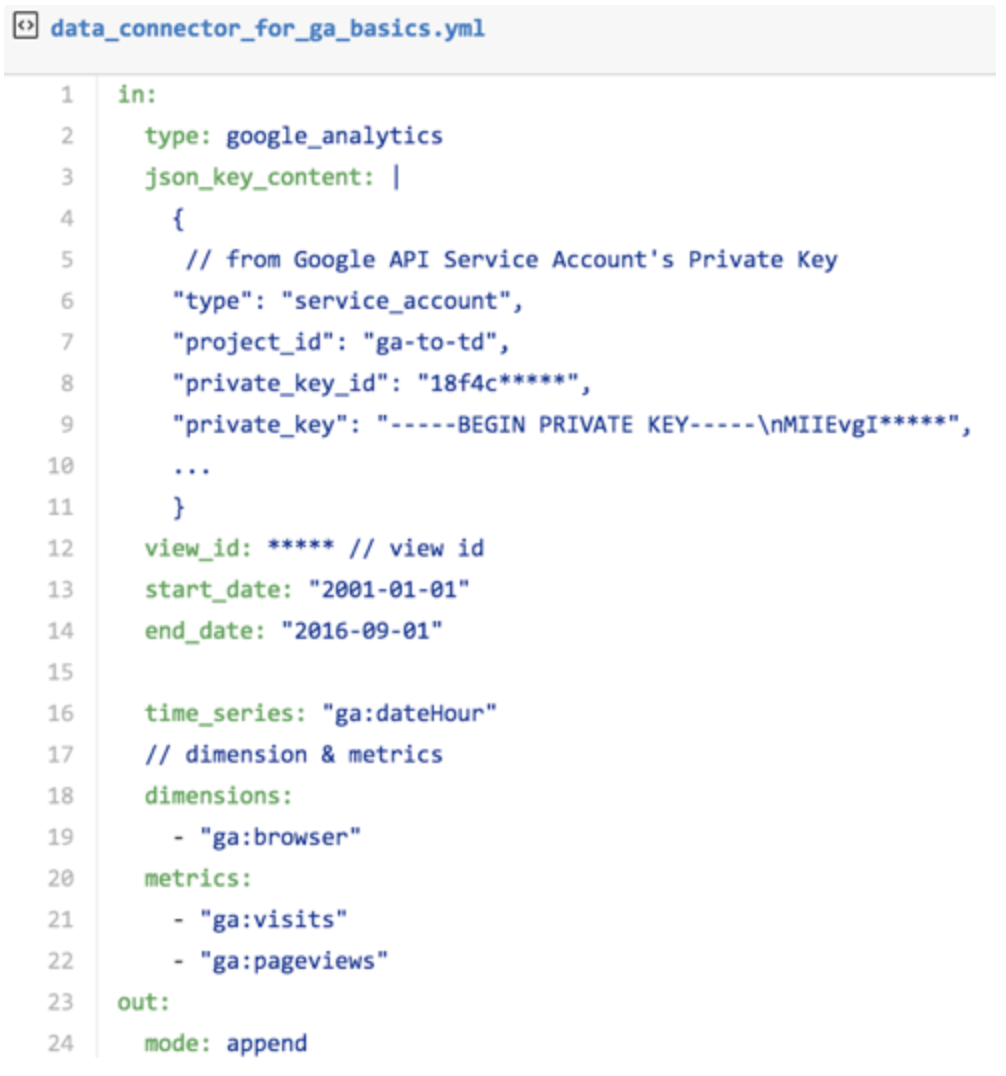
Sections of the configuration file:
"type" in this instance is google analytics. "json_key_content" paste the contents of the JSON file here, from opening bracket to closing bracket ( {} ). "view_id”: enter the Google Analytics View ID, described in section 2, here. "Start_date”: the start of the data acquisition period specified in "YYYY-MM-DD"format. (default: 7 days ago) "end_date”: the end of the data acquisition period specified in "YYYY-MM-DD"format. (default: 1 day ago) "time_series”: you must specify the timestamp for the "time"column at the time of import to the TD. You can specify "date"or "dateHour”. By doing so, you consume one dimension in time_series. You can set up to 6 more dimensions. "dimension”, "metrics”: Specify the Dimensions columns and Metrics that you are accessing from Google Analytics. "Out:"Type "mode: append"to append incoming data to an existing table. Type "mode:replace"to replace data in an existing table.
You can preview how the system will parse the file by using the preview command.
$ td connector:preview config.ymlIf the system detects your column name or column type in a way that you do not expect, modify the config.yml directly and preview again. | The data connector supports parsing of "boolean", "long", "double", "string", and "timestamp" types.
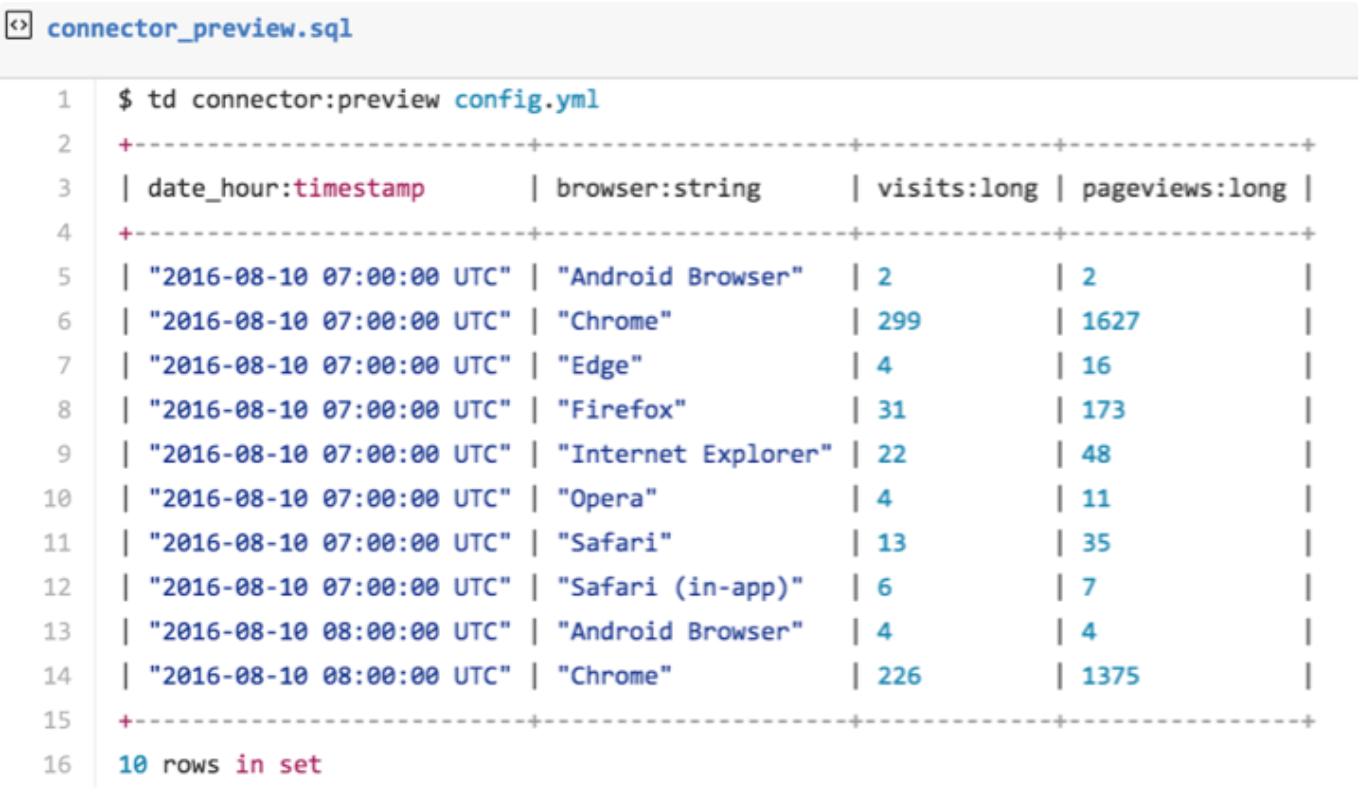
You see the time series ("date_hour”), dimensions ("browser”), and metrics ("visits”, "pageviews.”) as specified in the configuration file.
The preview can help you get a sense of the transfer results. The Google Analytics "time_series"maps to the time column in the TD data table. Usually, the time column is TD’s partitioning key. You could use "ga: date"instead of "date_hour”. Note that some "time-series"combinations are invalid for example ga:1dayUsers and ga:7dayUsers cannot be used in the same configuration.
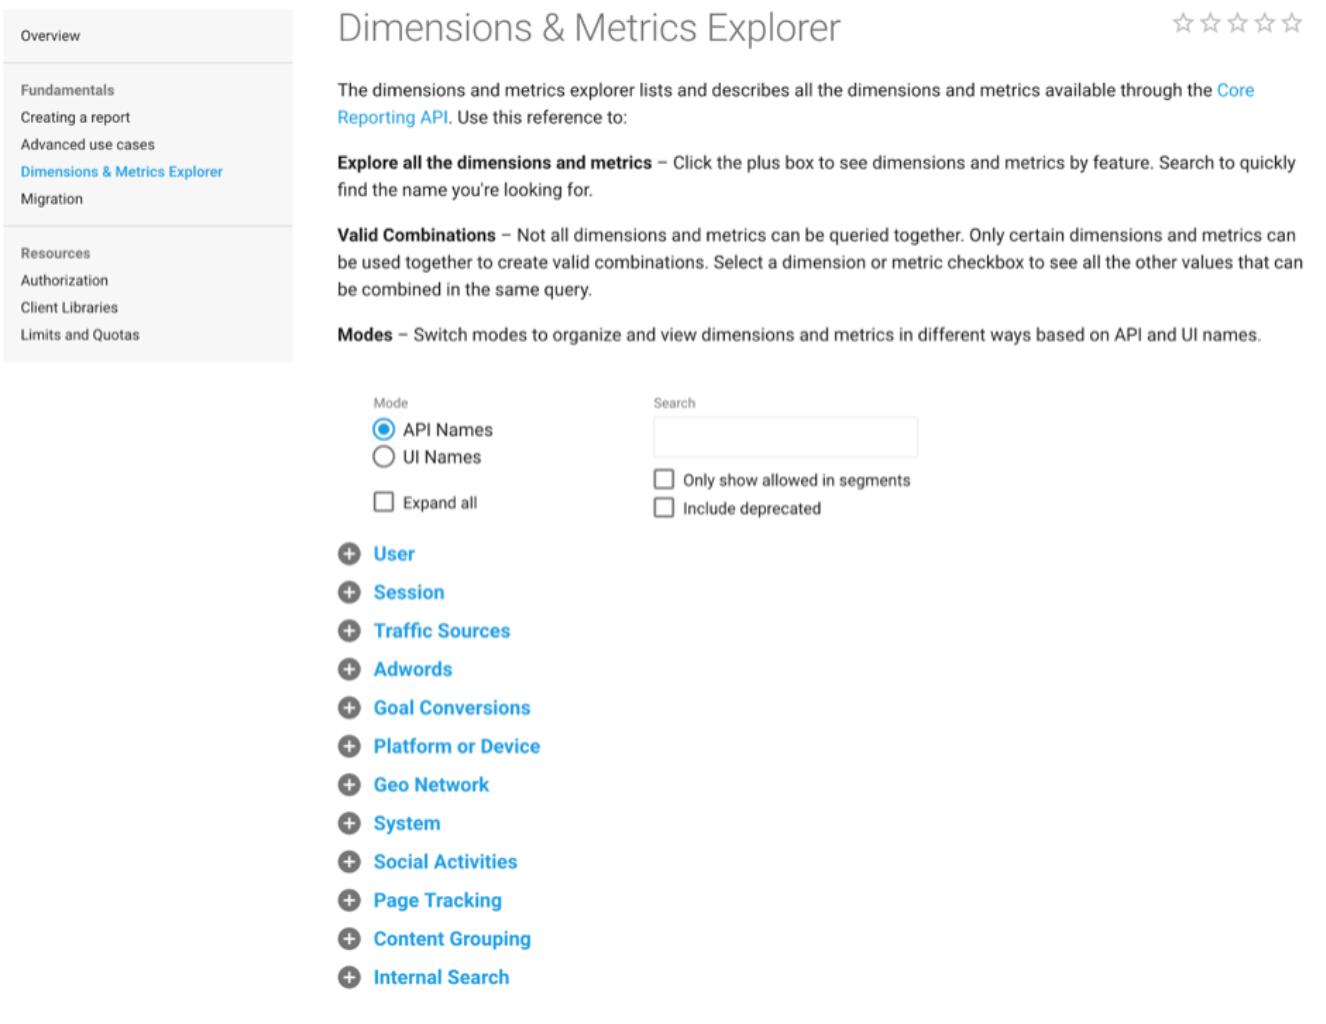
In the Google API V4 > Reporting > Dimensions& Metrics Explorer, you can see the list of Dimensions and Metrics that you can import into Treasure Data.
The transfer of data into Treasure Data might take a couple of hours depending on the size of the data.
You must specify the database and table where their data is stored.
td connector:issue config.yml --database td_sample_db --table td_sample_table \
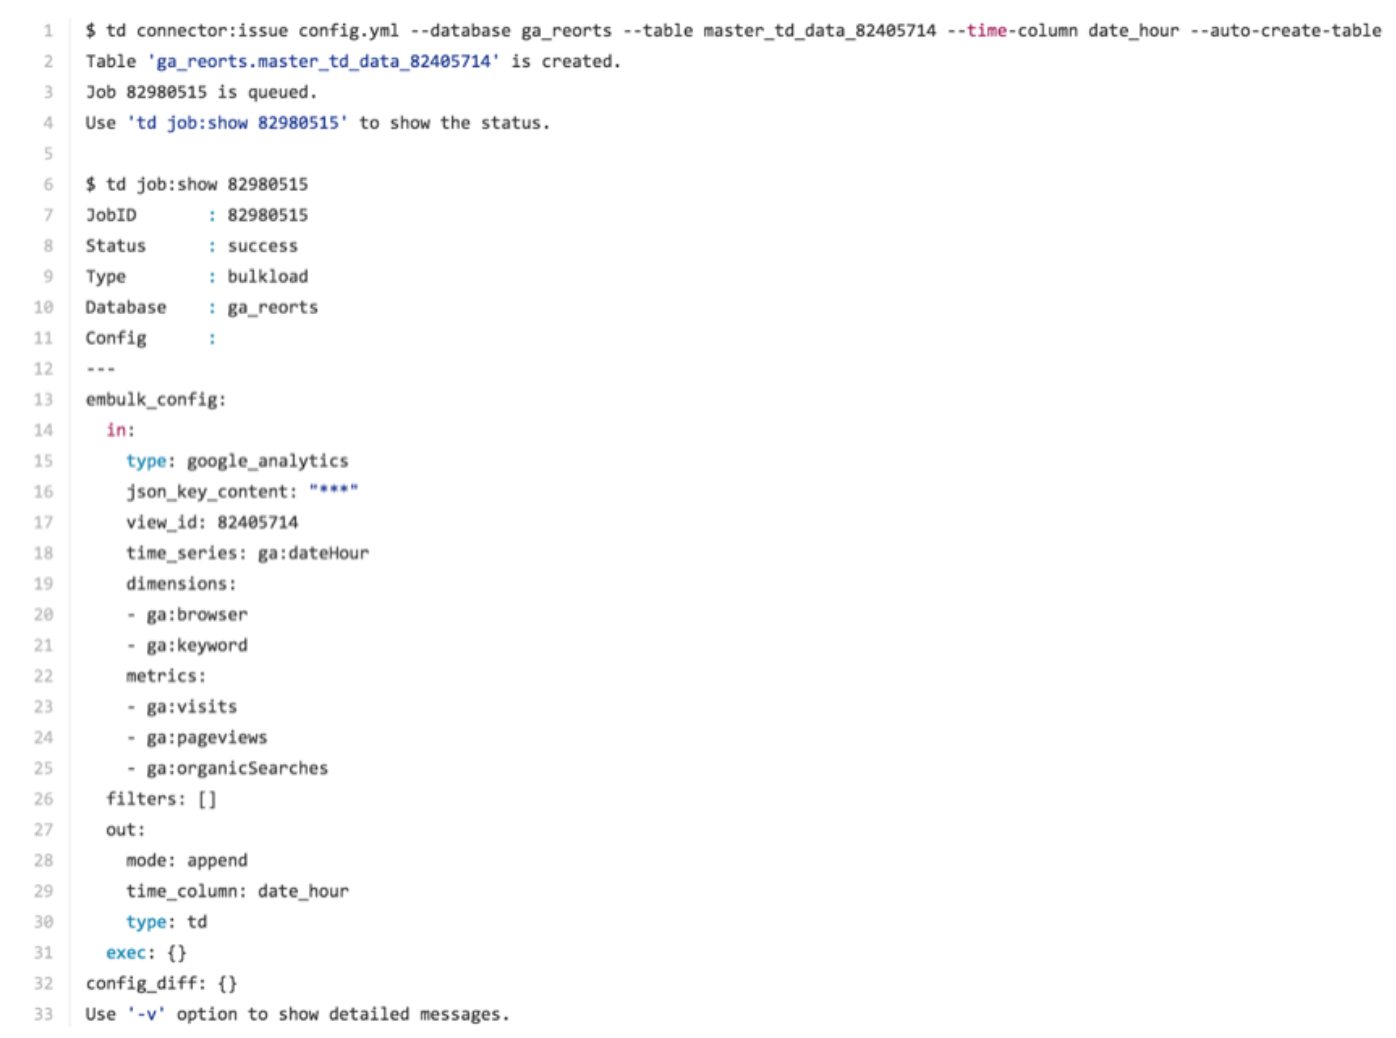
--time-column date_hourThe preceding command assumes you have already created database(td_sample_db) and table(td_sample_table). If the database or the table do not exist in TD this command will not succeed, so create the database and table manually or use --auto-create-table option with TD connector:issue command to auto-create the database and table:
td connector:issue config.yml --database td_sample_db --table td_sample_table --time-column date_hour --auto-create-tableThe data connector does not sort records server-side. To use time-based partitioning effectively, sort records in files beforehand.
In the following example, you can see that if the database did not already exist, it is created. You can see the specification that directs imported by Embulk, Treasure Data’s bulk data loader. You see, by default, that the time_series item specified in the In: section translates to the time column in the Out: section. The time column is used as a ‘partition key’ in Treasure Data.
You can schedule periodic Data Connector execution for incremental Google Analytics imports. We carefully configure our scheduler to ensure high availability. By using this feature, you no longer need a cron daemon on your local data center.
For the scheduled import, the Data Connector for Google Analytics imports all data at first.
Scheduled execution supports additional configuration parameters that control the behavior of the Data Connector during its periodic attempts to fetch data from Google Analytics:
incremental This configuration is used to control the load mode, which governs how the Data Connector fetches data from Google Analytics based on one of the native timestamps.
incremental: true (default)
in this mode, the data connector will only fetch records that have been updated since the previous run of the connector. This is useful when the user wants to fetch just the records in the range of time.- start_date
- end_date
These options are required for incremental mode, to load necessary data only from Google Analytics, as the following example.
incremental: false
In this mode, the data connector will fetch all the records of the specified regardless of when they were last updated.
last_record_time This configuration is used to fetch records from this time.
Example: seed file using incremental mode and last_record_time
in:
  type: google_analytics
  json_key_content: |
    {
      ... paste here you got key file content on Step 1 ...
    }
  view_id: 104222666
  time_series: "ga:dateHour"
  incremental: true
  start_date: '2016-01-30'
  end_date: '2017-01-01'
  last_record_time: '2016-12-01 08:00:00 UTC'
  dimensions:
    - "ga:browser"
  metrics:
    - "ga:visits"
    - "ga:pageviews"
With the preceding configuration, the data connector loads all records starting from 2016-12-01 00:00:00.
On the second and subsequent runs, only data that comes after the last execution gets imported.
A new schedule can be created using the TD connector:create command. The following are required: the name of the schedule, the cron-style schedule, the database and table where their data will be stored, and the data connector configuration file.
$ td connector:create \
    daily_import \
    "10 0 * * *" \
    td_sample_db \
    td_sample_table \
    config.yml
It’s also recommended to specify the --time-column option because Treasure Data’s storage is partitioned by time (see also About Data Partitioning).
$ td connector:create \
    daily_import \
    "10 0 * * *" \
    td_sample_db \
    td_sample_table \
    load.yml \
The cron parameter also accepts three special options: @hourly, @daily and @monthly. | By default, the schedule is set up in UTC timezone. You can set the schedule in a timezone using -t or --timezone option. Note that --timezone option only supports extended timezone formats like 'Asia/Tokyo', 'America/Los_Angeles' etc. Timezone abbreviations like PST, CST are *not* supported and may lead to unexpected schedules.
You can see the list of scheduled entries by running the command TD connector:list.
$ td connector:listtd connector:show shows the execution settings of a schedule entry.
td connector:show daily_importtd connector:history shows the execution history of a schedule entry. To investigate the results of each individual run, use td job jobid.
td connector:history daily_importtd connector:delete removes the schedule.
$ td connector:delete daily_import