# Python Apps Import Integration
Treasure Dataは、サーバーサイドのログとイベントを収集し、Pythonアプリケーションからシームレスにデータをインポートするために[td-agent](https://docs.treasuredata.com/smart/project-product-documentation/about-treasure-data-s-server-side-agent)を提供しています。
## 前提条件
- Pythonの基本知識
- [TD Toolbelt](https://toolbelt.treasuredata.com/)を含むTreasure Dataの基本知識
- Python 2.6以上(ローカルテスト用)
## td-agentのインストール
アプリケーションサーバーに`td-agent`をインストールします。td-agentはアプリケーションサーバー内に配置され、アプリケーションログのクラウドへのアップロードに専念します。
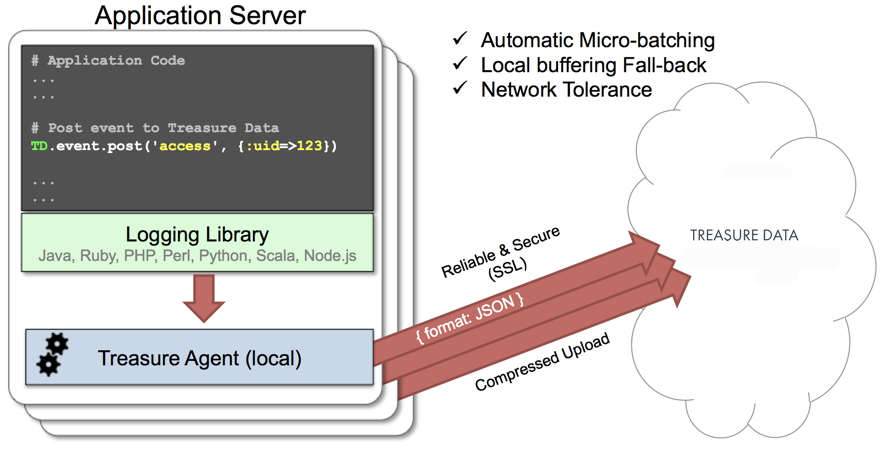
[fluent-logger-python](http://github.com/fluent/fluent-logger-python)ライブラリにより、Pythonアプリケーションはローカルのtd-agentにレコードを投稿できます。td-agentは、5分ごとにデータをクラウドにアップロードします。デーモンはローカルノードで実行されるため、ロギングのレイテンシーは無視できます。
## td-agentのインストールオプション
`td-agent`をインストールするには、環境に応じて以下のコマンドのいずれかを実行します。エージェントプログラムは、rpm/deb/dmgなどの各プラットフォームのパッケージ管理ソフトウェアを使用して自動的にインストールされます。
### RHEL/CentOS 5,6,7
```
$ curl -L https://toolbelt.treasuredata.com/sh/install-redhat-td-agent3.sh | sh
```
### Ubuntu and Debian
```
# 18.04 Bionic
$ curl -L https://toolbelt.treasuredata.com/sh/install-ubuntu-bionic-td-agent3.sh | sh
# 16.04 Xenial (64bit only)
$ curl -L https://toolbelt.treasuredata.com/sh/install-ubuntu-xenial-td-agent3.sh | sh
```
##### EOLバージョンのレガシーサポートはまだ利用可能です
```
# 14.04 Trusty
$ curl -L https://toolbelt.treasuredata.com/sh/install-ubuntu-trusty-td-agent3.sh | sh
# 12.04 Precise
$ curl -L https://toolbelt.treasuredata.com/sh/install-ubuntu-precise-td-agent3.sh | sh
# Debian Stretch (64-bit only) $ curl -L https://toolbelt.treasuredata.com/sh/install-debian-stretch-td-agent3.sh | sh
# Debian Jessie (64-bit only)
$ curl -L https://toolbelt.treasuredata.com/sh/install-debian-jessie-td-agent3.sh | sh
# Debian Squeeze (64-bit only)
$ curl -L https://toolbelt.treasuredata.com/sh/install-debian-squeeze-td-agent2.sh | sh
```
### Amazon Linux
Amazon Linux 1またはAmazon Linux 2を選択できます。[Installing td-agent on AWS Linux](https://docs.treasuredata.com/smart/project-product-documentation/installing-td-agent-on-aws-linux)を参照してください。
### MacOS X 10.11+
```
$ open 'https://td-agent-package-browser.herokuapp.com/3/macosx'
```
MacOS X 10.11.1(El Capitan)では、いくつかのセキュリティ変更が導入されました。td-agentがインストールされた後、**/Library/LaunchDaemons/td-agent.plist**ファイルを編集して、**/usr/sbin/td-agent**を**/opt/td-agent/usr/sbin/td-agent**に変更してください。
### Windows Server 2012+
Windowsのインストールには、以下の詳細な手順が必要です:
- [Installing Treasure Agent using .msi Installer (Windows)](https://docs.fluentd.org/installation/install-by-msi)
### Opscode Chef Repository
```
$ echo 'cookbook "td-agent"' >> Berksfile
$ berks install
```
[AWS Elastic Beanstalk](https://github.com/treasure-data/elastic-beanstalk-td-agent)もサポートされています。Windowsはサポートされていません。
## /etc/td-agent/td-agent.confの変更
`apikey`オプションを設定して、APIキーを指定します。APIキーは、TD Consoleから確認できます。
```conf
# Treasure Data Input and Output
type forward
port 24224
type tdlog
endpoint api.treasuredata.com
apikey YOUR_API_KEY
auto_create_table
buffer_type file
buffer_path /var/log/td-agent/buffer/td
```
`YOUR_API_KEY` should be your actual apikey string. You can retrieve your API key from your profiles in TD Console. Using a [write-only API key](/products/my-settings/getting-your-api-keys) is recommended.
以下の行を追加した後、エージェントを再起動してください。
```
# Linux
$ sudo /etc/init.d/td-agent restart
# MacOS X
$ sudo launchctl unload /Library/LaunchDaemons/td-agent.plist
$ sudo launchctl load /Library/LaunchDaemons/td-agent.plist
```
td-agentは、ポート24224経由でデータを受け入れ、バッファリング(*var/log/td-agent/buffer/td*)し、自動的にクラウドにデータをアップロードします。
## fluent-logger-pythonの使用
pip経由でfluent-loggerライブラリをインストールします。
```
$ pip install fluent-logger
```
次のように初期化してレコードを投稿します。
```
# Initialize
from fluent import sender
from fluent import event
sender.setup('td.test_db', host='localhost', port=24224)
event.Event('follow', {
'from': 'userA',
'to': 'userB'
})
```
## インポートの確認
プログラムを実行します。
```
$ python test.py
```
SIGUSR1シグナルを送信すると、td-agentのバッファがフラッシュされます。アップロードは即座に開始されます。
```
# Linux
$ kill -USR1 `cat /var/run/td-agent/td-agent.pid`
# MacOS X
$ sudo kill -USR1 `sudo launchctl list | grep td-agent | cut -f 1`
```
データが正常にアップロードされたことを確認するには、*td tables*コマンドを発行します。
```
$ td tables
+------------+------------+------+-----------+
| Database | Table | Type | Count |
+------------+------------+------+-----------+
| test_db | follow | log | 1 |
+------------+------------+------+-----------+
```
# 本番デプロイ
### gunicorn、tornado、またはmodwsgiを使用
[gunicorn](http://gunicorn.org/)、[tornado](http://www.tornadoweb.org/)、または[modwsgi](http://code.google.com/p/modwsgi/)の使用を推奨します。他のセットアップは完全には検証されていません。
## td-agentの高可用性構成
高トラフィックのウェブサイト(5つ以上のアプリケーションノード)の場合、td-agentの高可用性構成を使用して、データ転送の信頼性とクエリパフォーマンスを向上させます。
- [High-Availability Configurations of td-agent](https://docs.treasuredata.com/smart/project-product-documentation/configuring-td-agent-for-high-availability)
## td-agentの監視
td-agent自体の監視も重要です。td-agentの一般的な監視方法については、以下を参照してください:
- [Monitoring td-agent](https://docs.treasuredata.com/smart/project-product-documentation/monitoring-td-agent)
td-agentは、[Fluentdプロジェクト](http://fluentd.org/)の下で完全にオープンソース化されています。